How To Reuse Functionality
One of the many advantages of using DynaMaker is the possibility of reusing functionality across your whole project. When you feel that you are doing something twice in different places, consider making that logic independent so it can be used in multiple places, so you get the exact same outcome of that logic wherever it's used.
In this how-to example, we go through some of the most common examples in which reusing functionality is crucial to avoid code duplication (some best practices are explained in the details too):
Although it's not needed, you can replicate these exercises from the actual open templates. We can add a copy to your own team if you reach us at support@dynamaker.com!
Subcomponent in Drawing
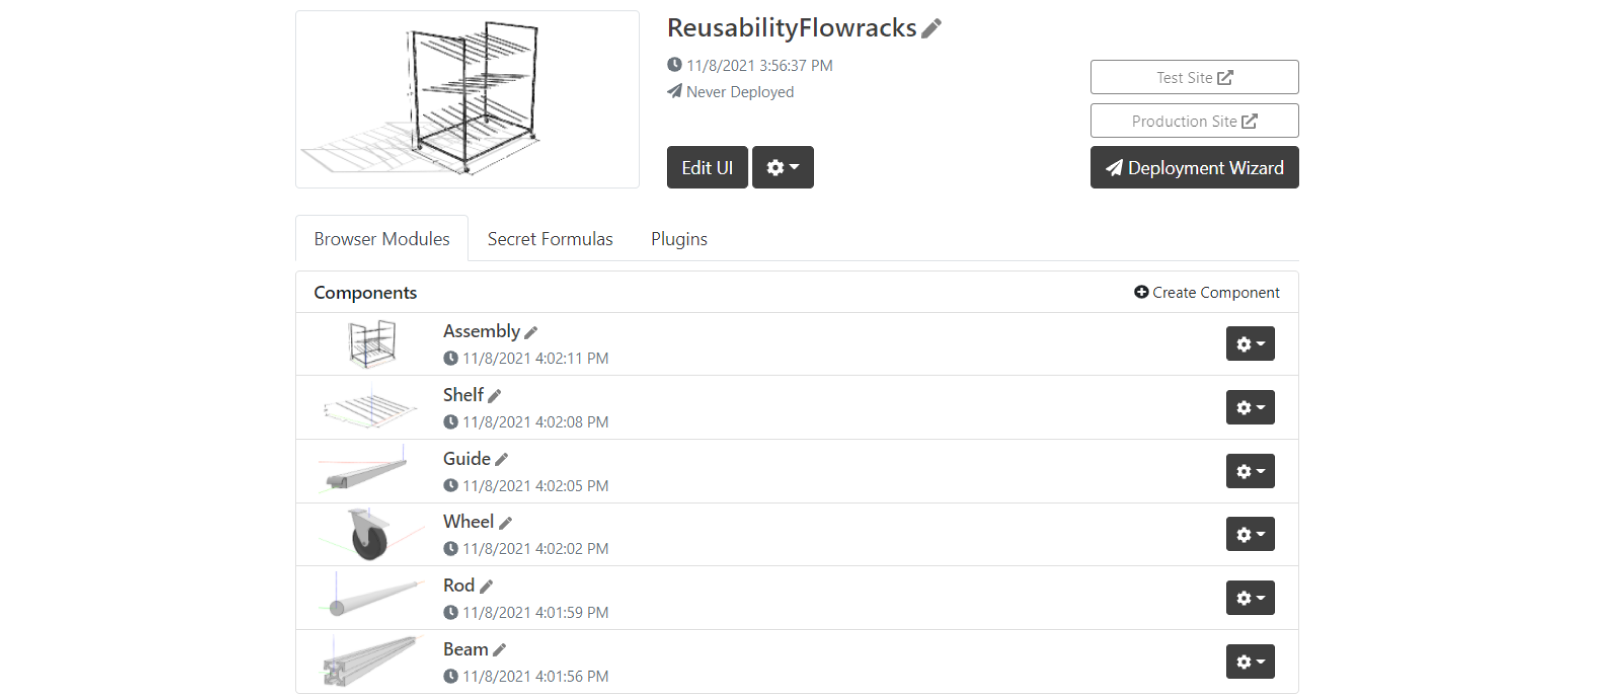
Here we want to show something related to a subcomponent in the drawing. As an example we take the DynaMaker open template Flowracks:
which has the following component structure:
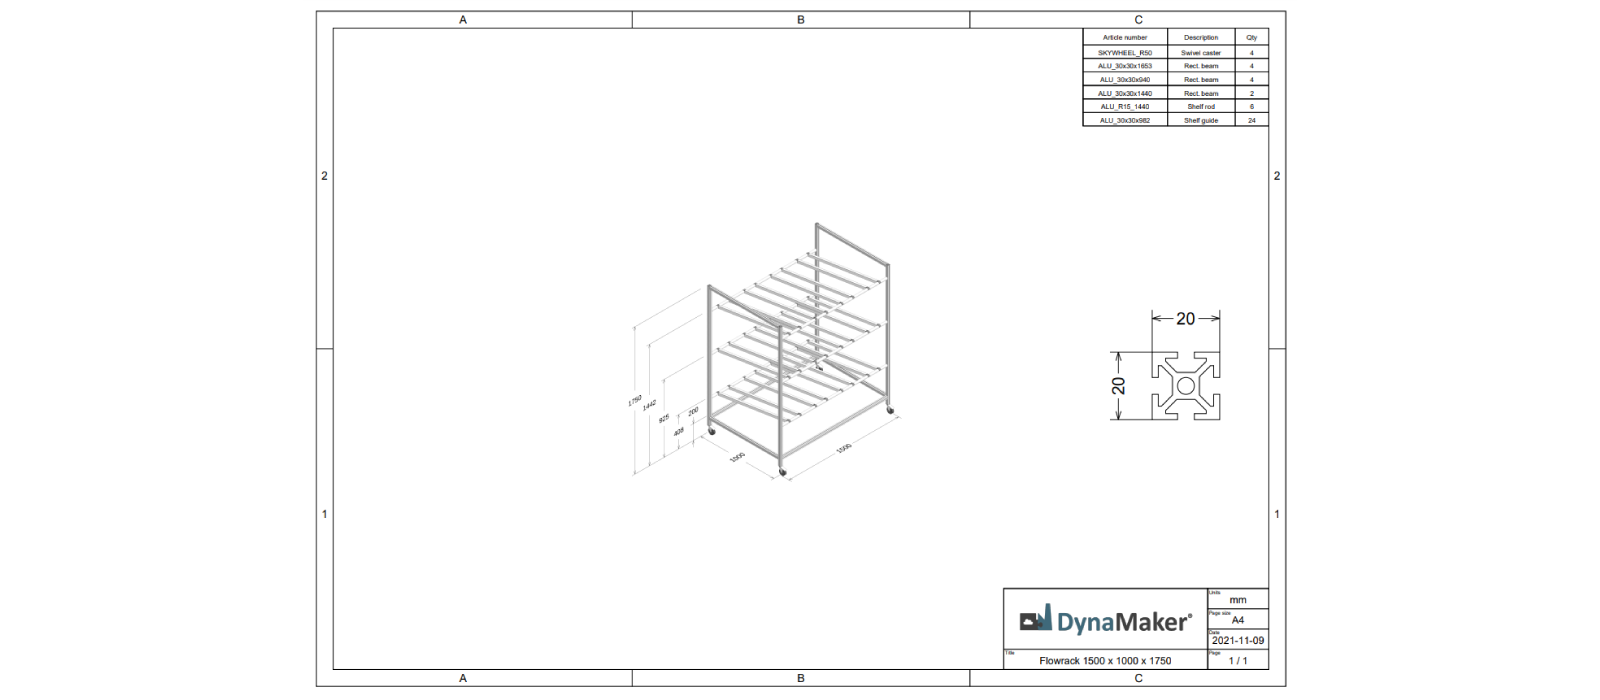
As for the exercise, we want to add the profile of the beams to the drawing, together with some dimensions. In other words, we want to reuse a sketch of a subcomponent (used for its model extrusion) for a layout that is going to be added to the drawing. These steps will be followed:
- A. Create function in component _Beam_ that generates the desired layout.
- B. Create function in component Assembly that gets this layout from the subcomponent _Beam_.
- C. Call function from Assembly in drawing and place it accordingly.
A. Function in _Beam_
First of all we would need to make sure that the function that generates the sketch is in GEOM2D of the
Beam component. Then in the component _Beam_ we could have the following (here the sketch comes from a static asset,
but could be replaced for any other SKYCAD.Sketch)
// GEOM2D
export function generateProfileSketch() {
  const profileSketch = ASSETS.STATIC_SKETCHES.ALU_PROFILE_20X20_DXF
  return profileSketch
}
Then, we would need to make sure that the extrusion, generated in GEOM3D, is using generateProfileSketch()
for its sketch:
// GEOM3D
export function generateModel(depth: number, width: number) {
  const model = new SKYCAD.ParametricModel()
  const baseSketch = GEOM2D.generateProfileSketch()
  const plane = new SKYCAD.Plane(0, 0, 1, 0)
  model.addExtrude(baseSketch, plane, depth)
  return model
}
Since this is already in the open template, let's create a function that gets this generateProfileSketch() and adds it
to some layout. Then, we could go to GEOM2D to create generateSectionLayout() as:
// GEOM2D
export function generateSectionLayout({ textSize = 10, defaultDimensionLineThickness = 0.1 } = {}) {
  const offset = 2 * textSize
  const layout = new SKYCAD.Layout({ defaultDimensionLineThickness })

  const profileSketch = generateProfileSketch()
  const profileBoundsSize = profileSketch.getBounds().getSize()
  const profileHeight = profileBoundsSize.y
  const profileWidth = profileBoundsSize.x

  layout.addSketch(profileSketch)

  layout.addDimension(
    new SKYMATH.Vector2D(-profileWidth / 2, profileHeight / 2),
    new SKYMATH.Vector2D(profileWidth / 2, profileHeight / 2),
    { textSize, offset, decimals: 0, extendLinesToTarget: true },
  )
  layout.addDimension(
    new SKYMATH.Vector2D(-profileWidth / 2, -profileHeight / 2),
    new SKYMATH.Vector2D(-profileWidth / 2, profileHeight / 2),
    { textSize, offset, decimals: 0, textRotation: Math.PI / 2, extendLinesToTarget: true },
  )

  return layout
}
To have a better control of textSize and defaultDimensionLineThickness, we pass them as optional arguments to the
function, so that later they can be passed directly from the drawing itself, with the help of the intellisense.
As best practices, since this function is in GEOM2D, add a simple preset 2D right away. This will strongly help you to detect bugs and see immediately the result of that function without the need of seeing it in the drawing. By doing this we can realize that, if something is wrong, then it has to be either in the sketch or in this new layout, and we can easily discard that the problem is in the drawing, since we haven't touched it yet!

Great! Since we want to call later this function in the Assembly, then we can create a function in the _Beam_,
within the class, that we can call for example getSectionLayout() to be consistent with the name given in
GEOM2D.
export class Component extends STUDIO.BaseComponent<CONSTANTS.Properties> {
  constructor() {
    // properties
  }

  getConnectors() {
    // connectors
  }

  generateGeometry() {
    // model
  }

  getSectionLayout(args: { textSize?: number; defaultDimensionLineThickness?: number }) {
    const sectionLayout = GEOM2D.generateSectionLayout(args)
    return sectionLayout
  }

  // other possible class functions
}
We could also write the optional arguments
textSizeanddefaultDimensionLineThicknessas it is inGEOM2D.generateSectionLayout()(with the default values), but in order to avoid having default values everywhere, we could just write the type of each optional argument ingetSectionLayout()instead, having the possibility to beundefinedhere because they will have defined default values in the end.
B. Function in Assembly
Now this function getSectionLayout() can be called in the Assembly wherever the component Beam is used as
subcomponent there. So, remember to Save & Update and Publish to apply the changes in other
components. Once published, we can create a function in _Assembly_ to call getSectionLayout() from any of the beam
components, since they all have the same profile.
export class Component extends STUDIO.BaseComponent<CONSTANTS.Properties> {
  constructor() {
    // properties
    this.update()
  }

  getMetrics() {
    // metrics
  }

  getConnectors() {
    // connectors
  }

  update() {
    // logic to add subcomponents
  }

  generateGeometry() {
    // geometry of subcomponents
  }

  generateLightweightGeometry() {
    // dimensions based on subcomponents
  }

  getBeamSectionLayout(args: { textSize?: number; defaultDimensionLineThickness?: number }) {
    const beamComponents = this.componentHandler.getComponents(BEAM.Component)
    if (beamComponents.length > 0) {
      // check to make sure beam components exist
      const beamComponent = beamComponents[0]
      const beamSectionLayout = beamComponent.getSectionLayout(args)
      return beamSectionLayout
    } else {
      console.warn('No beams found. Returning empty layout instead.') // show warning in the console browser
      return new SKYCAD.Layout()
    }
  }

  // other possible class functions
}
Notice the simple check we do to see if the beam components exist in the assembly. Also, it is easier for the developer in case of debugging if we add warnings that will be shown in the browser console (F12) in places where we shouldn't end up.
C. Call Function in Drawing
Since we write the arguments with the correct type throughout the functions, then it should be very easy to use that
function in the drawing (generateDrawing() in DRAWING). Since it returns a layout, then we can add it as
content to the drawing as usually done, by simply writing something like this:
export function generateDrawing(component: ASSEMBLY.Component, images: HTMLImageElement[]) {
  const drawing = new SKYDRAWING.Drawing()
  const pageId = 1
  drawing.addPage(pageId, { pageHeight, pageWidth })

  const beamSectionLayout = component.getBeamSectionLayout({ textSize: 5, defaultDimensionLineThickness: 0.001 })
  drawing.addContent(pageId, beamSectionLayout, { position: new SKYMATH.Vector2D(0.85 * pageWidth, 0.4 * pageHeight) })

  // header, BOM, etc

  return drawing
}
Notice that the optional arguments allows us to control some layout settings (text size and line thickness of dimensions) directly from the Drawing Editor.
We can see the results in the preview of the Drawing Editor. However, if we detect something is wrong, then we know that the connection between the drawing and the subcomponent is wrong, but we have discarded already that the problem could be in the layout/sketch itself, since we did the preset 2D for that. Finally, once the drawing is published, the drawing should be updated and ready to use in the new application:
BOM
In this example, we want to generate a Bill of materials (BOM) of a product and we want to show it in two different ways: as a table somehow in the drawing and in CSV format downloadable through a button. However, the BOM should be generated from the same function so that we reuse the same functionality.
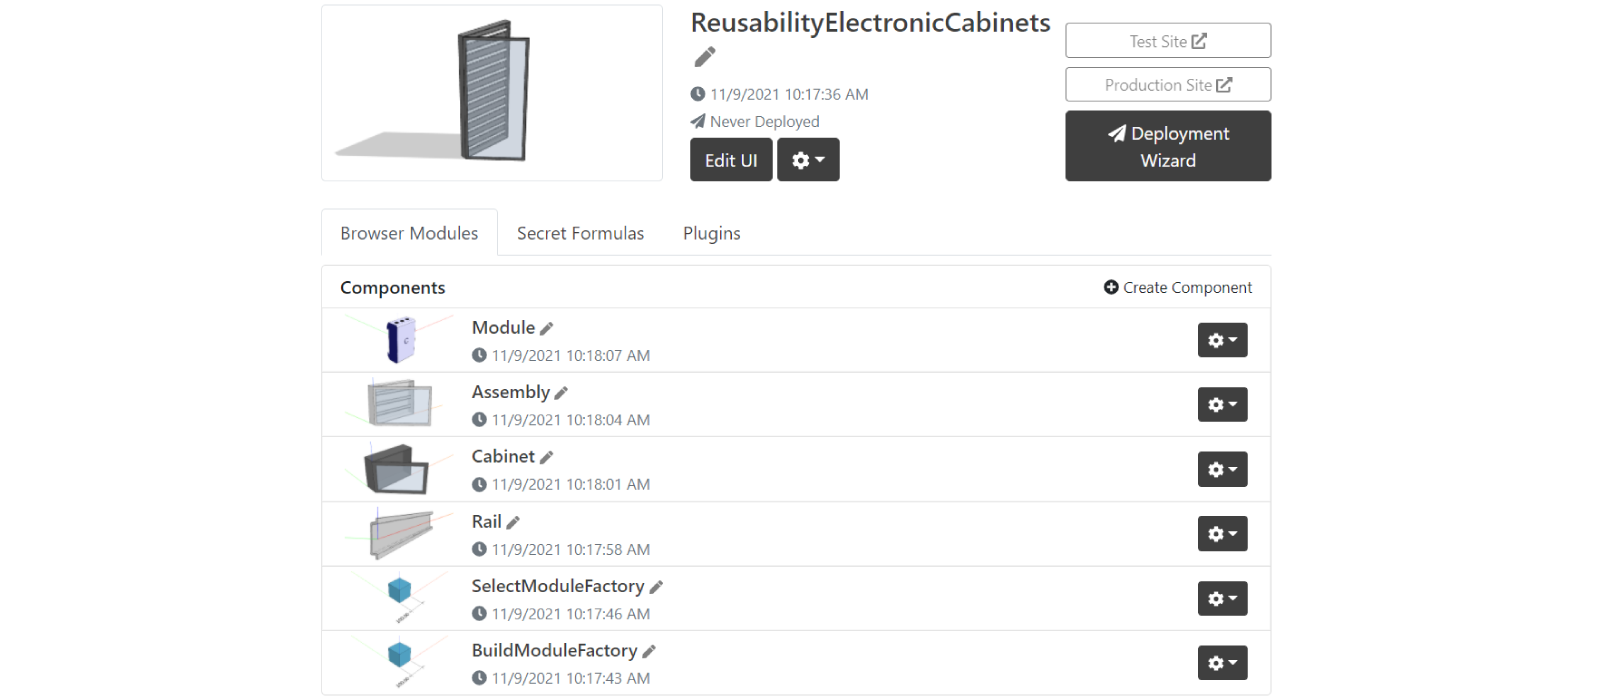
For this we take the open template Electronic Cabinet:
which has the following component structure (you can ignore Select/BuildModuleFactory components for now):
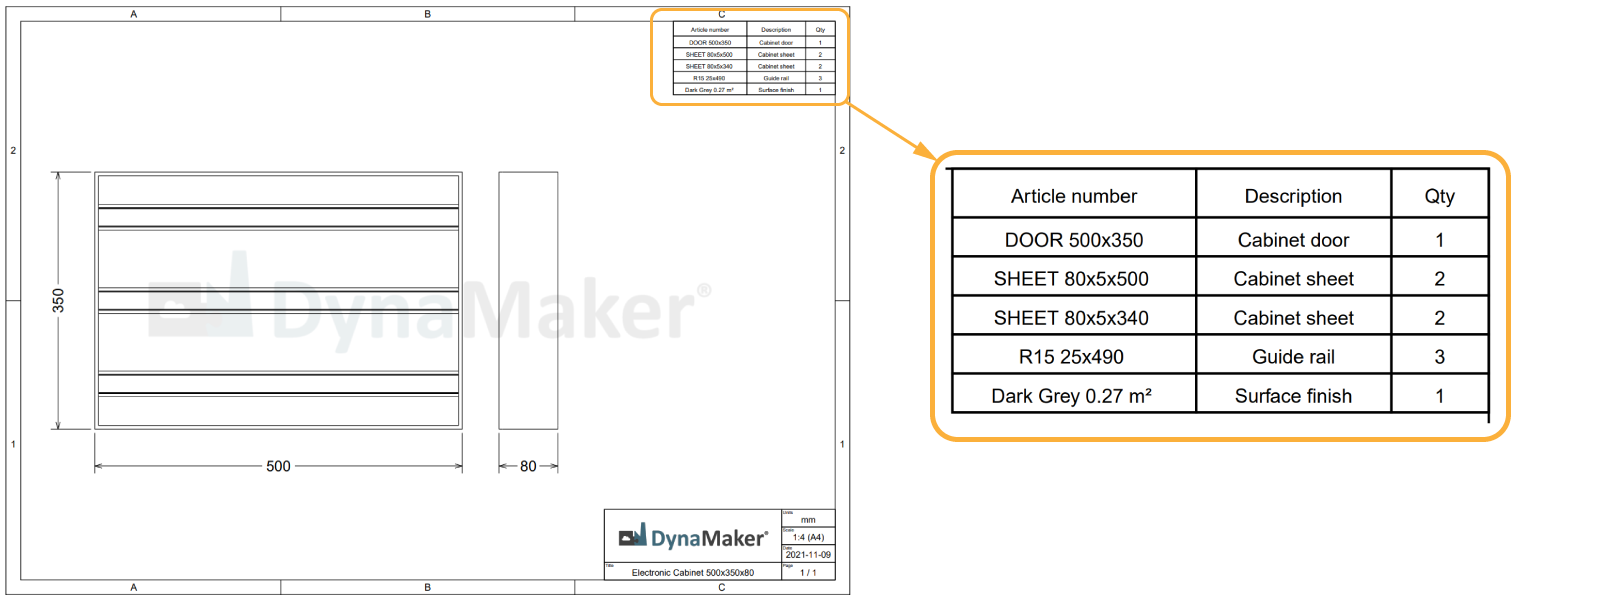
Although this initial open template has already the BOM in the drawing, we explain it here from the beginning. The steps that will be followed are:
- A. Create function to generate BOM in each subcomponent
- B. Create function to generate BOM in Assembly that collects all subcomponents BOMs
- C. Create button that uses the function from Assembly to generate a CSV file
- D. Call function from Assembly to generate a table in drawing accordingly
A. Function in Subcomponents
Starting from the most simple component, the component Module, we will add the function getBom() within the class,
so that it can be called in other top-level components, as:
export class Component extends STUDIO.BaseComponent<CONSTANTS.Properties> {
  constructor() {
    // properties
  }

  generateGeometry() {
    // geometry with models
  }

  generateLightweightGeometry() {
    // gemeotry with dimensions and other sketches
  }

  // other class functions

  getBom() {
    const { width, depth, height, moduleType } = this.properties
    const output: { artNr: string; qty: number; description: string }[] = []
    output.push({ artNr: `MOD-${moduleType} ${width}x${height} `, qty: 1, description: `Module ${moduleType}` })
    return output
  }
}
Although there are many ways to create a BOM, we want it to be a list of objects that contain artNr (article number),
qty (number of items) and description (for easier identification), so that we can have each in a column of a table.
It is up to you how you want to do it!
Repeat this process in all subcomponents with their own article number and description. Leave qty as 1, since we will
stack them later in Assembly. Remember to Save & Update and Publish to see the changes across
your project.
B. Function in Assembly
Once the subcomponents are published, we need to collect all these BOMs in Assembly in some function within the
class (this works as well for subcomponents that contain other subcomponents).
export class Component extends STUDIO.BaseComponent<CONSTANTS.Properties> {
  constructor() {
    // properties
    this.update()
  }

  getConnectors() {
    // connectors for placing subcomponents
  }

  update() {
   // logic to add subcomponents
  }

  generateGeometry({ skipCabinetDoor = false } = {}) {
    // geometry of subcomponents
  }

  private getCabinetSurface() { // gets surface in m² from properties
    const { width, height, depth } = this.properties
    const area = ...
    return area
  }

  // other class functions

  getBom() {
    const { cabinetColor } = this.properties
    const bomRows: { artNr: string, qty: number, description: string }[] = []

    this.componentHandler.getInstances(RAIL.Component).forEach(instance => {
      const compBom = instance.getComponent().getBom()
      compBom.forEach(item => addOrMergeItem(item, bomRows))
    })

    this.componentHandler.getInstances(CABINET.Component).forEach(instance => {
      const compBom = instance.getComponent().getBom()
      compBom.forEach(item => addOrMergeItem(item, bomRows))
    })

    bomRows.push({ artNr: `${cabinetColor} ${Math.round(this.getCabinetSurface()).toFixed(2)} m² `, qty: 1, description: `Surface finish` })

    return bomRows
  }

function addOrMergeItem(item: { artNr: string, qty: number, description: string }, list: { artNr: string, qty: number, description: string }[]) {
  const existingItem = list.filter(listItem => item.artNr === listItem.artNr)
  if (existingItem.length > 0) {
    existingItem[0].qty += item.qty
  } else {
    list.push(item)
  }
}
See that in getBom() we go through the instances in the assembly and we get their BOM, and we add it (or merge them by
summing up the quantity) to the final BOM, called bomRows here. In this case, a component Rail contains multiple
Modules components, so we prepared a similar logic there as it is in Assembly here.
Notice two things in the code above:
- inside the
class, before the functiongetCabinetSurface()the wordprivatemakes it usable only within the component. This prevents using this function somewhere else (e.g. other components, UI, drawing, etc). Also, since the function is within theclass, the properties and otherclassfunctions can be used here too.- outside the
class, the functionaddOrMergeItem()is not related at all to the component, but it can only be used in the tab COMPONENT. Since it is not part of the component, arguments need to be sent as any other common function.
C. Download BOM as CSV File
Once Assembly is published, we can use its getBom() in the app.
- In ACTIONS, create the function
getBomCsvRows()as:
export function getBomData() {
  const assemblyComponent = getComponent() // function in template
  const bomRows = assemblyComponent.getBom()
  const bomCsvRows = []
  bomRows.forEach((row) => {
    bomCsvRows.push(`${row.artNr},${row.description},${row.qty}`)
  })
  return bomCsvRows.join('\n')
}
- In UI, create a button that downloads the file with that data:
const downloadBomButton = new SKYUI.Button(
  'Download BOM',
  () => {
    const bomData = ACTIONS.getBomData()
    Studio.downloadFile('bom.csv', bomData)
  },
  {
    icon: 'save-file',
  },
)
D. Call Function in Drawing
Simultaneously we can add a table from these bomRows that come from Assembly. In this case, we generate the bom
layout in a separate function called generateBomLayout() to keep the function generateDrawing() in
DRAWING cleaner and easier to read.
export function generateDrawing(component: ASSEMBLY.Component) {
  const drawing = new SKYDRAWING.Drawing()
  const pageId = 1
  drawing.addPage(pageId, { pageHeight, pageWidth })

  const bomRows = assemblyComponent.getBom()
  const bomLayout = generateBomLayout(bomRows)
  drawing.addContent(pageId, bomLayout, { anchor: 'top-right' })

  // views and header

  return drawing
}

function generateBomLayout(bomRows: { artNr: string; qty: number; description: string }[]) {
  const table = new SKYCAD.Table({
    defaultTextSize: 3,
    columnWidths: [25, 20, 10],
    rowHeights: [5],
  })

  table.addText('Article number', 0, 0, { size: 2 })
  table.addText('Description', 0, 1, { size: 2 })
  table.addText('Qty', 0, 2, { size: 2 })

  let row = 1
  bomRows.forEach((bomRow) => {
    table.addText(bomRow.artNr, row, 0, { size: 2 })
    table.addText(bomRow.description, row, 1, { size: 2 })
    table.addText(bomRow.qty.toString(), row, 2, { size: 2 })
    row++
  })
  const bomLayout = table.generateLayout()
  return bomLayout
}
Once the drawing is published, the new application includes the new button and the BOM table, both using the same function from Assembly.
Constants across Project
Another common problem happens when there are a lot of constants or common functions that are being used in different places, not only in an Assembly but also in its subcomponents, drawings or even in the app sometimes. In other to be consistent, you should keep all constants in one single place so you can reuse the same value across your project. For this there are two simple approaches:
- A. Use component
- B. Use dataset
Remember that if a constant it's only used once (e.g. some specific dimension in a sketch), you should keep it within the function for simplicity. It could be messy (and dangerous) to have it in a common file that can be used anywhere else.
A. Use Component
If you are updating regularly your constants, it might be worthy to have them in a specific component, since it would be easier to edit and update changes through publishing. For this, then:
- Create a new component and call it something different than Constants (due to naming conflict), e.g. ProjectConstants.
- Empty the component by removing everything in COMPONENT, PARAMETERS, PRESETS, etc, so you don't confuse it with an actual component.
- Place all your constants as usual in CONSTANTS, for example:
export enum MATERIAL {
  WOOD = 'Wood',
  STEEL = 'Steel',
  PVC = 'PVC',
}

export enum INSULATION_TYPE {
  NONE = 0,
  BLANKET = 'type-1',
  IFC = 'type-2',
  SIP = 'type-3',
}

export function getInsulationLabel(insulation: INSULATION_TYPE) {
  switch (insulation) {
    case INSULATION_TYPE.BLANKET:
      return 'Blanket: batts and rolls'
    case INSULATION_TYPE.IFC:
      return 'Insulating concrete forms'
    case INSULATION_TYPE.SIP:
      return 'Structural insulated panels'
  }
}

export const DOOR = {
  THICKNESS: 15,
  MIN_WIDTH: 500,
  MAX_WIDTH: 2000,
  HANDLE_TYPE: {
    PULL: 'pull-handle',
    LEVER_LOCK: 'lever-lock',
  },
}
Write
exportbefore every constant you want to export (i.e. all here). Also notice that you can also export, not only constants, but also functions that use some constants from the same tab.
-
In API, you can export to other components everything in CONSTANTS (that has
export) by having:export * from './constants.js' -
Save & Update and Publish to be able to use these constants everywhere else in the project. Remember, that if you update any of these values, then you would need to publish again this component.
-
Import the component ProjectConstants wherever you want to use it, like you would do for subcomponents or assets for example.

-
Extract any value from constants as you would do with regular constants, like:
const doorMaxWidth = PROJECTCONSTANTS.DOOR.MAX_WIDTHconst I = PROJECTCONSTANTS.INSULATION_TYPE
const insulationParameter = SKYPARAM.generateDropdown(PARAMETER.INSULATION, 'Insulation', [
new SKYPARAM.DropdownItem(PROJECTCONSTANTS.getInsulationLabel(I.NONE), I.NONE),
new SKYPARAM.DropdownItem(PROJECTCONSTANTS.getInsulationLabel(I.BLANKET), I.BLANKET),
new SKYPARAM.DropdownItem(PROJECTCONSTANTS.getInsulationLabel(I.IFC), I.IFC),
new SKYPARAM.DropdownItem(PROJECTCONSTANTS.getInsulationLabel(I.SIP), I.SIP),
])
insulationParameter.setValue(component.getProperty('insulation'))
B. Use Dataset
However, another approach to store all your constants would be to use datasets. If they are not being updated regularly (e.g. they come from some static table of properties) then this approach is much better than using a component, specially when having a large amount of constants, properties, etc. However, keep in mind that this is limited to just values.
For this approach you can see this other how-to example where datasets are explained step by step, including some common uses.
C. Use Libraries
When you have not only constants, but also components, static assets, etc, that are needed in different applications, you should use Libraries, which can be considered as mere containers. Using libraries avoids having duplicated logic in a bigger scale (e.g. components, files, etc). For example, if you have 20 applications that are using the same component, having a Library with it, makes it easier when updating that single component. The rest of the applications that uses that component will update accordingly. You can read more about them here.