How To Create Components
Components in DynaMaker are typically known as Parts and Assemblies in other CAD softwares. The advantage of using them over simple Visualization Models is that they include certain functionalities that can make the development of your complex product configurators easier.
Syntax
When creating a component, you can start from the template of the cube:
- Go into Studio > + New Building Block > Component.
- Choose e.g. CubeComponent as name, and Width, depth and height as input.
- You will see a component, which has its own "visualization model" connected already to some inputs or properties.
- Then you will see the following class essentially containing:
propertiesthat work as the input for the whole component.generateGeometryas the only visualization model for the whole component.
export interface CubeComponentProperties {
  width: number
  depth: number
  height: number
}
export class CubeComponent extends STUDIO.BaseComponent<CubeComponentProperties> {
  constructor() {
    super()

    this.properties = {
      width: 100,
      depth: 100,
      height: 100,
    }
  }

  generateGeometry() {
    const width = this.properties.width
    const depth = this.properties.depth
    const height = this.properties.height

    const geometryGroup = new SKYCAD.GeometryGroup()

    const model = new SKYCAD.ParametricModel()
    const sketch = SKYCAD.generateRectangleSketch(0, 0, width, depth)
    const plane = new SKYCAD.Plane()
    model.addExtrude(sketch, plane, height)
    geometryGroup.addGeometry(model)

    return geometryGroup
  }
}
Component Basics
A. Blocks
A component consists of some default blocks but additional ones can be added.
A1. Default blocks
A component comes with 3 class functions or sub-blocks as default that are ready to be used:
generateGeometry()as the visualization model.update()meant for assemblies with subcomponents.getConnectors()that must return a list of connectors meant for easier placement in assemblies.
An example with these 3 (skipping the logic inside) would look like these:
export class CubeComponent extends STUDIO.BaseComponent<CubeComponentProperties> {
  constructor() {
    super()

    this.properties = {
      // properties
    }
  }

  getConnectors() {
    // list of connectors
  }

  update() {
    // logic for sub-components
  }

  generateGeometry() {
    // visualization model
  }
}
See that the template only comes with generateGeometry as it's usual to have a visualization while not always
connectors or sub-components commonly found in assemblies. Although these 3 are optional to use, they help to put
together the product configurator with other built-in functions, that are explained later in this guide.
A2. Custom blocks
Additional blocks can be added to any component with whatever purpose that easily wraps certain functionality. Some
examples are those that include certain calculations with the properties, generation of BOM lists and so on. Simply add
them as it is done with the default blocks, see getBom() and getVolume() below:
export class CubeComponent extends STUDIO.BaseComponent<CubeComponentProperties> {
  constructor() {
    super()

    this.properties = {
      // properties
    }
  }

  getConnectors() {
    // list of connectors
  }

  update() {
    // logic for sub-components
  }

  generateGeometry() {
    // visualization model
  }

  getBom() {
    // logic for generating a BOM
  }

  getVolume() {
    const volume = this.properties.width * this.properties.depth * this.properties.height
    return volume
  }
}
A3. Using blocks within each other
Naturally you can always call any block within each other, just make sure there's not recursion causing infinite
loops.
In the example below, the height is calculated in getHeight() which is used within generateGeometry():
export class CubeComponent extends STUDIO.BaseComponent<CubeComponentProperties> {
  constructor() {
    super()

    this.properties = {
      size: 50,
    }
  }

  getHeight() {
    const cubeSize = this.properties.size
    const cubeHeight = 3 * cubeSize
    return cubeHeight
  }

  generateGeometry() {
    const cubeSize = this.properties.size
    const cubeHeight = this.getHeight()

    const geometryGroup = new SKYCAD.GeometryGroup()

    const model = new SKYCAD.ParametricModel()
    const sketch = SKYCAD.generateRectangleSketch(0, 0, cubeSize, cubeSize)
    const plane = new SKYCAD.Plane()
    model.addExtrude(sketch, plane, cubeHeight)
    geometryGroup.addGeometry(model)

    return geometryGroup
  }
}
B. Properties
As you have probably seen in the template, there are 3 properties by default. Naturally, these properties can be changed
or removed. In order to add a new one, let's say cornerRadius for the extrusion:
- under
CubeComponentProperties, addcornerRadius: number. - within the
constructor, addcornerRadius: 5as the default value, making it ready to use. - then in e.g.
generateGeometry(), assign the property to a variable likeconst cornerRadius = this.properties.cornerRadius. - and simply use it e.g. as the radius of the sketch used for the extrusion in this case as in the example below:
Although you can retrieved any property with this.properties, you can also use:
getProperty()by giving the property as string (e.g.const cubeWidth = this.getProperty('width')).getProperties()which gives the whole object (e.g.const { width, depth } = this.getProperties()).
Component Into Components
It is possible and recommended in most cases, that instead of having one that does too much, it's best to split its logic into separate components, specially when these are complex on their own. You can do this in two ways:
- a single package with multiple components.
- a main package, containing multiple packages with one or more components each.
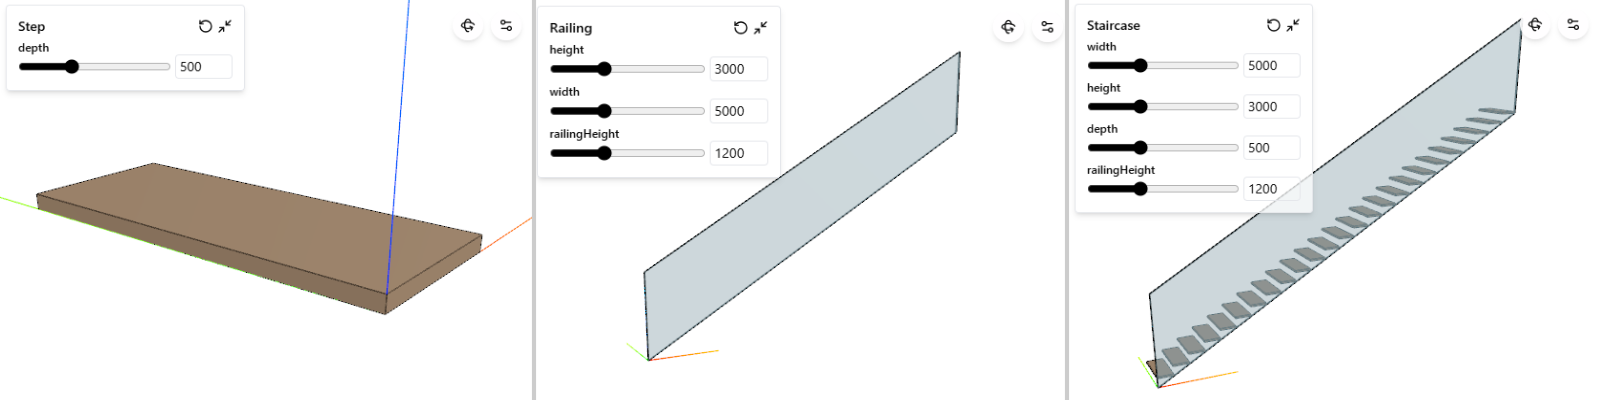
Either way, you can always switch to the other when you see fit in favour of cleaner code. To show the difference we take a staircase made of side railing and steps as product like the following:
A. Single package
Using a single package is recommended when the product is simple enough that everything can be built within the same package.
Let's start by building the step and railing components with simple geometries. Try to build the geometry yourself first and compare with the solutions below. Remember to keep all component blocks within the same package.
Component Step:
Notice STEP_WIDTH is left outside since it will be also used later in the upcoming component Staircase.
const STEP_WIDTH = 200

interface StepProperties {
  depth: number
}
export class Step extends STUDIO.BaseComponent<StepProperties> {
  constructor() {
    super()

    this.properties = {
      depth: 500,
    }
  }

  generateGeometry() {
    const { depth } = this.getProperties()
    const HEIGHT = 20

    const model = new SKYCAD.ParametricModel()
    const baseSketch = SKYCAD.generateRectangleSketch(0, 0, STEP_WIDTH, depth)
    const plane = new SKYCAD.Plane()
    model.addExtrude(baseSketch, plane, HEIGHT)

    const group = new SKYCAD.GeometryGroup()
    group.addGeometry(model, {
      materials: [new SKYCAD.Material({ color: new SKYCAD.RgbColor(196, 164, 132) })],
    })

    return group
  }
}
Component Railing:
interface RailingProperties {
  height: number
  width: number
  railingHeight: number
}
export class Railing extends STUDIO.BaseComponent<RailingProperties> {
  constructor() {
    super()
    this.properties = {
      height: 3000,
      width: 5000,
      railingHeight: 1200,
    }
  }
  generateGeometry() {
    const { height, width, railingHeight } = this.properties
    const group = new SKYCAD.GeometryGroup()

    const model = new SKYCAD.ParametricModel()

    const sketch = new SKYCAD.Sketch()
    sketch.moveTo(0, 0)
    sketch.lineTo(0, railingHeight)
    sketch.lineTo(width, height + railingHeight)
    sketch.lineTo(width, height)
    sketch.lineToId(0)

    const plane = new SKYCAD.Plane(0, -1, 0)

    const GLASS_THICKNESS = 20
    model.addExtrude(sketch, plane, GLASS_THICKNESS)

    group.addGeometry(model, {
      materials: [
        new SKYCAD.Material({
          color: new SKYCAD.RgbColor(173, 216, 230),
          opacity: 0.5,
        }),
      ],
    })
    return group
  }
}
As for the staircase we would need to import these components into a new one somehow. For this, the componentHandler
of the component is crucial to use
Good to know about the componentHandler API:
this.componentHandler.add()adds a component as subcomponent.this.componentHandler.clear()removes a specific component type (i.e. step, railing, etc) previously added.this.componentHandler.clearAll()removes all components previously added.this.componentHandler.generateAllGeometry()creates the geometry of all the components added, as long as their component blockgenerateGeometry()is used as visualization model.
Therefore the component block update() becomes quite relevant since it's automatically triggered for every change in
their properties. Here it's the place to add/update/remove the subcomponents.
Component Staircase:
interface StaircaseProperties {
  width: number
  height: number
  depth: number
  railingHeight: number
}
export class Staircase extends STUDIO.BaseComponent<StaircaseProperties> {
  constructor() {
    super()

    this.properties = {
      width: 5000,
      height: 3000,
      depth: 500,
      railingHeight: 1200,
    }

    this.update()
  }

  update() {
    const { width, depth, height, railingHeight } = this.getProperties()

    this.componentHandler.clear(Railing)
    const railingComponent = new Railing()
    railingComponent.setProperties({ height, railingHeight, width })
    this.componentHandler.add(railingComponent)

    this.componentHandler.clear(Step)
    const stepComponent = new Step()
    stepComponent.setProperties({ depth })

    const MAX_STEP_RISE = 220

    const nrSteps = Math.max(Math.floor(height / MAX_STEP_RISE), Math.floor(width / STEP_WIDTH))

    const stepRise = height / nrSteps // z-space between steps
    const stepRun = width / nrSteps // x-space between steps

    for (let i = 0; i < nrSteps; i++) {
      this.componentHandler.add(stepComponent, {
        position: new SKYMATH.Vector3D(i * stepRun, 0, (i + 1) * stepRise),
      })
    }
  }

  generateGeometry() {
    const group = this.componentHandler.generateAllGeometry()
    return group
  }
}
Finally the single package ASSEMBLY would look like this:
Doublecheck the full code of the package ASSEMBLY with all 3 components together:
const STEP_WIDTH = 200

interface StepProperties {
  depth: number
}
export class Step extends STUDIO.BaseComponent<StepProperties> {
  constructor() {
    super()

    this.properties = {
      depth: 500,
    }
  }

  generateGeometry() {
    const { depth } = this.getProperties()
    const HEIGHT = 20

    const model = new SKYCAD.ParametricModel()
    const baseSketch = SKYCAD.generateRectangleSketch(0, 0, STEP_WIDTH, depth)
    const plane = new SKYCAD.Plane()
    model.addExtrude(baseSketch, plane, HEIGHT)

    const geometryGroup = new SKYCAD.GeometryGroup()
    geometryGroup.addGeometry(model, {
      materials: [new SKYCAD.Material({ color: new SKYCAD.RgbColor(196, 164, 132) })],
    })

    return geometryGroup
  }
}

interface RailingProperties {
  height: number
  width: number
  railingHeight: number
}
export class Railing extends STUDIO.BaseComponent<RailingProperties> {
  constructor() {
    super()
    this.properties = {
      height: 3000,
      width: 5000,
      railingHeight: 1200,
    }
  }
  generateGeometry() {
    const { height, width, railingHeight } = this.properties
    const geometryGroup = new SKYCAD.GeometryGroup()

    const model = new SKYCAD.ParametricModel()

    const sketch = new SKYCAD.Sketch()
    sketch.moveTo(0, 0)
    sketch.lineTo(0, railingHeight)
    sketch.lineTo(width, height + railingHeight)
    sketch.lineTo(width, height)
    sketch.lineToId(0)

    const plane = new SKYCAD.Plane(0, -1, 0)

    const GLASS_THICKNESS = 20
    model.addExtrude(sketch, plane, GLASS_THICKNESS)

    geometryGroup.addGeometry(model, {
      materials: [
        new SKYCAD.Material({
          color: new SKYCAD.RgbColor(173, 216, 230),
          opacity: 0.5,
        }),
      ],
    })
    return geometryGroup
  }
}

interface StaircaseProperties {
  width: number
  height: number
  depth: number
  railingHeight: number
}
export class Staircase extends STUDIO.BaseComponent<StaircaseProperties> {
  constructor() {
    super()

    this.properties = {
      width: 5000,
      height: 3000,
      depth: 500,
      railingHeight: 1200,
    }

    this.update()
  }

  update() {
    const { width, depth, height, railingHeight } = this.getProperties()
    this.componentHandler.clearAll()

    const railingComponent = new Railing()
    railingComponent.setProperties({ height, railingHeight, width })
    this.componentHandler.add(railingComponent)

    // StairSteps
    this.componentHandler.clear(Step)
    const stepComponent = new Step()
    stepComponent.setProperties({ depth })

    const MAX_STEP_RISE = 220

    const nrSteps = Math.max(Math.floor(height / MAX_STEP_RISE), Math.floor(width / STEP_WIDTH))

    const stepRise = height / nrSteps // z-space between steps
    const stepRun = width / nrSteps // x-space between steps

    for (let i = 0; i < nrSteps; i++) {
      this.componentHandler.add(stepComponent, {
        position: new SKYMATH.Vector3D(i * stepRun, 0, (i + 1) * stepRise),
      })
    }
  }

  generateGeometry() {
    const geometryGroup = this.componentHandler.generateAllGeometry()
    return geometryGroup
  }
}
B. Multiple packages
Using multiple packages is recommended when the product is complex enough that a package with at least one component helps with its development. We will take the same staircase as product example to see the difference with the single-package approach described before.
-
STAIRSSTEP package:
- create component block with name
Stepand package nameSTAIRSSTEP. - copy the code of the component from the previous section.
- add
exportbefore the constantSTEP_WIDTHto be able to use it later in other packages.
- create component block with name
-
RAILING package:
- create component block with name
Railingand package nameRAILING. - copy the code of the component from the previous section.
- create component block with name
-
STAIRCASE package:
- create component block with name
Staircaseand package nameSTAIRCASE. - copy the code of the component from the previous section.
- next to Save & Run, click ... > Edit imports and check both
STAIRSSTEPandRAILING. - replace
RailingwithRAILING.Railing,StepwithSTAIRSSTEP.Step, andSTEP_WIDTHwithSTAIRSSTEP.STEP_WIDTH.
- create component block with name
When the product configurator gets complex, especially when using multiple packages with more than one export per package, don't forget to check the interactive Structure Graph that shows the dependencies (i.e. what's used where):
- go into the relevant package/block, click its ... > Show Structure Graph.
C. Instances
When using this.componentHandler.add, a copy or instance of the component is added, which is convenient to reuse due
to the built-in API it brings with it.
C1. Adding, updating and removing
For the case that a subcomponent (e.g. railing) that always exists within another component (e.g. staircase), it's best
to add it in its constructor since this part is only triggered once only when created.
export class Staircase extends STUDIO.BaseComponent<StaircaseProperties> {
  constructor() {
    super()

    this.properties = {
      width: 5000,
      height: 3000,
      depth: 500,
      railingHeight: 1200,
    }

    const railingComponent = new RAILING.Railing()
    this.componentHandler.add(railingComponent)

    this.update()
  }

  update() {
    const { width, depth, height, railingHeight } = this.getProperties()

    const railingComponents = this.componentHandler.getComponents(RAILING.Railing) // gives list with 1 component here
    const railingComponent = railingComponents[0]!
    railingComponent.setProperties({ height, railingHeight, width })

    // ...other logic other subcomponents (e.g. steps)
  }

  generateGeometry() {
    const geometryGroup = this.componentHandler.generateAllGeometry()
    return geometryGroup
  }
}
Thanks to the componentHandler, you can also:
-
get specific components and instances by class type:
const allComponents = this.componentHandler.getAllComponents() // railing and step componentsconst railingComponents = this.componentHandler.getComponents(RAILING.Railing)const allInstances = this.componentHandler.getAllInstances() // railing and step instancesconst railingInstances = this.componentHandler.getInstances(RAILING.Railing) -
remove (all) components/ instances:
this.componentHandler.clearAll() // removes all instancesthis.componentHandler.clear(RAILING.Railing) // removes all railing instancesthis.componentHandler.removeComponent(railingComponentToRemove)this.componentHandler.removeInstances([railingInstance1, railingInstance2])
C2. Repositioning
Position and rotation only lies within the instance, i.e. the component doesn't know anything about its position in the visualization. Let's take an example of a staircase with a railing on its left side:
export class Staircase extends STUDIO.BaseComponent<StaircaseProperties> {
  constructor() {
    super()

    this.properties = {
      width: 5000,
      height: 3000,
      depth: 500,
      railingHeight: 1200,
    }

    const railingComponent = new RAILING.Railing()
    this.componentHandler.add(railingComponent)

    this.update()
  }

  update() {
    const { width, depth, height, railingHeight } = this.getProperties()

    const railings = this.componentHandler.getInstances(RAILING.Railing)
    const railing = railings[0]!
    railing.setPosition(new SKYMATH.Vector3D(0, depth, 0))
    // railing.setRotation(new SKYMATH.Vector3D(0, 0, 0))

    // ...other logic other subcomponents (e.g. steps)
  }

  generateGeometry() {
    const geometryGroup = this.componentHandler.generateAllGeometry()
    return geometryGroup
  }
}
You can also fetched the position and rotation of an instance like:
const railings = this.componentHandler.getInstances(RAILING.Railing)
const railing = railings[0]!
const leftRailingPosition = railing.getPosition()
const leftRailingRotation = railing.getRotation()
C3. Tags
Tagging instances allow you to add some distinction between instances, despite perhaps sharing the same component:
Let's take an example of a staircase with a railing with 2 railings, one at each side:
export class Staircase extends STUDIO.BaseComponent<StaircaseProperties> {
  constructor() {
    super()

    this.properties = {
      width: 5000,
      height: 3000,
      depth: 500,
      railingHeight: 1200,
    }

    const railingComponent = new RAILING.Railing()
    this.componentHandler.add(railingComponent, { withTags: ['left'] })
    this.componentHandler.add(railingComponent, { withTags: ['right'] })

    this.update()
  }

  update() {
    const { width, depth, height, railingHeight } = this.getProperties()

    const leftRailings = this.componentHandler.getInstances(RAILING.Railing, { withTags: ['left'] })
    const leftRailing = leftRailings[0]!
    leftRailing.setPosition(new SKYMATH.Vector3D(0, 0, 0))

    const rightRailings = this.componentHandler.getInstances(RAILING.Railing, { withTags: ['right'] })
    const rightRailing = rightRailings[0]!
    rightRailing.setPosition(new SKYMATH.Vector3D(0, depth, 0))

    // ...other logic other subcomponents (e.g. steps)
  }

  generateGeometry() {
    const geometryGroup = this.componentHandler.generateAllGeometry()
    return geometryGroup
  }
}
You can also:
- remove a specific instance if you tagged them accordingly:
this.componentHandler.clear(RAILING.Railing, { withTags: ['left-side'] }) // removes all railing instances with specified tags
- have control of the instance tags like:
firstRailingInstance.addTag('glass') // adds new tag
const hasGlassTag = firstRailingInstance.hasTag('glass') // returns true or false
const instanceTags = firstRailingInstance.getTags() // returns tags, e.g. ['left', 'glass']