Advanced Automation
When exporting your technical drawings or any other manufacturing files in DynaMaker, you can convert the format file into another one easily. The standard plugins available for that are the following:
Quote File Service
Generate quote files and send them to connected systems automatically.

Design Automation Service
Swap visualization assets with native STEP files in your exports.
QFS
It is common to want to add some files from DynaMaker to another system, for example a CPQ, when a configuration is completed or a quote changes status. While using the client-side postMessage API is the most simple way of sending quotation files between DynaMaker and your other systems, it is not always possible to use. If the files need to be generated and sent at some point after the user has ended their browser session, Quote File Service can be used to generate the files on the server via a simple REST API.
1. Setup Plugin
The first step in setting up QFS for your DynaMaker product configurator is to enable its plugin in the dashboard. For that:
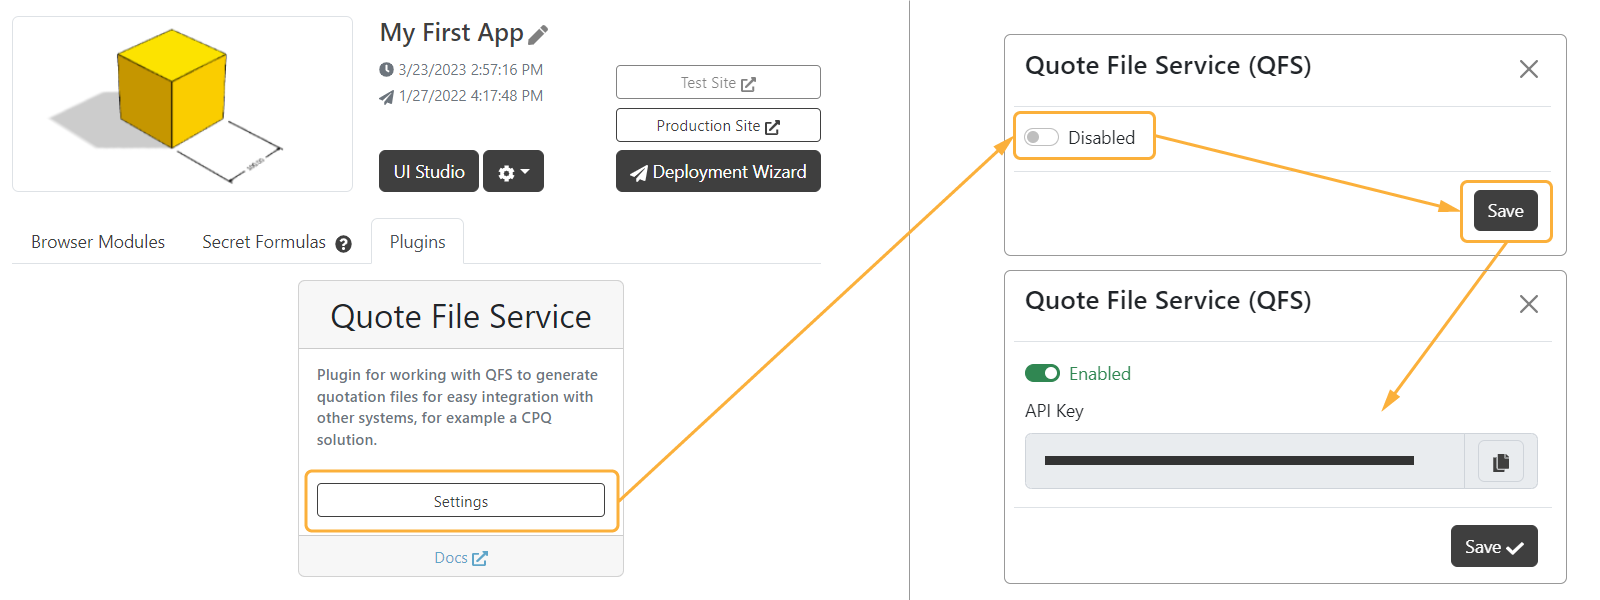
- Go to Plugins in your dashboard and look for the Quote File Service plugin.
- Open Settings, enable the plugin and click on Save.
- See the API Key generated for further use.
When the plugin has been enabled, we can access the PLUGINS.QFS namespace which has a function called onJobRequest -
a job is explained in more detail later in step 2C. Create job. As
the first argument we specify which task we want to implement. This is just a name that we choose, for example
generate-pdf. The second argument is a callback function that returns a base64-encoded
data URL for that task.
Some example task of use:
- task
generate-pdfto generate a PDF as data URL:
PLUGINS.QFS.onJobRequest('generate-pdf', async (config) => {
  await ACTIONS.updateConfiguration(config)
  const drawing = ACTIONS.generateQuotationDrawing() // generates SKYDRAWING.Drawing
  return drawing.generatePdfDataUrl()
})
- task
generate-stepto generate a STEP as data URL:
PLUGINS.QFS.onJobRequest('generate-step', async (config) => {
  await ACTIONS.updateConfiguration(config)
  const assemblyComponent = ACTIONS.getAssemblyComponent()
  const geometryToStep = assemblyComponent.generateGeometry()
  const stepData = await PLUGINS.DAS.generateSTEPFile(geometryToStep)
  return stepData.generateDataUrl()
})
See that
ACTIONS.updateConfiguration()would work as a function that takesconfigas the data sent by the system and we would update the DynaMaker components accordingly. As an example, if using the Elfsquad plugin, thisconfigwould be the raw data sent by the CPQ system, which would be of the typePLUGINS.ELFSQUAD.ElfsquadConfiguration.
If you want to send plain text (txt, json, xml) you must first encode it, for example with the default JavaScript function btoa function:
PLUGINS.QFS.onJobRequest('generate-bom', (config) => {
  return btoa(ACTIONS.getBomText(config))
})
2. Integration
2A. REST API
After the plugin has been enabled and at least one task has been implemented as per the section above, we can use the
Quote File Service REST API to create jobs. A job is defined by a task, for example generate-pdf, and some
configuration data.
2B. Authentication
To authenticate your requests to QFS, copy the API Key from the QFS plugin in the dashboard and include it in the header of your requests. Be mindful of how you store and share your key!
qfs-api-key: <my-qfs-api-key>
2C. Create job
To create a job, send a POST request to https://qfs.dynamaker.com/jobs with your API Key in the header and with the
following data in the JSON body:
- applicationId The ID of your DynaMaker product configurator
- environment Either test or production
- task The name of the task that you implemented in your product configurator code using the QFS plugin
- configuration The configuration data that should be used for this particular job. This is the same configuration data that you get as an argument to the task callback inside your DynaMaker code.
Example request:
POST https://qfs.dynamaker.com/jobs
{
  "applicationId": "SaOrCvlMUl3",
  "environment": "test",
  "task": "generate-pdf",
  "configuration": {
    "height": 500,
    "width": 2000
  }
}
Example response:
{
  "id": "5IhgHvhnn3quGuDvtxWirDtl4PwkJhJbxlCO",
  "url": "https://qfs.dynamaker.com/jobs/5IhgHvhnn3quGuDvtxWirDtl4PwkJhJbxlCO"
}
2D. Get job status
By doing a GET request to the url specified in the response of the POST request above, we can check the status, which
can be one of the following:
- queued The job has been created but has not started yet.
- processing The job is currently running.
- finished The job has finished and the response will include a
resultproperty with an URL where the resulting data can be fetched. - failed The job failed and an error message is included in the
messageproperty of the response JSON. - expired The job finished more than 24 hours ago and the result is no longer available.
Example request:
GET https://qfs.dynamaker.com/jobs/5IhgHvhnn3quGuDvtxWirDtl4PwkJhJbxlCO
Example response:
{
  "id": "5IhgJvhnn2quGuDvtxVirDtl8PwkJhJbxlCM",
  "status": "finished",
  "result": "https://qfs.dynamaker.com/jobs/5IhgHvhnn3quGuDvtxWirDtl4PwkJhJbxlCO/result"
}
2E. Get job result
Example request:
GET https://qfs.dynamaker.com/jobs/5IhgHvhnn3quGuDvtxWirDtl4PwkJhJbxlCO/result
The response will be the PDF data.
2F. Webhook
By including a callbackUrl when creating a job, QFS will send a POST request with the result to that URL when the job
has finished. If the job was successful, QFS will include success=true in the
URL parameters and the body
be the data produced by the job. If there was an error, success=false will be sent instead and the body will be a JSON
object including a message property.
- Successful example
Create job request
POST https://qfs.dynamaker.com/jobs
{
  "applicationId": "SaOrCvlMUl3",
  "environment": "test",
  "task": "generate-pdf",
  "callbackUrl": "https://mycompany.com/api/webhook?id=abc123",
  "configuration": {
    "height": 500,
    "width": 2000
  }
}
Responding webhook request
POST https://mycompany.com/api/webhook?id=abc123&success=true
<pdf data>
- Example where task name was misspelled
Create job request
POST https://qfs.dynamaker.com/jobs
{
  "applicationId": "SaOrCvlMUl3",
  "environment": "test",
  "task": "generate-pd",
  "callbackUrl": "https://mycompany.com/api/webhook?id=abc124",
  "configuration": {
    "height": 500,
    "width": 2000
  }
}
Responding webhook request
POST https://mycompany.com/api/webhook?id=abc124&success=false
{
  "success": false,
  "message": "'The task generate-pd' is not implemented in the DynaMaker application"
}
The REST API described in the section above can be used together with no-code solutions such as Microsoft Power Automate for easy integration.
DAS
Certain advanced CAD tasks may not be feasible to implement in the browser with TypeScript. However, you can still accomplish many such tasks within your DynaMaker product configurator by utilizing our Design Automation Service.
To get started with DAS, the first step is to enable its plugin in your product configurator's dashboard. This can be done by following these 3 simple steps:
-
Navigate to the Plugins section within your dashboard and locate the Design Automation Service plugin.
-
Open the plugin's Settings, enable it, and click on the Save button to save your changes.
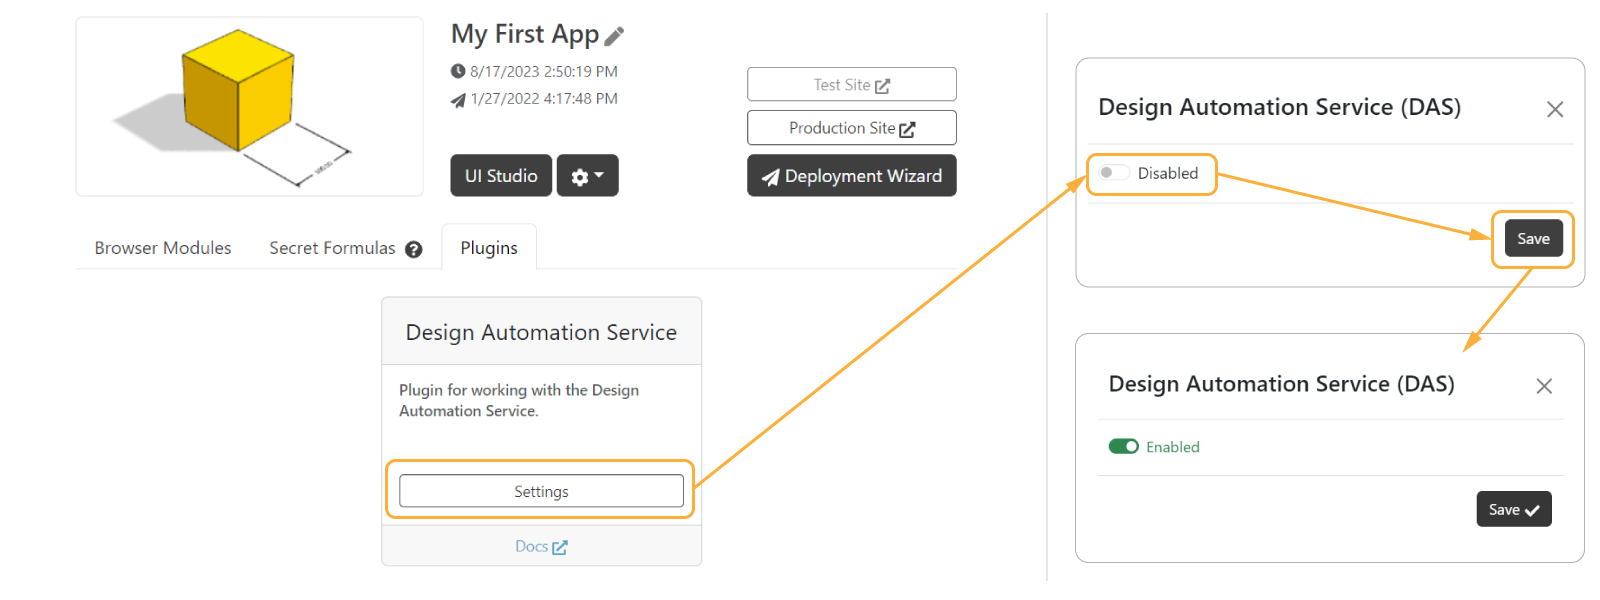
- Once the plugin has been enabled, you can access the
PLUGINS.DASnamespace and begin utilizing its functionality within your product configurator.
1. Generate STEP File
Depending on what you have in your geometry, you can generate STEP files in one way or another. Here we show a code snippet that demonstrates how to create a button that can be used to generate and download a STEP file in each way from:
-
geometry with 2 or more models that include static models with source STEP files (geometries made from
SKYCAD.ParametricModelcan be included or not), DAS must be used:const downloadSTEPButton = new SKYUI.Button('Download STEP', async () => {const assemblyComponent = ACTIONS.getAssemblyComponent()const geometry = assemblyComponent.generateGeometry()const stepData = await PLUGINS.DAS.generateSTEPFile(geometry)Studio.downloadFile('assembly.step', stepData)})Notice that there must be always 2 models present and one of them must be a static model to be able to use DAS.
-
geometry with 1 static model with no geometries made of
SKYCAD.ParametricModel, you can retrieve it directly from Files.const downloadSTEPButton = new SKYUI.Button('Download Door handle STEP', async () => {const doorHandleStepData = await fetchFileText(ASSETS.URLS.DOOR_HANDLE_STEP)Studio.downloadFile('model.step', doorHandleStepData)})async function fetchFileText(url: string) {const response = await fetch(url)return response.text()}Notice that the original STEP file will be used, meaning that it will keep its origin and the new possible position/rotation given to the static model will be lost.
-
geometry with no static models but 1 or more geometries made exclusively of
SKYCAD.ParametricModel, you can use the regular STEP exporter instead for that.
2. Reuse original STEP files
If you have the original STEP models and you want to use them in the export process through the DynaMaker plugin DAS, then you can add the STEP model as a source of said mesh model as follows:
const meshModel = new SKYCAD.MeshModel(ASSETS.URLS.MY_MODEL_GLB, { sourceUrl: ASSETS.URLS.MY_MODEL_STEP })
Doing so, the mesh model will be completely replaced by the original STEP model accounting for the instance position and rotation.