CPQ & E-commerce Systems
CPQ (Configure, Price, Quote) systems help manage product configuration, pricing, and quoting workflows. In DynaMaker the following standard plugins can be found:

Elfsquad
Connect product configuration data with dynamic visualizations and quote-ready attachments.

Tacton
Transform CPQ configurations into visualizations and customer-ready quote materials.

WordPress
Embed DynaMaker product configurators directly into WordPress websites using an iframe.

Custom (Embedding)
Embed DynaMaker product configurators into your own platforms with iframes

WooCommerce
Add DynaMaker product customization to WooCommerce stores.
Litium-Monitor
Connect ERP product data with DynaMaker visualizations and generated quote files.

Experlogix
Connect Experlogix configurations with DynaMaker visualizations and quote files.

Sailsrep
Connect AI-powered configurations with DynaMaker visualizations & quote files.

Shopify
Add DynaMaker product customization to Webbpartner e-commerce stores.
As for the greyed-out plugins above, reach support@dynamaker.com for information.
Elfsquad
Elfsquad CPQ is a software for eliminating all errors in the pre-production process, connecting the end customer to the product and production flawlessly. Configure, Price and Quote (CPQ) are the basic parts of the calculation- and quotation process. You can read more about how to use it in detail in their documentation.
In DynaMaker the Elfsquad CPQ software exists as a plugin and it is very easy to use! To explain how it works, we will go through:
1. Elfsquad Account
1A. Login
You need an account in Elfsquad to be able to use it in DynaMaker. You can use the same account for multiple product configurators. You can log in at https://login.elfsquad.io/.
There are some things that we need to do in the Elfsquad CPQ software before jumping into the DynaMaker product configurator. We will need 3 ids: Client, Secret and Model Ids.
1B. OpenId Client & Secret
To be able to connect any Elfsquad app with a DynaMaker product configurator, we need to create an ID. For this:
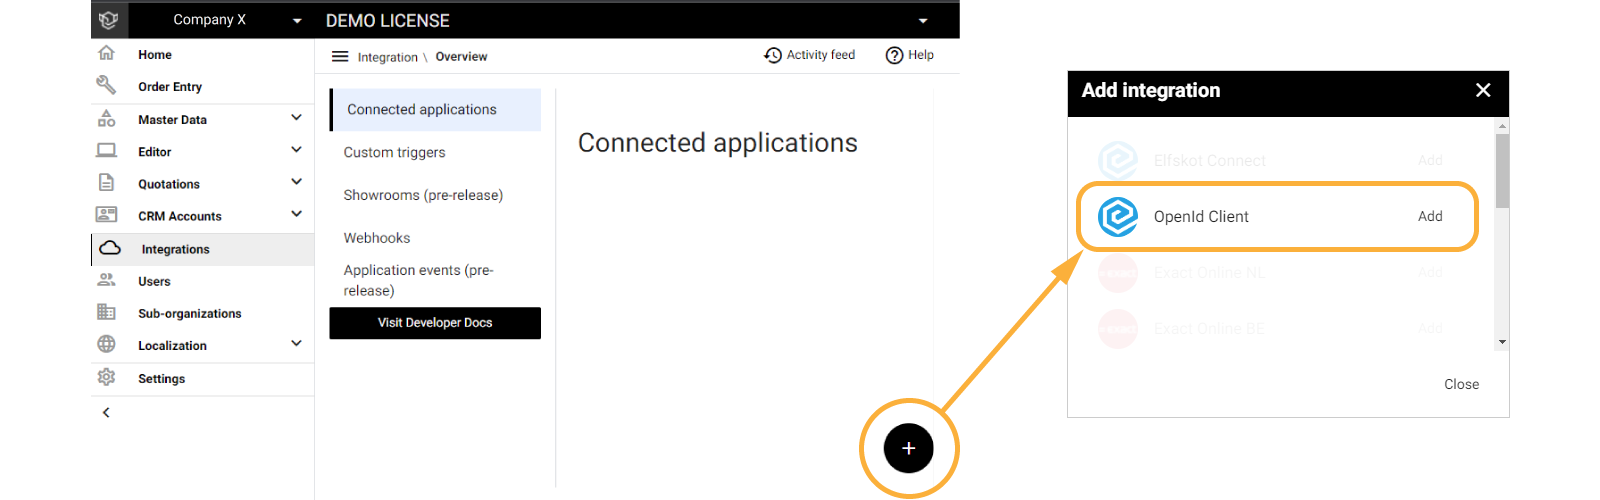
- In your Elfsquad account dashboard, go to Integrations.
- Under Connected applications, create an OpenId Client.
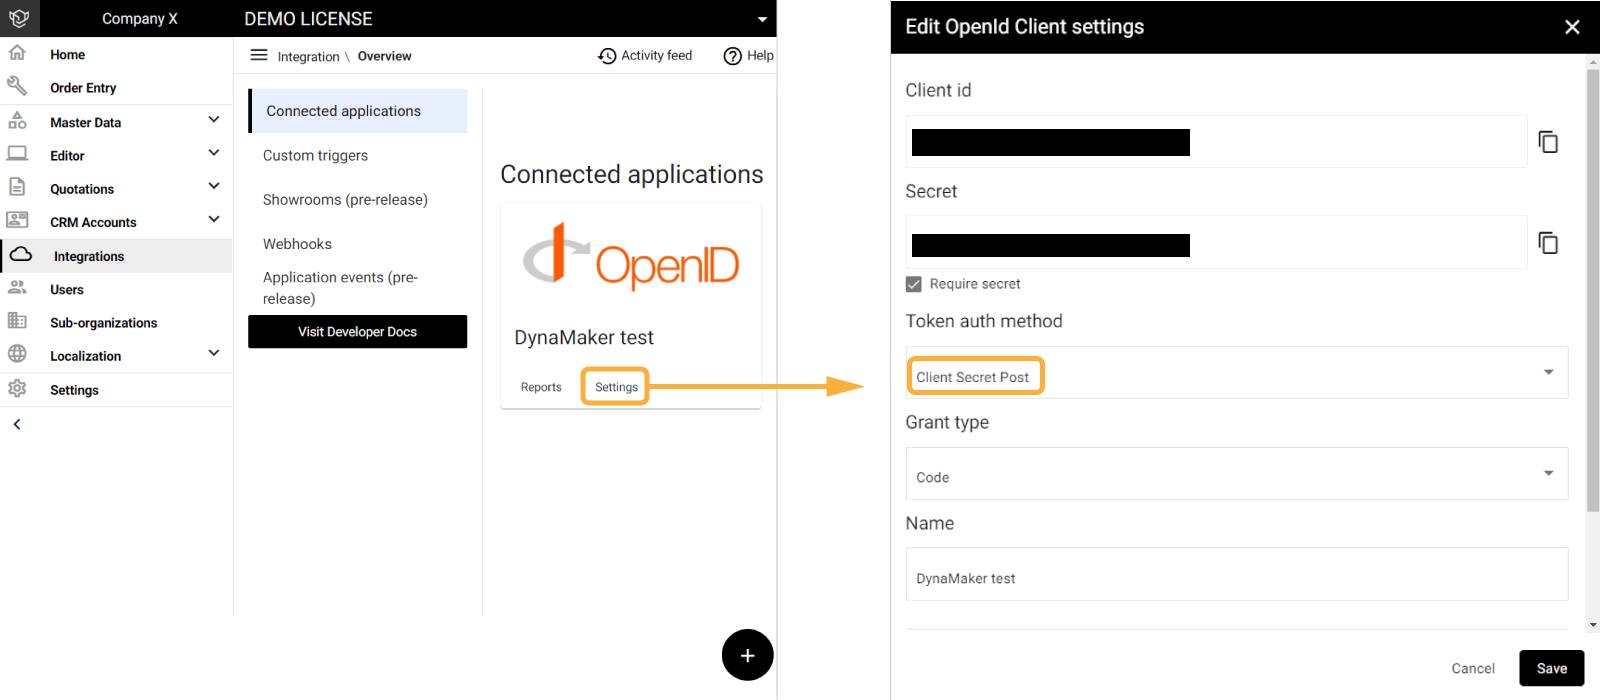
You can rename this OpenId Client if you want, but the most important things to keep for later are the Client Id and the Secret, which will be used in DynaMaker to enable the connection. Don't forget to select Client Secret Post under Token auth method.
1C. Feature Model Id
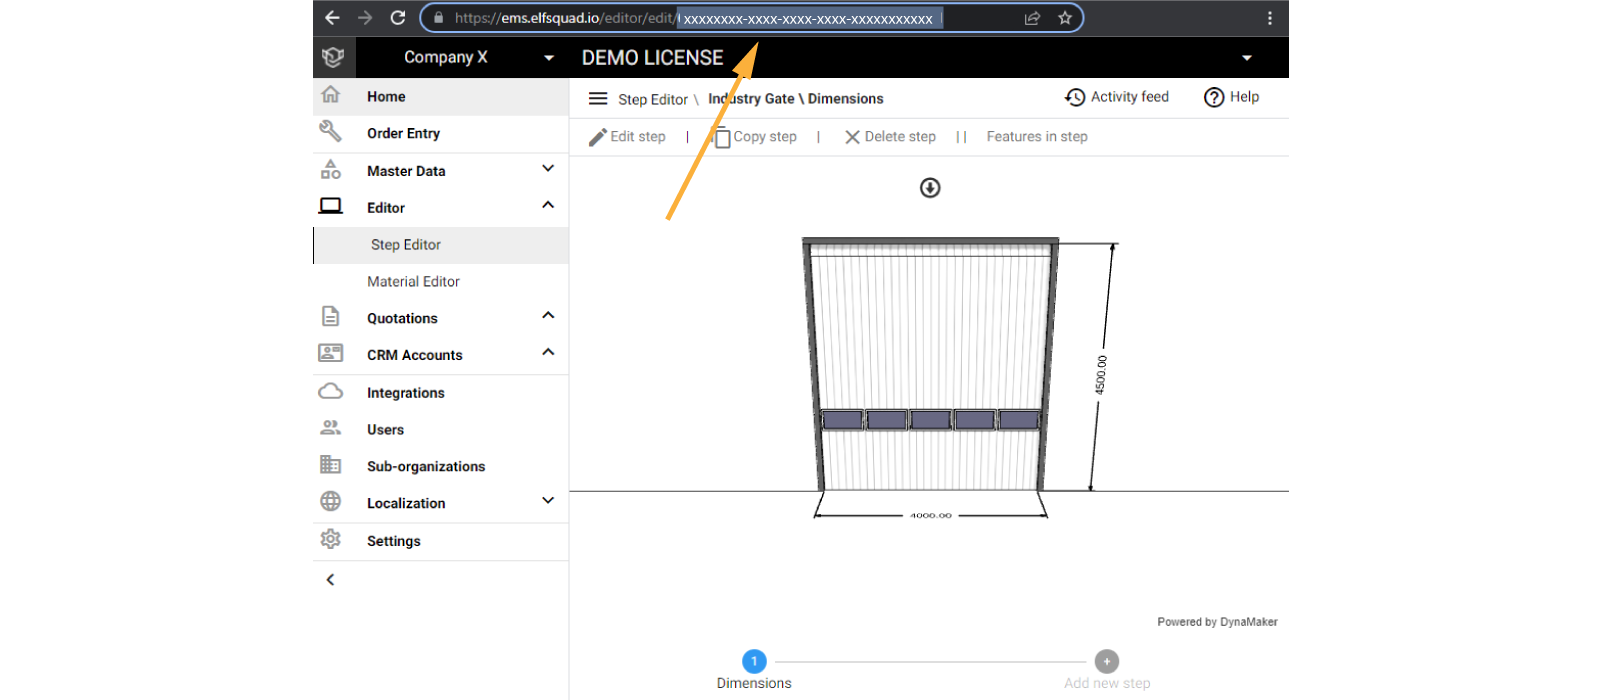
The Feature Model Id can be found in different places. For example, if you go into the Step Editor and select your
Elfsquad app to edit, you can find the Feature Model Id in the URL:
1D. Enable Third-Party Visualization
To visualize your DynaMaker product configurator in the Elfsquad app:
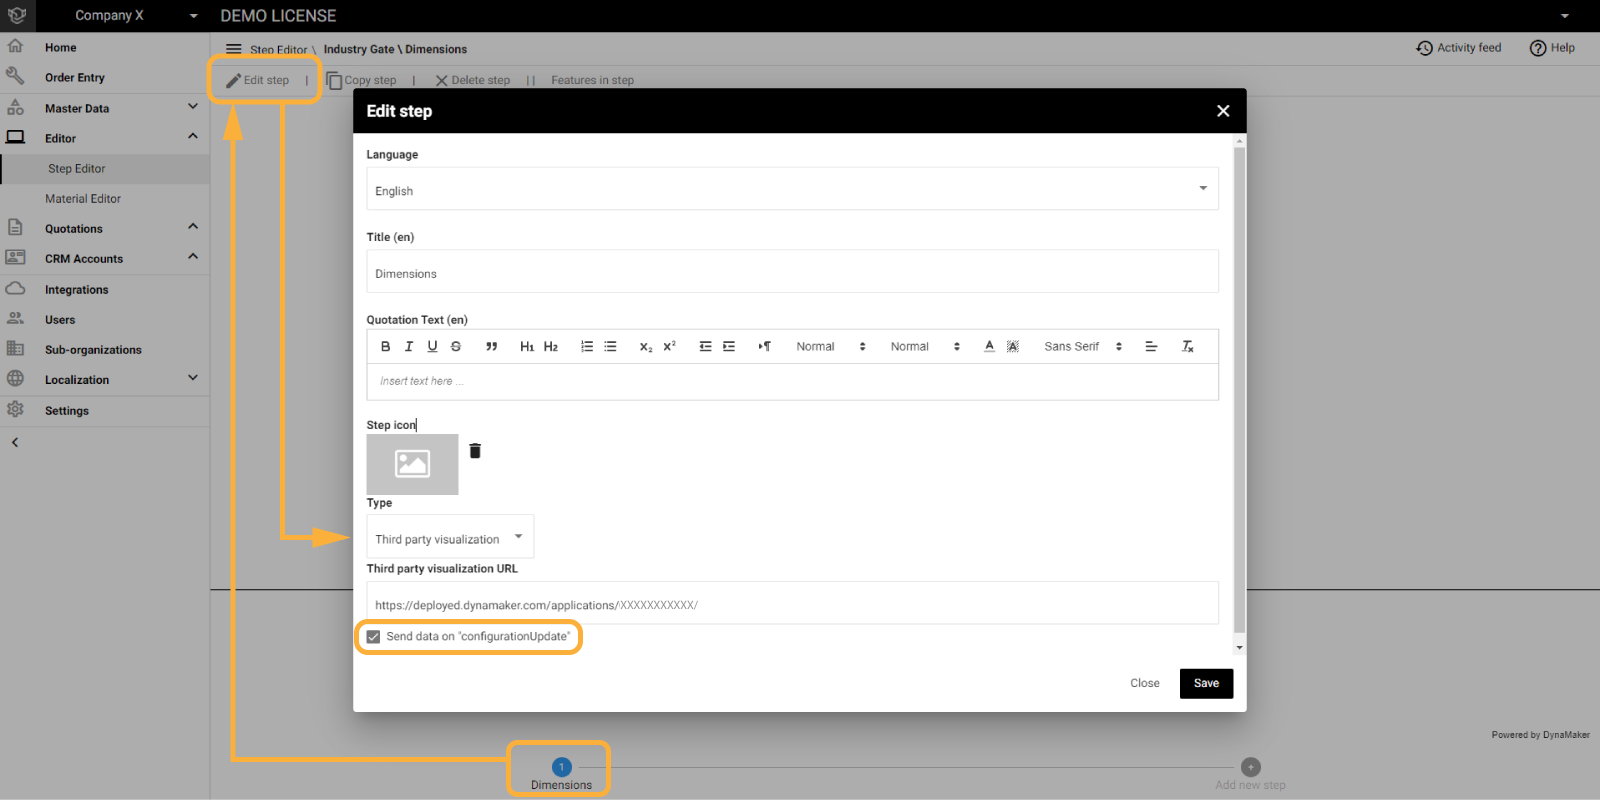
- In Editor/Step Editor, edit the Elfsquad app you want to add the DynaMaker product configurator to.
- Enable the Third-Party Visualization option.
- Add the link of the deployed product configurator in the field Third party visualization URL
- Check the box Send data on "configurationUpdate".
- Save your changes.
- Repeat all these in all Elfsquad app steps that you want to show the DynaMaker product configurator.
1E. Add Reference Values
As a last step in the Elfsquad plugin, you need to connect all the parameters in the Elfsquad app that you want to use in your DynaMaker product configurator. This is done automatically by the in-built plugin in DynaMaker only if those Elfsquad parameters have a reference.
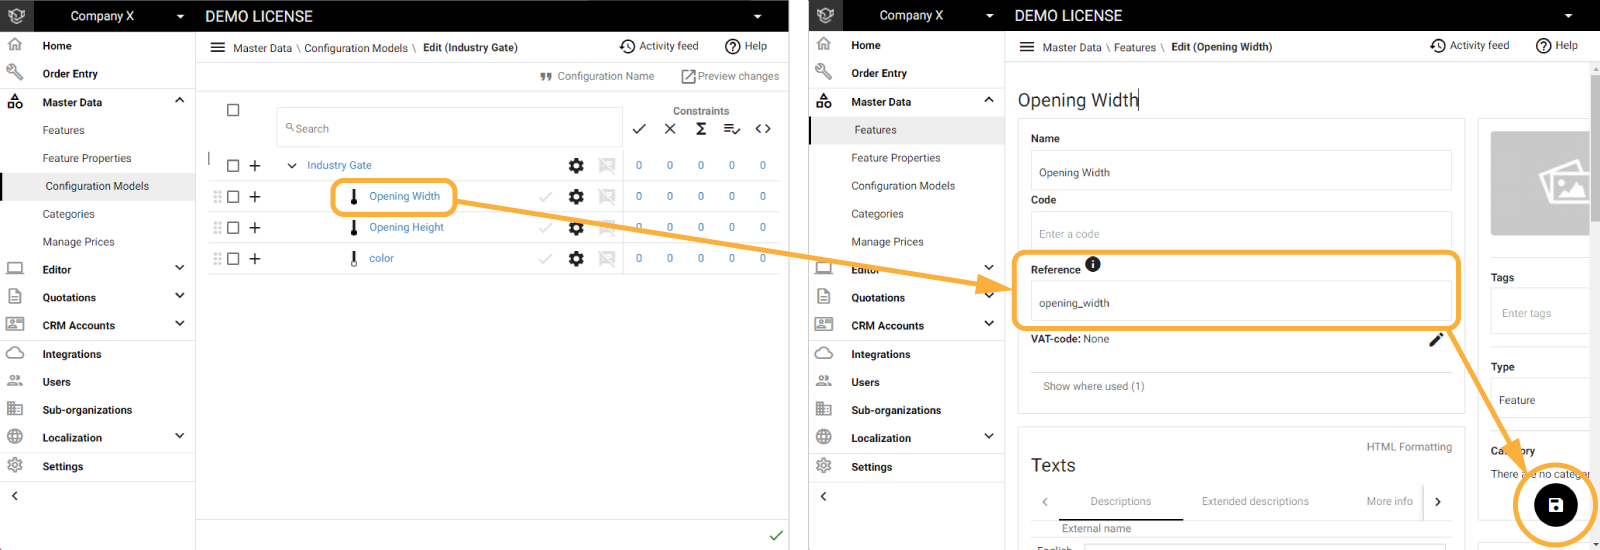
This reference will be the first part of the variable that is going to be used in DynaMaker, so choose a simple name
without any special characters. Try to use a consistent and code-friendly naming convention in all your variables, e.g.
OPENING_WIDTH, opening_width or openingWidth.
Since the reference field does not have to be unique across different features in Elfsquad, the variable name in DynaMaker will consist of the reference value and the node ID. The result will be something like this:
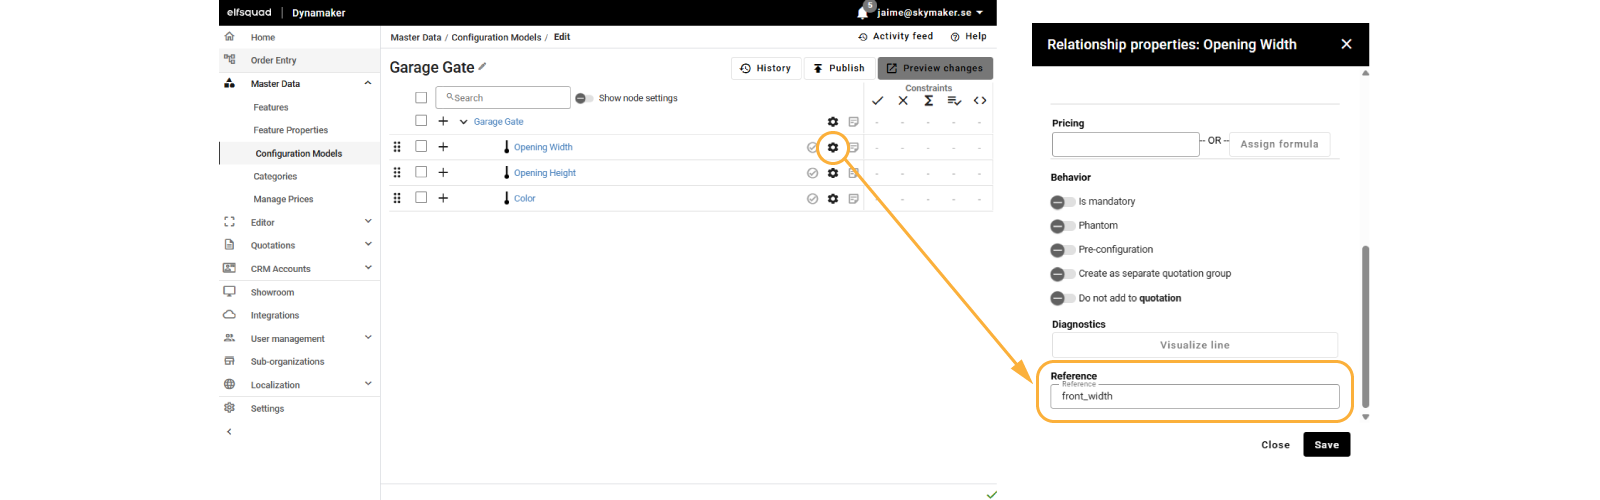
width_9c4a18ad_2d06_462a_97ff_29a90f056baa. Althoughwidthwould be a nicer variable name, this pattern enables the reuse of features in Elfsquad. If you reuse your width feature, it will have a unique ID appended each time, and thus you can differentiate between a door width and the total width for example.However you can actually set unique references even for existing features that can override the feature reference. So for the example below, the feature Opening width will come with the reference
front_widthinstead of the default autogeneratedopening_width_9c4a18ad_2d06_462a_97ff_29a90f056baa.
This would help when having the same existing feature reused. As example, imagine that you would have the same Opening width feature for the front and back wall. Then in DynaMaker you would get both features as e.g.:
opening_width_9c4a18ad_2d06_462a_97ff_29a90f056baaopening_width_f7b92cde_8a15_4f3b_b21d_6c83e9a4f5d2
Of course this doesn't help much, but if you fill the unique reference field for each feature individually, then they would become e.g.:front_widthback_width
It's recommended also to give a reference not only to the options of an Elfsquad dropdown parameter, but also to the
parent. For example if you have an Elfsquad parameter Size, whose options are Small (with reference small),
Medium (medium) and Large (large), you could add its reference as size. Later in DynaMaker you wouldn't need
to go through all the options but just to read the value of the parent, i.e. Size. Doing so the child reference
selected will be the value of the parent (as selectionGroups, explained later).
With this the Elfsquad app is ready to be used in DynaMaker. Now let's go into the DynaMaker product configurator and connect these parameters.
2. DynaMaker Plugin
2A. Enable Plugin
To enable the Elfsquad Plugin in DynaMaker, you need to:
- Open Settings of the plugin Elfsquad in your dashboard.
- Fill in the required fields with the Feature Model, Client and Secret Ids.
- Synchronized plugin
- Save plugin
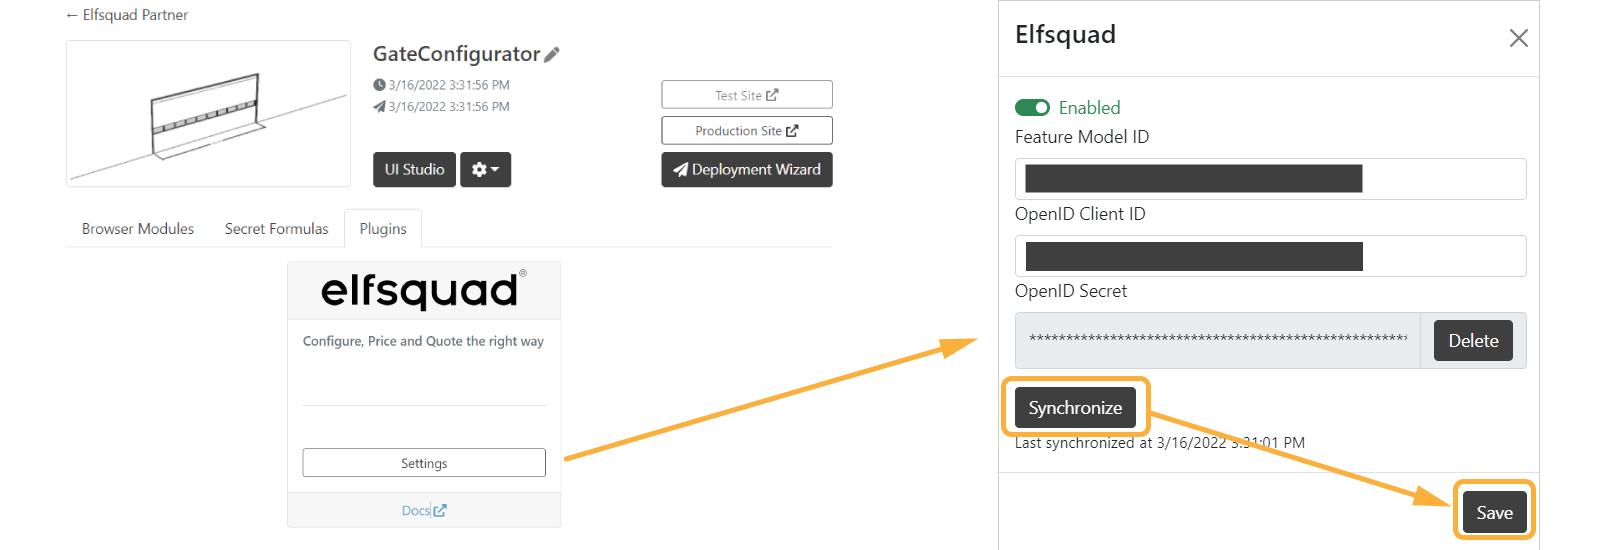
If the synchronization does not work, double check all the IDs and the secret.
Now this plugin will show up as a new import in your components and UI.
2B. Use Plugin in UI
The UI of the DynaMaker product configurator will be the bridge between the Elfsquad parameters and the components. In DynaMaker you can:
- Step 1. Read Elfsquad configurator changes
- Step 2 (Optional) Read Elfsquad step changes
- Step 3 (Optional) Send DynaMaker values to Elfsquad
Step 1 - Read Elfsquad configurator changes
- Go to the UI of your product configurator.
- Import
PLUGINSin edit/hide imports... at the top of the code editor as if it's a component. - Now that you can use
PLUGINS, call the functiononConfigurationUpdatefrom the plugin, which will be triggered automatically with every change in the Elfsquad app:
PLUGINS.ELFSQUAD.onConfigurationUpdate((parsedConfiguration, rawConfiguration) => {
  const assemblyComponent = ACTIONS.getAssemblyComponent()

  const oldHeight = assemblyComponent.getProperty('height')
  assemblyComponent.setPropertiesFromData(rawConfiguration) // function to create later in assembly

  const newHeight = assemblyComponent.getProperty('height')

  const needsUpdateCamera = oldHeight !== newHeight
  Studio.requestGeometryUpdate().then(() => {
    if (needsUpdateCamera) {
      Studio.setCameraToFitBounds({ travelTime: 750 })
    }
  })
})
Here for example we take
rawConfiguration(Elfsquad data) that we send to a new functionassemblyComponent.setPropertiesFromData()in which we handle all the Elfsquad parameter values. Additionally, we have added extra logic to detect if the propertyheightof the assembly has changed. If so, we update the camera accordingly. However, don't forget to update the geometry (Studio.requestGeometryUpdate()) or you won't see any changes.
You can also set the assembly properties directly in the function PLUGINS.ELFSQUAD.onConfigurationUpdate() and use
parsedConfiguration instead. However it might be cleaner to do it in the components that are being affected. It's up
to you how you want to do it, but if you use rawConfiguration and parse the data later (as we show in the next
section) you will be able to create presets directly with the raw data that Elfsquad is sending (very useful for finding
bugs in specific Elfsquad configurations).
Particularly, when reading images uploaded to the Elfsquad configurator, you need to make sure you get the proper data
to be able to assign it to a property in your component. Since loading a picture is async make sure to have the
function and its geometry-updates as async too:
PLUGINS.ELFSQUAD.onConfigurationUpdate(async (parsedData, rawData) => {
  const logoImageId = PLUGINS.ELFSQUAD.definition.values.logo_image_description_r7nxwevo_4932_mqtd_vbl6_hzcyf4knujpa.id
  const useLogoImage: boolean | undefined = data.values?.[logoImageId]?.selected // if having no picture is an option by not selecting said feature in Elfsquad
  const logoImageDataUrl: string | undefined = data.imageValues?.[logoImageId]
  const logoImage = useLogoImage && logoImageDataUrl ? await loadImage(logoImageDataUrl) : null
  assemblyComponent.setProperties({ logoImage })
  await Studio.requestGeometryUpdate()
}

function loadImage(imageDataUrl: string) {
  return new Promise<HTMLImageElement>((resolve) => {
    const image = new Image()
    image.onload = () => {
      resolve(image)
    }
    image.src = imageDataUrl
  })
}
If no picture is available, set these properties to
nullby default instead ofundefined, becauseassemblyComponent.setProperties({ logoImage: undefined })has no effect.
Step 2 - (Optional) Read Elfsquad step changes
When changing steps in the Elfsquad configurator, you can also read and perhaps show/hide a different visualization based on the step (e.g. basic visualization in initial steps compared to full geometry in the latest steps). For that use:
-
onStepChange()to react to step changes in Elfsquad:PLUGINS.ELFSQUAD.onStepChange((parsedData, rawData) => {console.log(`Step changed to '${parsedData.title}' with ID '${parsedData.id}'`)})
Step 3 -(Optional) Send DynaMaker values to Elfsquad
Sometimes it might be much easier to calculate certain things in DynaMaker and send them back to an Elfquad values, typically when mouse interaction is presented in the product configurator, or simply rules that don't need to be in Elfsquad at all. For that use:
updateConfigurationValue()to send back a value of a single feature to Elfsquad:PLUGINS.ELFSQUAD.updateConfigurationValue({id: PLUGINS.ELFSQUAD.definition.values.width_de87ac38_9450_3efb_ab1e_08da432e87a1.id,value: component.getProperty('width'), // number})updateConfigurationValues()to send back values of multiple features at the same time to Elfsquad:PLUGINS.ELFSQUAD.updateConfigurationValues([{id: PLUGINS.ELFSQUAD.definition.values.position_x_83t3rdss_7863_sgsf_zwg4_sdhts3xhasfg.id,value: component.getProperty('positionX'), // number},{id: PLUGINS.ELFSQUAD.definition.values.position_y_d9ouihju_9453_8rfv_s34v_sdfsr22e87a2.id,value: component.getProperty('positionY'), // number},])updateTextValue()to send back values of a single text-type feature to Elfsquad:PLUGINS.ELFSQUAD.updateTextValue({id: PLUGINS.ELFSQUAD.definition.values.motor_description_k9vmqpld_2817_lkue_zxq9_xbmrn8tpejwc.id,value: component.getProperty('motorDescription'), // string})updateImageValue()to send back values (here the image URL source as string) of a single image-type feature to Elfsquad:PLUGINS.ELFSQUAD.updateImageValue({id: PLUGINS.ELFSQUAD.definition.values.logo_image_description_r7nxwevo_4932_mqtd_vbl6_hzcyf4knujpa.id,value: component.getProperty('logoImage').src, // string})
2C. Use Plugin in Component
In case you want to have a cleaner UI and update the properties within the component itself, you could do it with the
previously mentioned function assemblyComponent.setPropertiesFromData().
- In your component, import
PLUGINSas if it's a subcomponent, - Create a
classfunctionsetPropertiesFromData()which could look like:
export class Component extends STUDIO.BaseComponent<Properties> {
  constructor() {
    // properties etc
  }

  setPropertiesFromData(data: PLUGINS.ELFSQUAD.ElfsquadConfiguration) {
    const result = PLUGINS.ELFSQUAD.parseConfiguration(data)

    const { selectionGroups, values, texts } = result

    const ralColor = selectionGroups['RAL_COLOR_4cb91b31_e7d5_43f7_bd1b_09f9cfa7b2cb']
    const openingWidth = values['OPENING_WIDTH_7d5e4750_e7dd_4c7a_9ec0_a3ddf7c8b79e']
    const hasDoor = values['HAS_DOOR_2a0b7cb6_f7d0_452e_b247_de20f556da8b']

    if (ralColor !== undefined) {
      // parameter dropdown with multiple choices
      this.properties.ralColor = ralColor
    }

    if (openingWidth !== undefined) {
      // parameter with input field
      this.properties.openingWidth = openingWidth.value
    }

    if (hasDoor !== undefined) {
      // parameter with checkbox (true or false)
      this.properties.hasDoor = hasDoor.selected
    }
  }

  // other functions like generateGeometry()
}
In this case we have shown 3 different types of parameters that are found in Elfsquad (there are more of course). The
most common ones are dropdowns, input fields and parameters with checkbox. These are represented by RAL_COLOR,
OPENING_WIDTH and HAS_DOOR respectively. If it's an assembly, remember to run this.update() at the end to
propagate the new properties to any possible subcomponent.
See that there are 5 sets of variables as a result of PLUGINS.ELFSQUAD.parseConfiguration(data):
-
selectionGroups: with all the parent features giving the child feature selected in each (e.g. like before, for a parent featureSizewith optionsSmall,MediumandLargethen one could directly get which size option has been selected through the parent asconst sizeSelected = selectionGroups['SIZE_4cb23b31_edsf_78f7_968b_09f9c645b2cb']). -
values: (most used) with the values of all Elfsquad features with references, includingselected: booleanto see if the value is selected or not. -
texts: with the values of those Elfsquad features that are purely a string (i.e. input text field). -
included: with the values of the Elfsquad configuration models as included that are used within the Elfsquad model (separated Elfsquad configuration models are not supported yet). -
dynamicGroups: with data regarding Elfsquad dynamic groups.
In order to make sure you use the same Elfsquad references, you could create a dataset or a set of constants with all the strings to make sure you don't misspell them. If the strings don't match, naturally the parameter will show up as
undefinedand could cause undesired bugs. So make sure you use the same references and use if-statements to check whether the values you are trying to get fromresultareundefinedor not. Alternatively, you could useconsole.warn()orconsole.log()to aid you when finding bugs. Don't forget to debug to see exactly what you are getting.
Notice that this plugin requires a matching setup in both DynaMaker and Elfsquad. So if you find problems of undefined variables, make sure to double-check the references, that the plugin is up-to-date (synchronized and saved) and the DynaMaker product configurator is enabled to be shown in the Elfsquad app (i.e. third-party visualization).
Of course, you can reach us at support@dynamaker.com if you feel that the problem comes specifically from the plugin.
2D. Hide UI
When the configurator is handled completely by Elfsquad, you might not need the tabs of DynaMaker anymore. To hide them entirely, you need to override the CSS in the product configurator in STYLE by adding:
.sky-toolbar-container {
  display: none;
}
This will only hide the tabs to the left (or right) of your product configurator. You could still add any other UI items, like a menu, QuickBar or metrics. You can read more about other CSS snippets here.
Tacton
The Tacton CPQ plugin brings helper functions and code completion for your Tacton product model to the DynaMaker editor. In order to explain how the plugin work, we will go through:
1. Prepare Tacton model
Create one or more groups in your Tacton model containing the values that you want the DynaMaker product configurator to
be able to access. The group name must include the string dynamaker (not case sensitive) to be available in
autocomplete in the DynaMaker editor.
2. DynaMaker Plugin
2A. Synchronization
To set it up, you can do it:
- i) manually via uploading the model (.tcx file)
- ii) automatically via server synchronization.
Step 1 - Manual File Upload
As an alternative to the automatic server synchronzation, you can do a manual upload of the model. If you don't already have the product model (.tcx file), you can download it from the Tacton CPQ admin interface. For that:
- Open the ticket that you want to target.
- Go to
Master Data > Products > YOUR_PRODUCT. - In
Attribute Valuesto the right, underModelclick onDownload.

Now that you have the file, you can upload it to the dashboard in DynaMaker.
- Go to Plugins in your dashboard and look for Tacton plugin.
- Choose File Upload, add your .tcx file & click on Save.
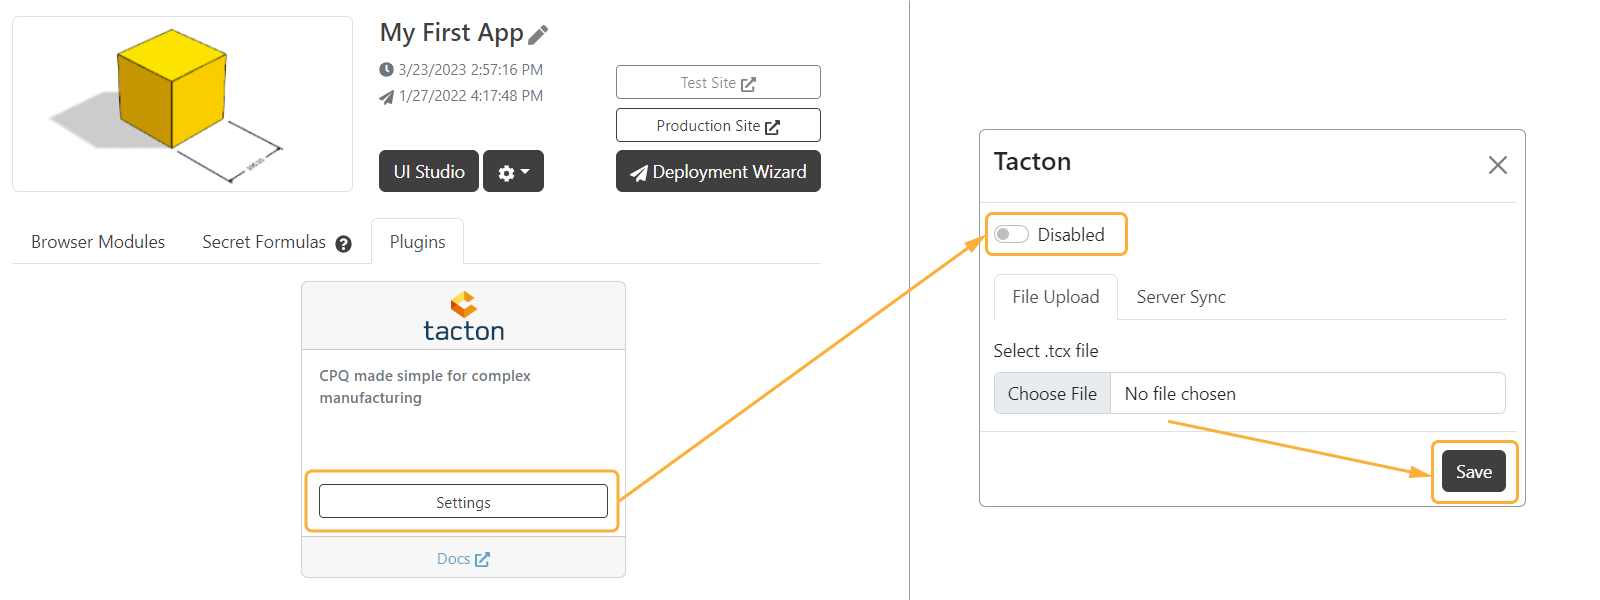
Step 2 - Automatic Server Synchronization
As an alternative to the manual upload, you can do a automatic server synchronization. For that you need to:
- Create Tacton CPQ API User
Create an API user for the DynaMaker integration in the ticket that you want to synchronize with. In the Tacton ticket
administration, go to Sales Process > Structure > Objects and Attributes > Users > Instances > Create User. Make sure
to set the API User field to Yes in the Attribute Values section.
- Allow Tacton model download
In the Tacton ticket administration, go to
Sales Process > Structure > Master Data Objects > Standard Objects > Product > Attributes > model and set Prevent
Download to No.
-
Fill in the fields in DynaMaker
-
Go to Plugins in your dashboard and look for Tacton plugin.
-
Choose Server Sync.
-
In Fill in URL, Ticket ID, Username and Password of your API user.
-
Click on Save.
-
Refresh the Product list and select the model that you want to sync with.
-
Click on Synchronize.
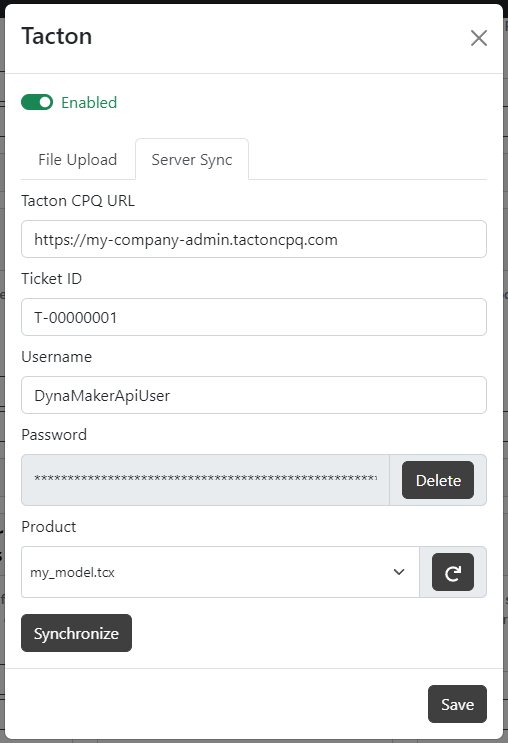
2B. Use Plugin in UI
The UI of the DynaMaker product configurator will be the bridge between the Tacton parameters and the components.
- Go to the UI of your product configurator.
- Import
PLUGINSin edit/hide imports... at the top of the code editor as if it's a component. - Now that you can use
PLUGINS, call the functiononConfigurationUpdatefrom the plugin, which will be triggered automatically with every change in the Tacton configurator:
PLUGINS.TACTON.onConfigurationUpdate((parsedConfiguration, rawConfiguration) => {
  const assemblyComponent = ACTIONS.getAssemblyComponent()

  const oldHeight = assemblyComponent.getProperty('height')
  assemblyComponent.setPropertiesFromData(rawConfiguration) // function to create later in assembly

  const newHeight = assemblyComponent.getProperty('height')

  const needsUpdateCamera = oldHeight !== newHeight
  Studio.requestGeometryUpdate().then(() => {
    if (needsUpdateCamera) {
      Studio.setCameraToFitBounds({ travelTime: 750 })
    }
  })
})
Here for example we take
rawConfiguration(Tacton data) that we send to a new functionassemblyComponent.setPropertiesFromData()in which we handle all the Tacton parameter values. Additionally, we have added extra logic to detect if the propertyheightof the assembly has changed. If so, we update the camera accordingly. However, don't forget to update the geometry (Studio.requestGeometryUpdate()) or you won't see any changes.
You can also set the assembly properties directly in the function PLUGINS.TACTON.onConfigurationUpdate() and use
parsedConfiguration instead. However it might be cleaner to do it in the components that are being affected. It's up
to you how you want to do it, but if you use rawConfiguration and parse the data later (as we show in the next
section) you will be able to create presets directly with the raw data that Tacton is sending (very useful for finding
bugs in specific Tacton configurations).
2C. Use Plugin in Component
In case you want to have a cleaner UI and update the properties within the component itself, you could do it with the
previously mentioned function assemblyComponent.setPropertiesFromData().
- In your component, import
PLUGINSas if it's a subcomponent, - Create a
classfunctionsetPropertiesFromData()which could look like:
export class Component extends STUDIO.BaseComponent<Properties> {
  constructor() {
    // properties etc
  }

  setPropertiesFromData(rawConfiguration: PLUGINS.TACTON.TactonData) {
    const result = PLUGINS.TACTON.parseConfiguration(rawConfiguration)

    const { dynamaker_strings, dynamaker_numbers } = result

    const ralColor = dynamaker_strings.ral_color
    this.properties.ralColor = ralColor

    const openingWidth = dynamaker_numbers.opening_width
    this.properties.openingWidth = openingWidth

    this.update() // in case there are subcomponents to update
  }

  // other functions like generateGeometry(), update(), etc
}
In the code above we show an example that there are some Tacton parameters that are already grouped in
dynamaker_strings and dynamaker_numbers (custom names given in Tacton) in which all the parameters are inside these
as example to differenciate numbers from strings, but of course you can have a single group (e.g. dynamaker_values)
with all the parameters. It's up to you how you want to customize this, but remember that if the Tacton model changes at
some point, the plugin must be synched again and you must fix all the broken connections between Tacton parameters and
properties, otherwise you will start getting errors and the Tacton configurator will have a broken DynaMaker
visualization.
WordPress
WordPress is an open-source platform used to build and manage websites. It supports many different site types through themes and plugins, with detailed guidance available in its official documentation.
In WordPress, DynaMaker exists as a plugin and it is very easy to use! Since everything is done within your WordPress account, all you need is follow these steps:
1. Install Plugin
First off you need to install the DynaMaker plugin through WordPress. You can find it under Plugins/Add New and search it with the keyword dynamaker.
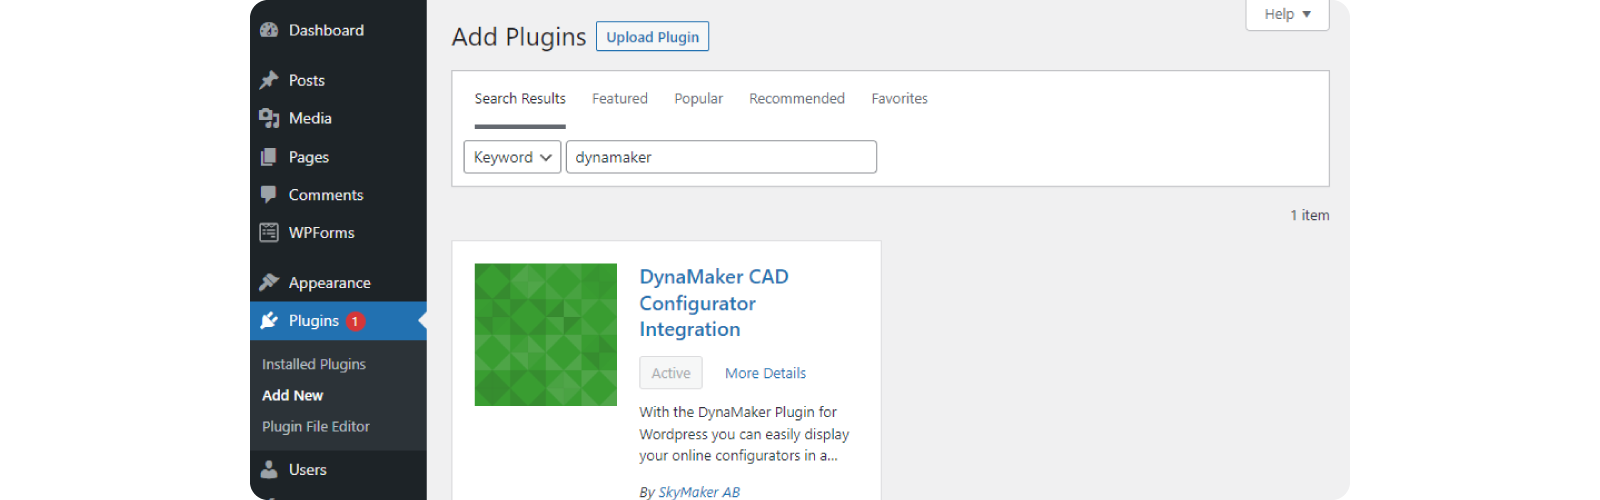
2. Use Plugin
Once you have installed it, you can use content blocks when you edit a page with the WordPress block editor. To embed your DynaMaker product configurator, choose the "DynaMaker iFrame" block
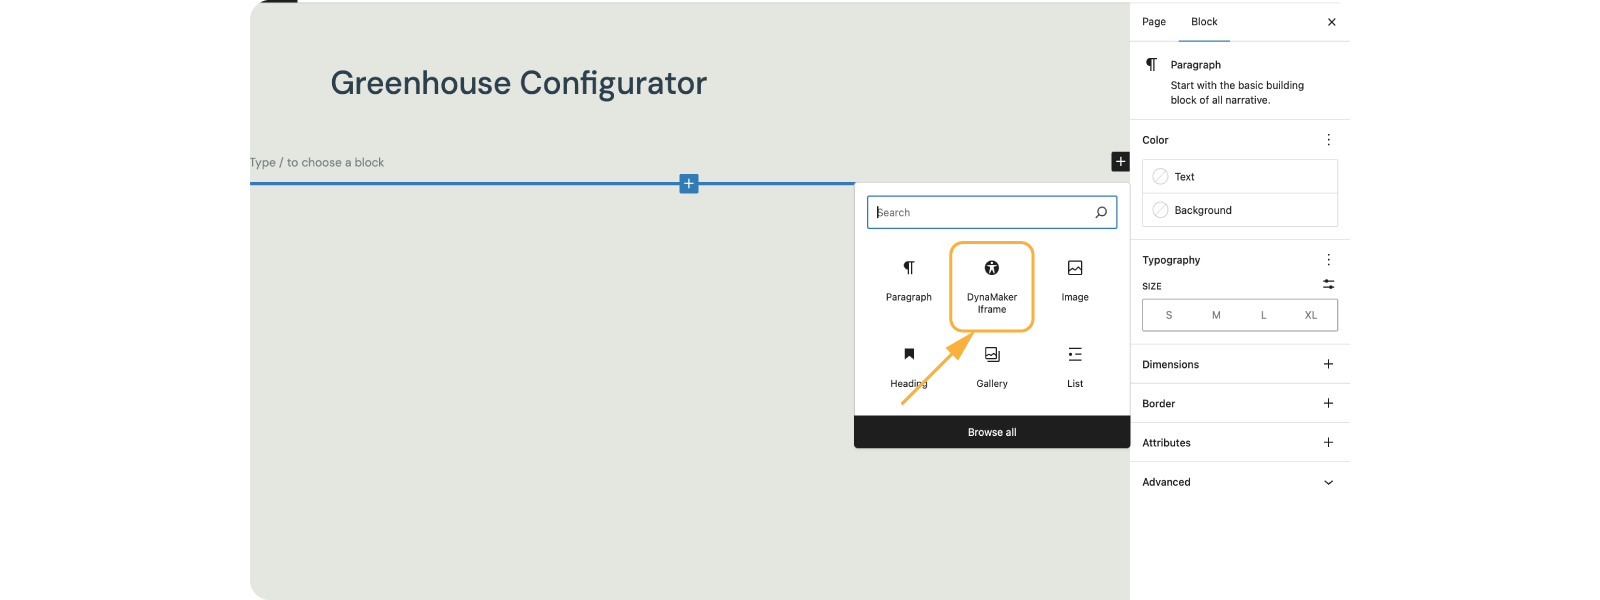
The only thing you need from DynaMaker is the product configurator ID. For example let's say it's v8tl3aDoiVo, which
can be found in the URL of the:
- Dashboard:
https://app.dynamaker.com/teams/YOUR_TEAM_ID/applications/v8tl3aDoiVo - Deployed Product Configurator:
https://deployed.dynamaker.com/applications/v8tl3aDoiVo/
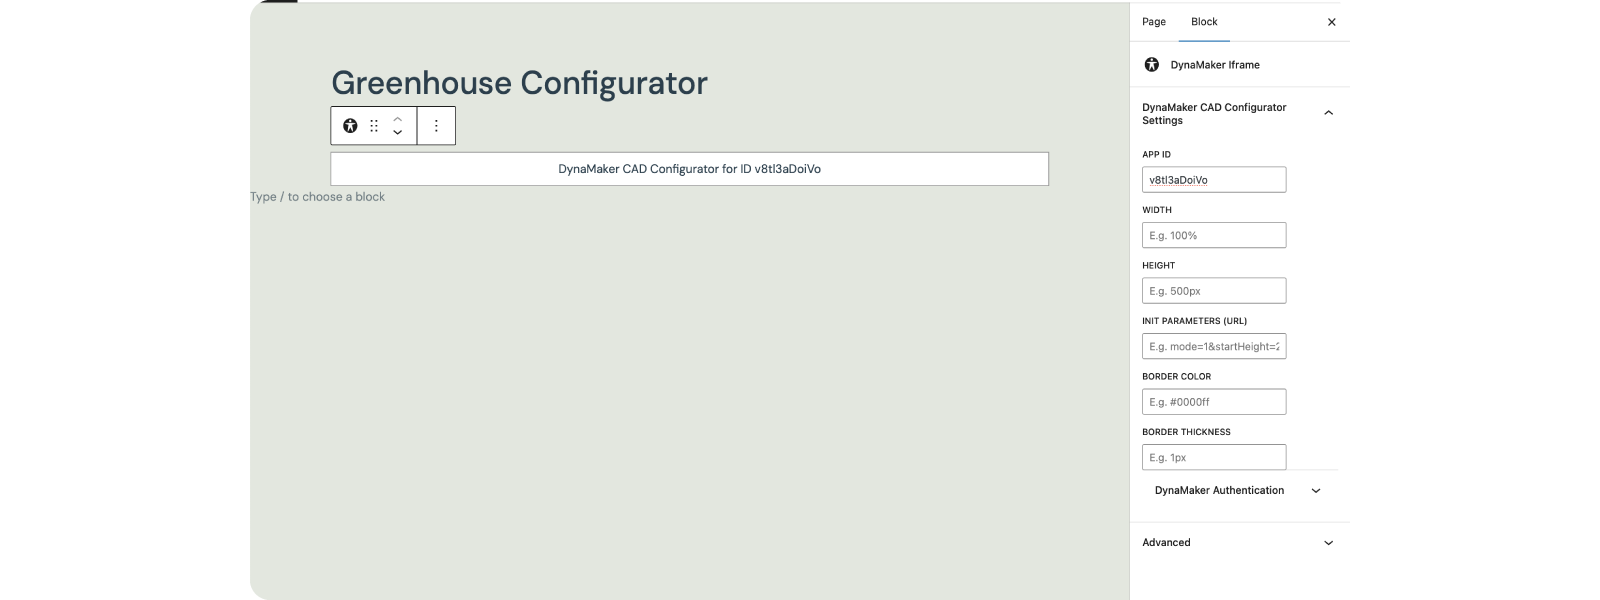
See that you can also change WIDTH and HEIGHT of the product configurator in your website, as if it was a regular iframe.
3. Preview Product Configurator
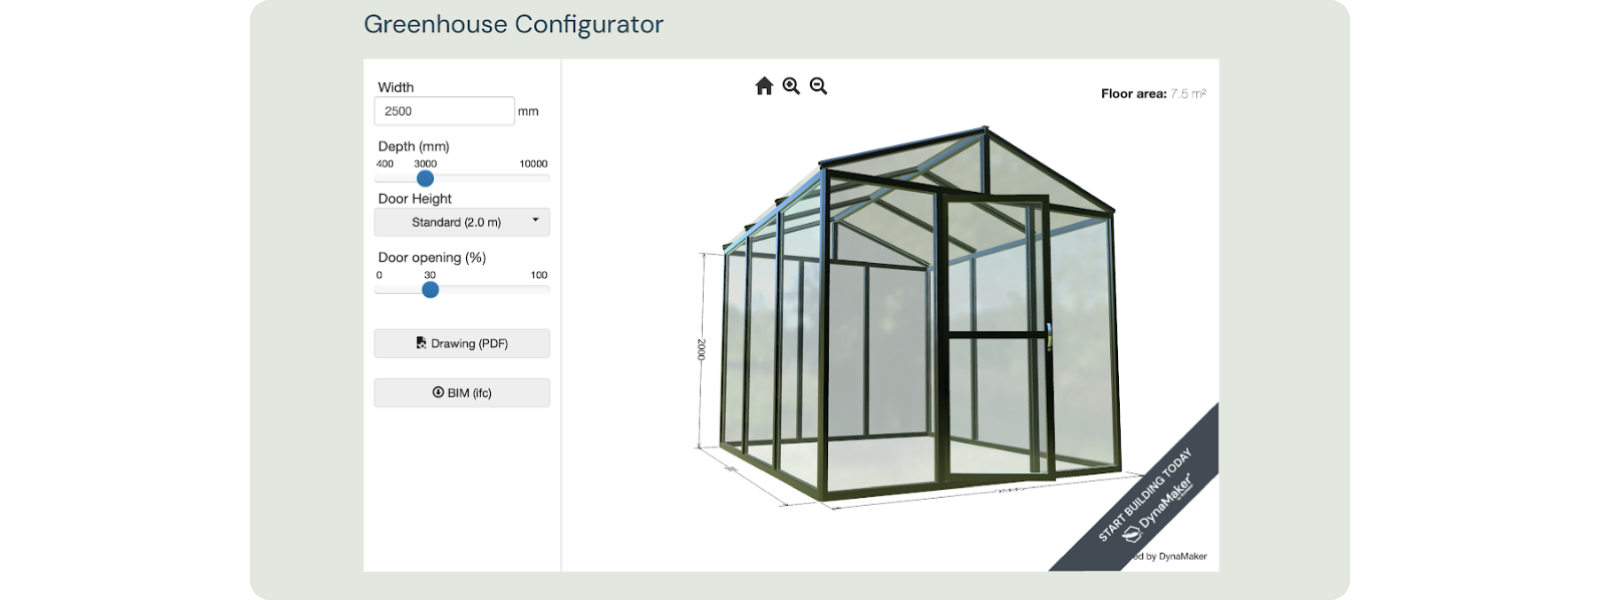
To see the results, preview the page to see your DynaMaker product configurator embedded in your website with the following result:
Custom (Embedding)
An iframe can be used to integrate a DynaMaker product configurator with your web page. In the simple case where you
just embed the product configurator, all you have to do is to set the src of the iframe element so that it points to
your project URL.
<iframe src="https://deployed.dynamaker.com/applications/bxI79qnVPLp/" width="100%" height="500px"></iframe>
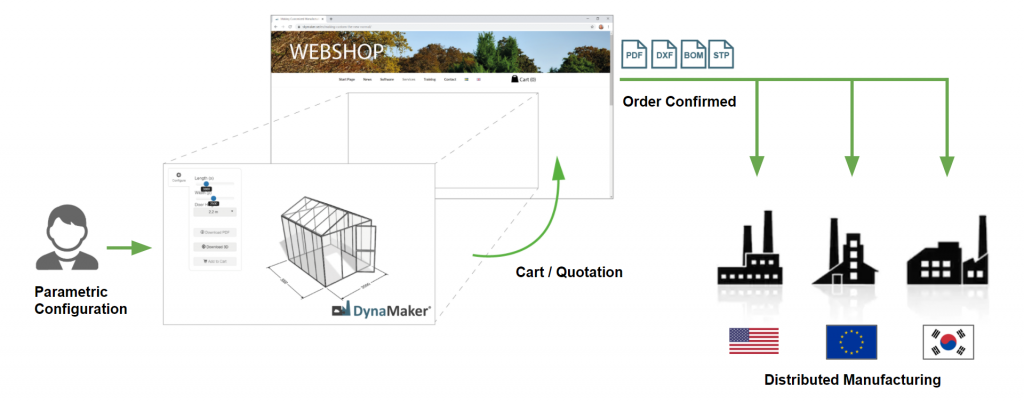
You can send information back and forth between your web page and the embedded product configurator by using the postMessage API. This is a very effective approach and best suitable when your integration (or part of it) does not require protected business logic to be done on the server.
A. Getting values from product configurator
Try changing the configuration of the bookshelf below! If everything works as expected, the values will be updated via
the postMessage API: Loading...
Below are code snippets that demonstrate how to retrieve and communicate configuration values between the parent window and an embedded product configurator. These code snippets facilitate the exchange of configuration data between the parent window and the embedded product configurator, helping you display and capture user-customized product specifications on your website.
- Code in the parent window:
In the parent window, you can use the following code to capture and display configuration values from the embedded product configurator. This code listens for messages from the product configurator and updates the displayed values accordingly.
// 1. Add an event listener to listen for messages from the configurator
window.addEventListener(
  'message',
  (event) => {
    // 2. Ensure that the message is coming from a trusted source
    if (event.origin === 'https://deployed.dynamaker.com') {
      // 3. Show event received in Console (DevTools, F12)
      console.log('Data received:', event.data)
    }
  },
  false,
)
- Code in the embedded product configurator:
In the embedded product configurator, use the following code to send the configuration values back to the parent window. This code ensures that the values are only sent when they are valid.
// Use the configurator's method to add a completion callback
configurator.addCompletionCallback((valid, values) => {
  // Check if the configuration is valid
  if (!valid) return

  // Check if the configurator is embedded in a different window
  if (window.parent !== window) {
    // Send the configuration values to the parent window as JSON
    window.parent.postMessage(values, '*')
  }
})
B. Sending values to product configurator
You may need to send updated configuration values to the embedded product configurator from your parent window. This enables the product configurator to reflect any changes made by the user or your application. Below, we provide code snippets demonstrating how to achieve this.
The appearance of the standard DynaMaker UI can be changed (or hidden) completely in the UI-editor tab with some CSS snippets in STYLE. Other UI items (i.e. menu, quickbar or metrics) could be added too to enhance your integration!
- Code in the parent window:
In the parent window, you can send updated values to the embedded product configurator using the following code:
// Get references to relevant elements and the configurator iframe
const iframe = document.getElementById('configurator-iframe')
const widthInput = document.getElementById('widthInput')
const depthInput = document.getElementById('depthInput')
const heightInput = document.getElementById('heightInput')

// Define a function to send updated values when inputs change
const onChange = () => {
  const dataToSend = {
    type: 'dynamaker.onConfigurationUpdate',
    configuration: {
      width: Number(widthInput.value),
      depth: Number(depthInput.value),
      height: Number(heightInput.value),
    },
  }

  iframe.contentWindow.postMessage(dataToSend, '*') // Send the updated properties to the configurator
}

// Attach the onChange function to input change events
widthInput.addEventListener('change', onChange)
depthInput.addEventListener('change', onChange)
heightInput.addEventListener('change', onChange)
- Code in the embedded product configurator:
In the embedded product configurator, you can listen for messages from the parent window and update the product configurator's state accordingly:
// Add an event listener to listen for messages from the parent window
window.addEventListener('message', (event) => {
  if (event.data?.type === 'dynamaker.onConfigurationUpdate') {
      const properties = event.data.configuration
      myComponent.setProperties(properties) // Send properties to main component
      Studio.requestGeometryUpdate() // Request a geometry update to reflect the changes
    } catch (error) {
      console.error(error)
    }
  }
})