DynaMaker Tools
When extending your DynaMaker product configurators with built-in functionality, you can use ready-to-use tools that enhance product configurator flexibility and user experience. The standard plugins available for that are the following:

Translation
Add effortless multi-language support to your product configurators.
URL Parameters
Take advantage of your product configurator's URL to get the most out of it.

Google Bucket
Access files from your Google Cloud Storage buckets directly within your product configurators.

Product Information Management
Import product data from spreadsheets.
As for the greyed-out plugins above, reach support@dynamaker.com for information.
Translation
In DynaMaker it is possible to switch the language of your product configurator via the plugin Translation.
In order to explain how it works, we will go through the plugin. In order to be able to use the plugin you need to:
1. Prepare TSV File
All you need for the plugin is a TSV (tab-separated values) file containing all the words needed in rows, having their translation in other languages in columns.
The plugin Translation can be found with the rest of the plugins under the dashboard tab Plugins. Then you can download a template that can be found in Settings of the plugin to check how a TSV file should look like:
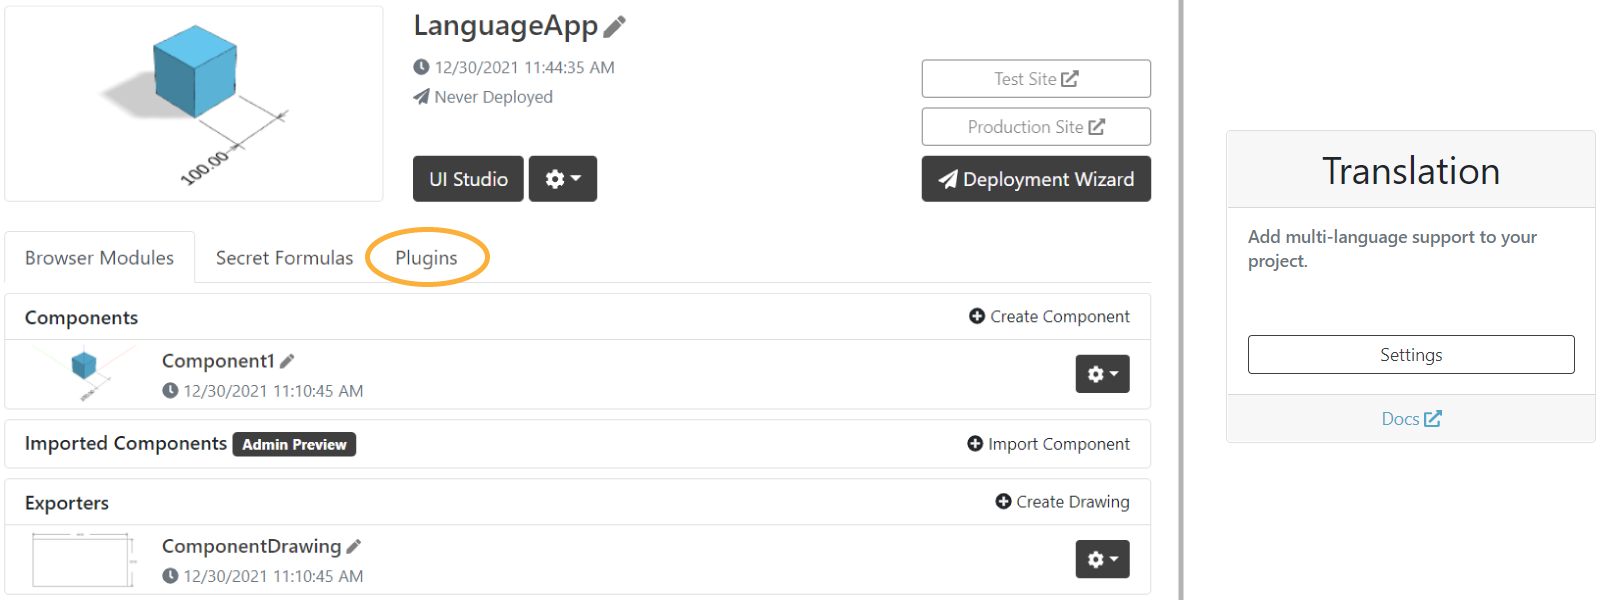

This file then should have all the words that will show up in the product configurator (e.g. parameter & button labels, metrics, etc). We take the default DynaMaker project template as example so you can try it out. About the TSV file:
- KEY has to be at the top of the column with the keys that are going to be used in DynaMaker
- same applies for the languages: e.g. EN at the top of the column for the words in English, SV for Swedish, ES for Spanish.
- language words can contain spaces and any other special character.
- Use strings (short and in upper case for convenience) as DynaMaker key words to get intellisense.
Here is the example that is going to be used in the product configurator (you can download the file here):

Once you have the file prepared, it's time to upload it.
2. Upload File
Simply upload your file to the plugin through Settings as seen before. Once uploaded, you will see a preview of it. Notice that the plugin will detect automatically which language is each column according to the keys used for each language. Don't forget to Save to apply changes.
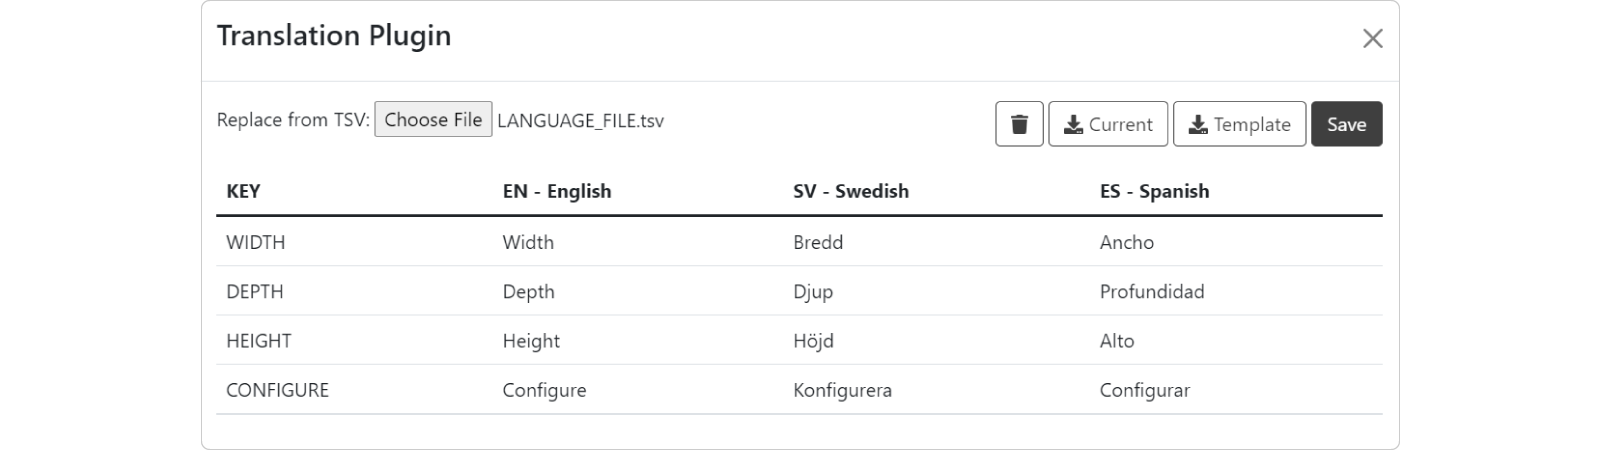
Some example of language keys: EN (English), SV (Swedish), ES (Spanish), FI (Finnish), NO (Norwegian), UK (Ukrainian).
If you find that a special character is not shown properly in the preview or UI of your DynaMaker product configurator, contact us at support@dynamaker.com and we will add it to the font used in DynaMaker.
3. Import Plugin
To be able to use the plugin, you need to import PLUGINS in whatever component-, product configurator- or Drawing Editor you need it, in the same way as you would do it with subcomponents or ASSETS.
In the default product configurator, we see labels that are coming from both the UI (e.g. tab Configure) and from the parameters of the configuration model of the default component. We will import the plugin in both places, like:

In PLUGINS.TRANSLATION you can find:
Languagewith all the available languages in your TSV file (EN,SVandEShere).TEXTwith all keys from the column KEYS of your TSV file (HEIGHT,DEPTH, etc).getLanguage()to get the current language used in the product configurator (ENby default)setLanguage(PLUGINS.TRANSLATION.Language.ES)to set the language of the product configurator to Spanishlanguageswith the list of all the available languagessetUrlKey('myAppLanguage')to change the default URL key (lang) tomyAppLanguage- we will see how this works later
Great! Let's go with the default product configurator template to see how we can use it.
4. Use Plugin
Now that the plugin is imported correctly, you can use it to replace all the labels that will show up in the product configurator:
// COMPONENT / PARAMETERS
const widthParameter = SKYPARAM.generateSlider('width', `${PLUGINS.TRANSLATION.TEXT.WIDTH} (x)`, {
  ...
})

const depthParameter = SKYPARAM.generateInputParameter('depth', `${PLUGINS.TRANSLATION.TEXT.DEPTH} (y)`, {
  ...
})

const heightParameter = SKYPARAM.generateDropdown('height', `${PLUGINS.TRANSLATION.TEXT.HEIGHT} (z)`,
...
)
// UI
export function onInit() {
  Studio.setTabs([
    new SKYUI.Tab({
      title: `${PLUGINS.TRANSLATION.TEXT.CONFIGURE}`,
      designStep: CONSTANTS.DESIGN_STEP.CONFIGURE,
      icon: 'cog',
      onInit: () => {
        ...
      },
    })
  ])
}
Perfect! Now the labels are connected to the plugin and its language, we can test it right away. We can switch language through:
-
i) the URL by adding
?lang=ESto the URL of your product configurator.This makes it ideal when working with iframes if they are connected somehow with the language of your website. As an example within the product configurator editor:
https://app.dynamaker.com/application-maker/YOUR_APP_ID/?lang=ES
You can change the default URL key of the language
langto anything else by using the built-in function of the pluginPLUGINS.TRANSLATION.setUrlKey('anythingElse'). -
ii) an action by using
PLUGINS.TRANSLATION.setLanguage(PLUGINS.TRANSLATION.Language.SV).Simply add this line to the action of a button, tab or even callback of a configuration model. The plugin will automatically take care of updating the labels. Depending on where the action takes place, you might need to reload the tab to apply changes with
Studio.reloadActiveTab(), similarly toStudio.requestGeometry()for the geometry.This method is ideal when we want to keep the ability to change the language (e.g. in a configuration model with a dropdown through a parameter).
URL
In DynaMaker it is possible to get certain data directly from the URL of your product configurator. This can be done easily with the plugin URL Parameters:
1. Set Up Plugin
In order to set up the plugin you need to enable it and then import it where it is going to be used.
1A. Enable Plugin
Enable the plugin under the tab Plugins of your dashboard
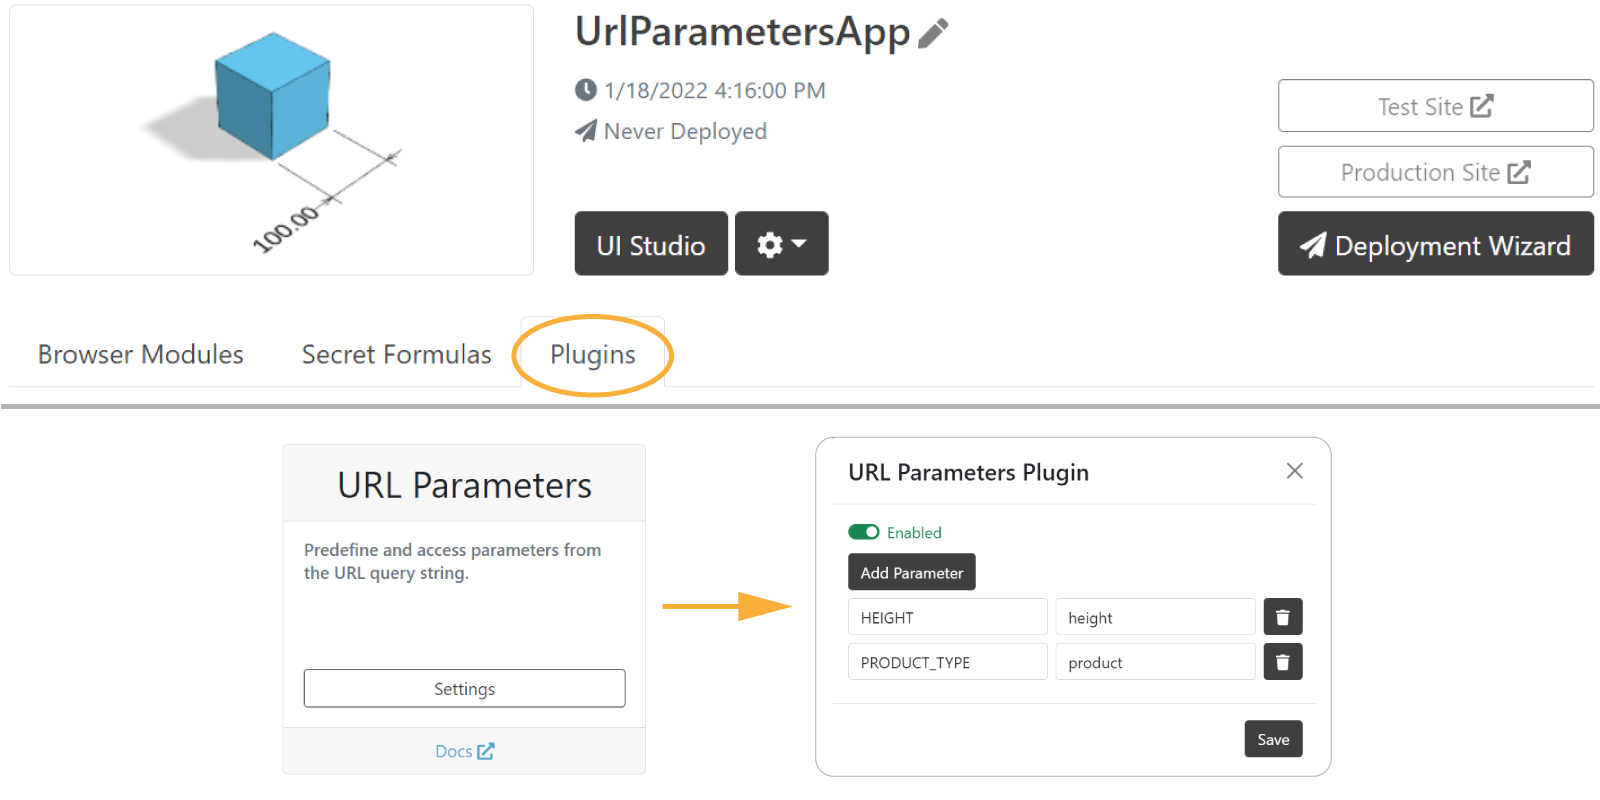
See that the plugin is asking for parameters which should have:
PARAMETER_IDused in the product configurator editor when coding.urlKeyused directly in the url of your product configurator.
1B. Import Plugin
Once you saved your changes, you need to import the plugin wherever it is used (typically in the product configurator).

Great! Now it is ready to use.
2. Fetch Data from URL
As an example we have created two URL parameters:
PRODUCT_TYPEmeant to change the color of the cubeHEIGHTmeant to change the height of the cube
As you notice in the product configurator of the project template, the component of your product configurator is first created in
COMPONENTS, within initComponentHandler(). Since we might have an URL prepared already with the product
and height selected, the plugin can be used in the following way:
export function initComponentHandler(handler: STUDIO.ComponentHandler) {
  const { HEIGHT, PRODUCT_TYPE } = PLUGINS.URL_PARAMETERS
  const color = PRODUCT_TYPE !== undefined ? getColor(PRODUCT_TYPE) : 0x53a5c7
  const height = HEIGHT !== undefined ? Number(HEIGHT) : 100

  const component = new COMPONENT1.Component()
  component.setProperties({ color, height })

  handler.add(component)
}

function getColor(PRODUCT_TYPE: string) {
  switch (PRODUCT_TYPE) {
    case 'red':
      return 0xff0000
    case 'green':
      return 0x00ff00
    case 'blue':
      return 0x0000ff
    default:
      console.warn(`Product ${PRODUCT_TYPE} not found; returning default color.`)
      return 0xffffff
  }
}
Make sure to handle
undefinedurl keys that can break your component.
Now that the component is connected to the URL, you can test your product configurator right away in the UI Editor without publishing. Some URL examples:
https://app.dynamaker.com/application-maker/YOUR_APP_ID/?product=red
https://app.dynamaker.com/application-maker/YOUR_APP_ID/?height=300
https://app.dynamaker.com/application-maker/YOUR_APP_ID/?product=green&height=150
https://app.dynamaker.com/application-maker/YOUR_APP_ID/?height=300&product=blue
You can also try these changes with the following prepared product configurator:
https://deployed.dynamaker.com/applications/test/97QOOTIop8i/
Don't forget ? before the url keys!
Google Bucket
Google Cloud Service provides file storage in Buckets. When you enable and synchronize the plugin, it will enable you to get the URL of all files stored in the bucket to use in your product configurator. This is useful when you have a large amount of static assets, need to orginize your static assets in a folder structure or easily need to replace static assets during the development of the product configurator.
Note that the bucket must be public to internet in order to get the DynaMaker product configurator to work.
1. Google Cloud Service Account
1A. Create a bucket
- Read more in their guide: https://cloud.google.com/storage/docs/buckets.
- Remember to make your Bucket public to internet.
It is good practice to use the role Storage Legacy Object Reader, this will prevent public users from listing the content of your Bucket.
1B. Set CORS policy for bucket:
- Read more in their guide: https://cloud.google.com/storage/docs/using-cors
- Example-policy:
[{"origin": ["https://app.dynamaker.com", "https://deployed.dynamaker.com"],"method": ["GET"],"responseHeader": ["Content-Type"],"maxAgeSeconds": 3600}]
1C. Create service account
Create a service account to use when connecting the product configurator to the Bucket.
- Read more about it here: https://cloud.google.com/iam/docs/service-accounts-create.
You will receive a JSON-file containing the account key, make sure to keep this safe!
2. DynaMaker Plugin
2A. Enable Plugin
Once you have your account key:
- Go to your dashboard, under Plugins, look for the plugin Google Bucket.
- Fill in the name of your bucket, paste the account key you got from Google, enable the plugin and save.
- Press Synchronize to synchronize your product configurator to your Bucket.
2B. Use Plugin
-
Go to a Component Container of your product configurator.
-
Import
PLUGINSin edit/hide imports... at the top of the code editor as if it's a subcomponent. -
Use
PLUGINS.GOOGLE_STATIC.getUrl('my_file.glb')to get the URL of the file that can be sent as input toSKYCAD.MeshModel(), which is the equivalent of a static 3D, as shown in the example below:generateGeometry() {const geometryGroup = new SKYCAD.GeometryGroup()const url = PLUGINS.GOOGLE_STATIC.getUrl('Table.glb')const model = new SKYCAD.MeshModel(url)geometryGroup.addGeometry(model, { scale: 1000 })return geometryGroup}