Low Code Automation
When automating your workflows and connecting DynaMaker with external services, you can use the available automation tools to streamline processes, trigger actions, and manage communication. The standard plugins available for that are the following:

Power Automate
Automate CAD workflows using configurable Power Automate flows.

Sendgrid
Automatically send quote emails with generated DynaMaker files attached.
CloudConvert
Convert files between different formats to support flexible workflows within your product configurators.

Zapier
Automate workflows by connecting DynaMaker with Zapier.
As for the greyed-out plugins above, reach support@dynamaker.com for information.
Power automate
Microsoft Power Automate allows you to automate workflows between your systems and services. With the Power Automate plugin in DynaMaker, you can trigger Power Automate flows directly from your DynaMaker product configurator, sending data such as quotation forms, drawings and images. This enables you to integrate your DynaMaker product configurator with hundreds of other services, such as ERP, CRM, and more.
In this guide, we will go through:
1. Power Automate Setup
1A. Create a Power Automate Flow
- Sign in to Power Automate or create an account if you don't have one yet.
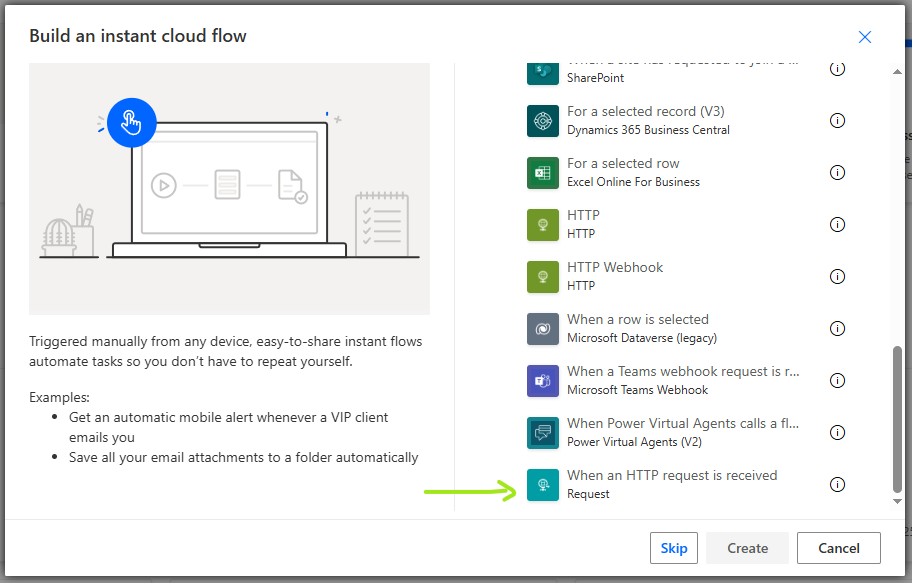
- Create a new instant cloud flow with a "When an HTTP request is received" trigger.
1B. Get the Flow HTTP Trigger URL
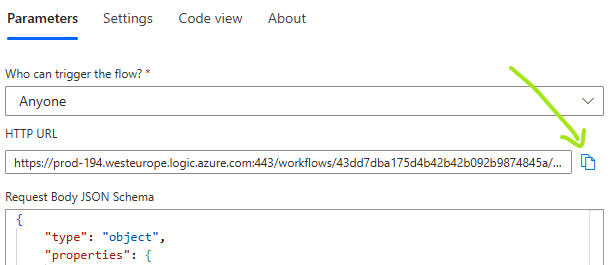
After saving your flow, you will be provided with a HTTP trigger URL. Copy this URL as you'll need to paste it into the DynaMaker plugin configuration.
2. DynaMaker Plugin
2A. Configure Plugin
Go to your dashboard, under Plugins, look for the plugin Power Automate. Click on the plugin to open the settings modal.
In the plugin settings modal:
- Paste the trigger URL from your Power Automate flow into the "Trigger URL" field.
- Define the fields you want to send to Power Automate by clicking "Add Field".
- For each field, provide a name (e.g., "customerName", "quotationPdf")
- Select the appropriate field type:
- Text: For sending text values
- PDF: For sending PDF files
- DXF: For sending DXF files
- PNG: For sending PNG images
- Copy the generated "Request Body JSON Schema" and paste it into your Power Automate flow's HTTP trigger configuration if you haven't already.
- Click "Save" to enable and configure the plugin.
2C. Use Plugin in Your Product Configurator
After configuring the plugin, you can use it in your product configurator code:
// Get the data that you want to send to your flow
const formData = await openQuotationFormModal()
const quotationPdf = ACTIONS.generateQuotationPdf()

// Use the triggerFlow method to send the data to your flow
const response = await PLUGINS.POWER_AUTOMATE.triggerFlow({
  customerName: formData.customerName,
  customerEmail: formData.customerEmail,
  quotationPdf,
})

if (response.success) {
  Studio.openInfoModal(
    'Thank you for your request!',
    'Your quotation request has been sent!',
    'You will receive further information via email shortly.',
  )
} else {
  Studio.openInfoModal(
    'Error',
    'Something went wrong while processing your request.',
    'Please try again later or contact support.',
  )
}
Use a form modal to gather contact information from your users.
3. Using DynaMaker Files in Power Automate
One of the most common use cases for the Power Automate plugin is sending files generated in DynaMaker as email attachments. Here's how to set up a flow that receives a PDF quotation from DynaMaker and sends it as an email attachment using Gmail.
3A. Configure the Flow to Handle File Data
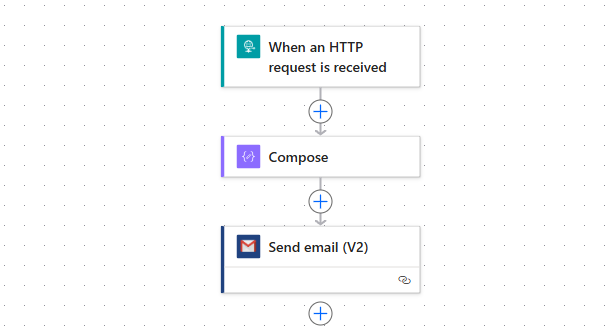
When your flow is triggered by the HTTP request from DynaMaker, the PDF data will be received as a base64-encoded string. You'll need to decode this before you can use it as an email attachment.
- After the HTTP trigger, add a "Compose" action
- If your field is named "quotationPdf", set the input to be the following functional expression:
base64ToBinary(triggerBody()?['quotationPdf'])
- This composition will contain the PDF data that can be used as an email attachment
3B. Send Email with PDF Attachment
Now, let's add a Gmail action to send this PDF as an attachment:
-
Add a "Gmail - Send email (V2)" action to your flow
-
Configure the basic email details:
- To: You can use the customer email from your trigger:
triggerBody()?['customerEmail'] - Subject: Enter a subject like "Your Quotation from [Company Name]"
- Body: Compose your email message
- To: You can use the customer email from your trigger:
-
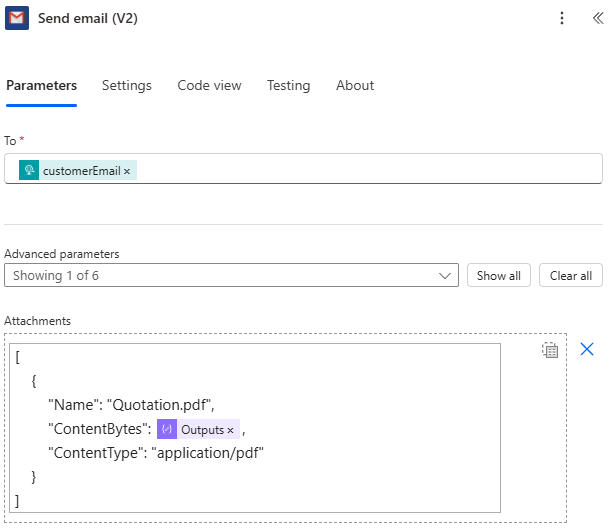
In the Attachments section:
- Name: Enter a name for the PDF (e.g., "Quotation.pdf")
- Content: Select the output from your Compose action
- Content-type: This should be the
MIME type of your file,
application/pdfin this case.
You can add more actions to your flow, such as saving the quotation to SharePoint, updating a CRM record, or notifying your sales team through Teams.
With the Power Automate plugin, you can integrate your DynaMaker product configurator with hundreds of other services, creating automated workflows that streamline your business processes. The possibilities are virtually endless - from sending quotation emails and updating CRM records to storing files in SharePoint and notifying teams in Microsoft Teams.
Free template for Elfsquad integration
To help you get started using QFS together with Elfsquad, we have created a template flow that you can use. At the very least, you will have to update the "Flow Settings" block with your specifics to get it running. When that information is filled in, you may of course modify the flow freely to make it suit your specific needs; please refer to the official documentation for that.
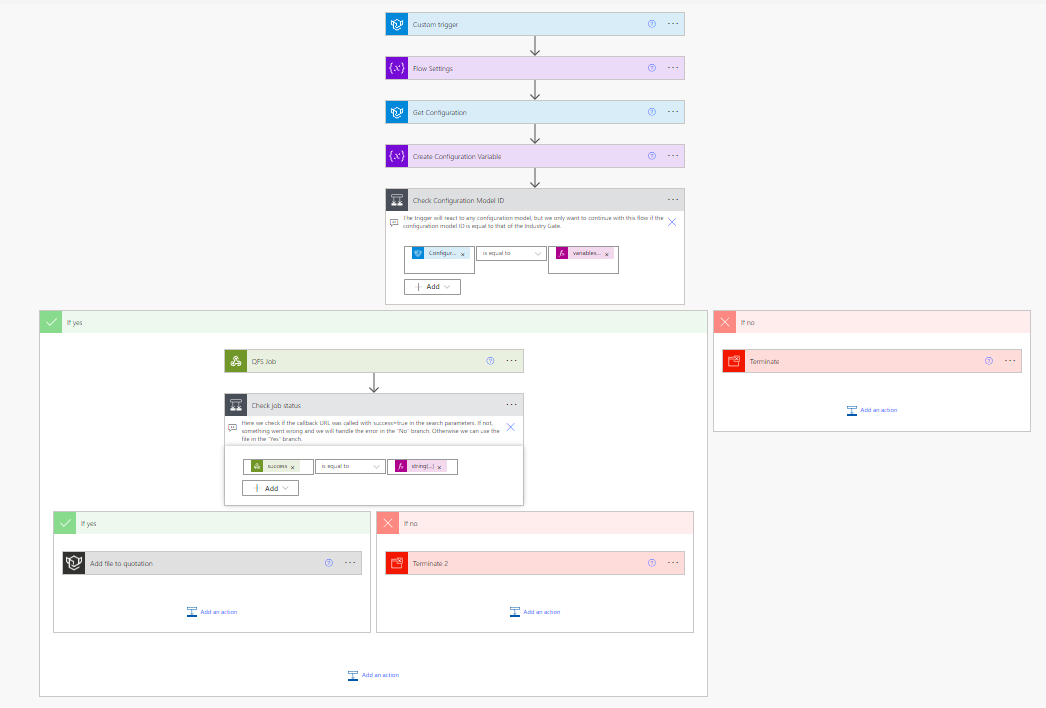
Here is a step-by-step guide on how you can get started with the template:
-
Download the template flow.
-
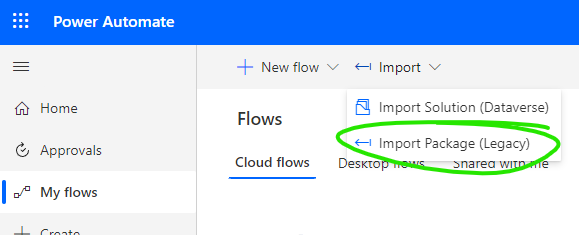
Go to "My flows" and click "Import Package".
-
Select your Elfsquad Data and Elfsquad Product Configurator connectors.

-
Click on the Import button to import the flow.
-
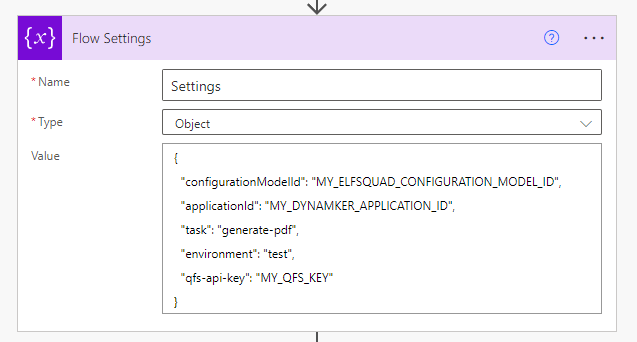
Update the "Flow Settings" block and save your flow.
- configurationModelId - This is the same as the "Feature Model ID" that you specified in your Elfsquad Plugin settings.
- applicationId - The ID of your DynaMaker product configurator.
- task - The QFS task that should be used.
- environment - Specifies which version of your deployed product configurator should be used,
testorproduction. - qfs-api-key - The API Key that can be found in your QFS Plugin settings in the dashboard of your DynaMaker product configurator.
-
Enable your flow from the flow info page.
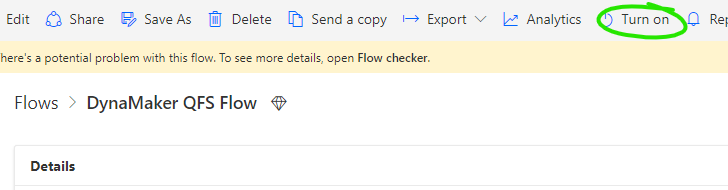
-
Test your flow by using the button in the upper right corner while on the edit flow page.

As usual, feel free to send an email to support@dynamaker.com if you get stuck or have questions.
SendGrid
SendGrid provides a cloud-based service that assists businesses with email delivery. On this page you will learn how to use the SendGrid plugin to send emails from your DynaMaker product configurator. You can read more about sending emails with SendGrid in their official documentation here.
In DynaMaker, SendGrid exists as a plugin and it is very easy to use! In order to explain how it works, we will go through:
1. SendGrid Account
1A. Register / Login
You need an account in SendGrid to be able to use it in DynaMaker. You can use the same account for multiple product configurators and have custom templates for each one. If you don't have an account yet, you can create one for free at https://signup.sendgrid.com.
Once you have set up your SendGrid account, there are a few steps to follow regarding the account and its access before going into the DynaMaker product configurator. First off, a SendGrid API key needs to be created for the plugin in DynaMaker. Then, different email templates can be created for the same product configurator (e.g. one for the users and one for the Sales department). Finally, the DynaMaker product configurator can use these templates and send the custom product values we need to show.
1B. Create API Key
- In your SendGrid account, to the left under Settings, go into API Keys.
- Create a new API key with restricted access with Mail Send enabled.
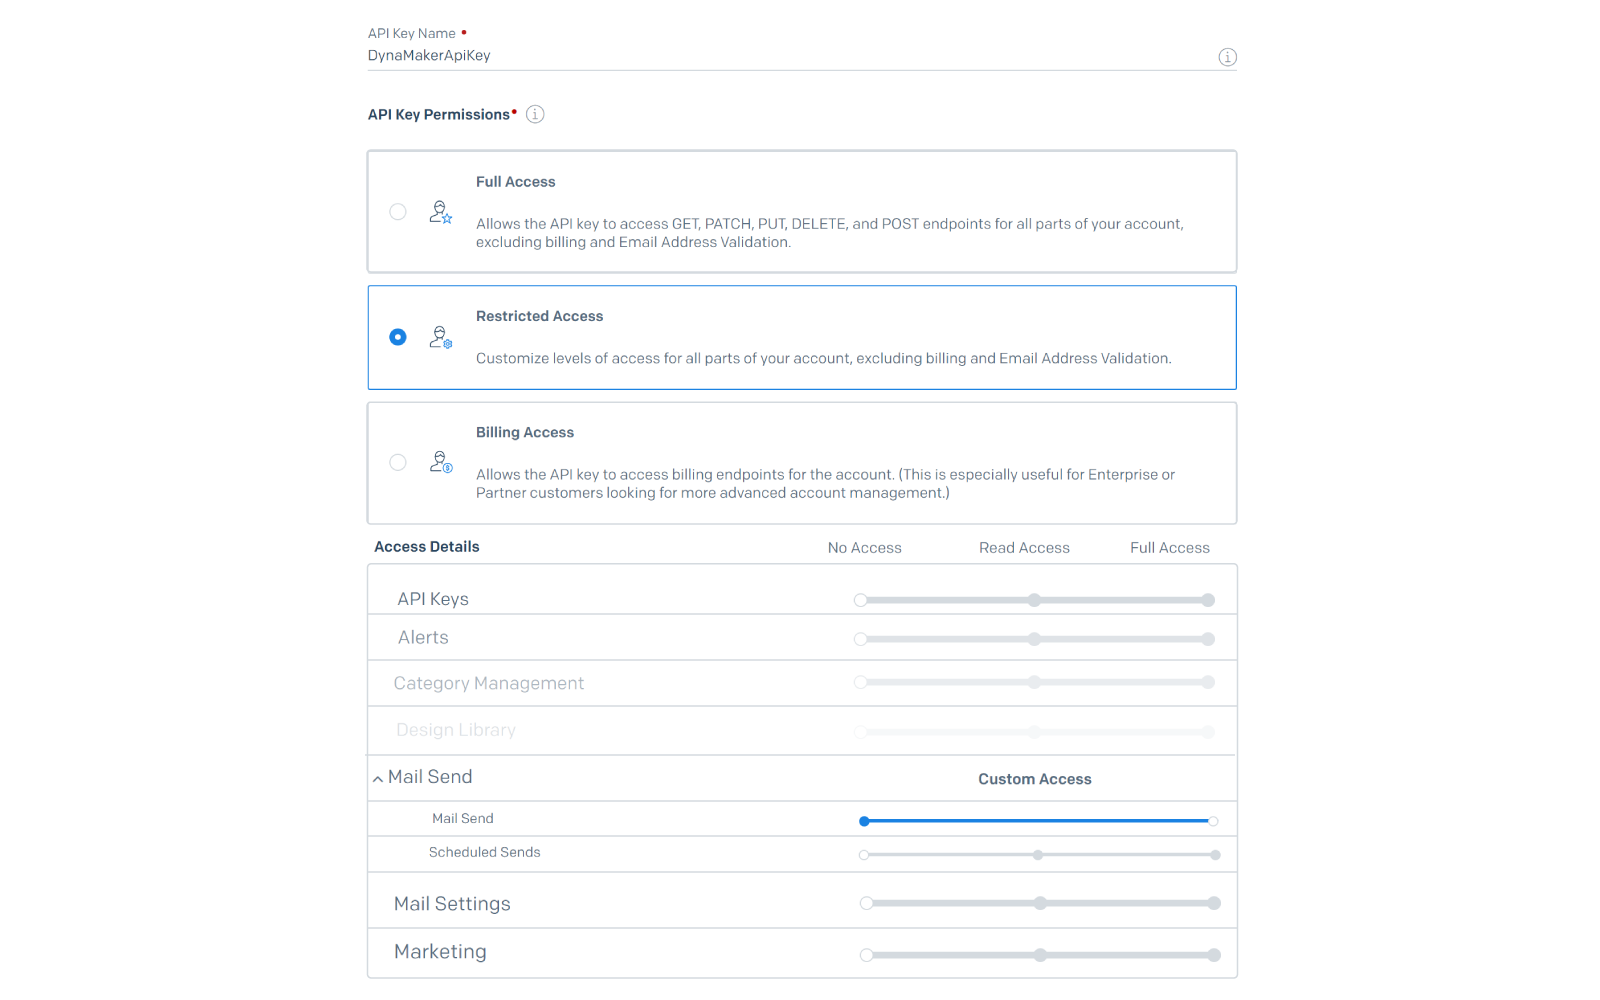
You will be given an API key that needs to be saved somewhere before SendGrid hides it.
Now, you can enable the plugin with this API key in your DynaMaker product configurator, like:
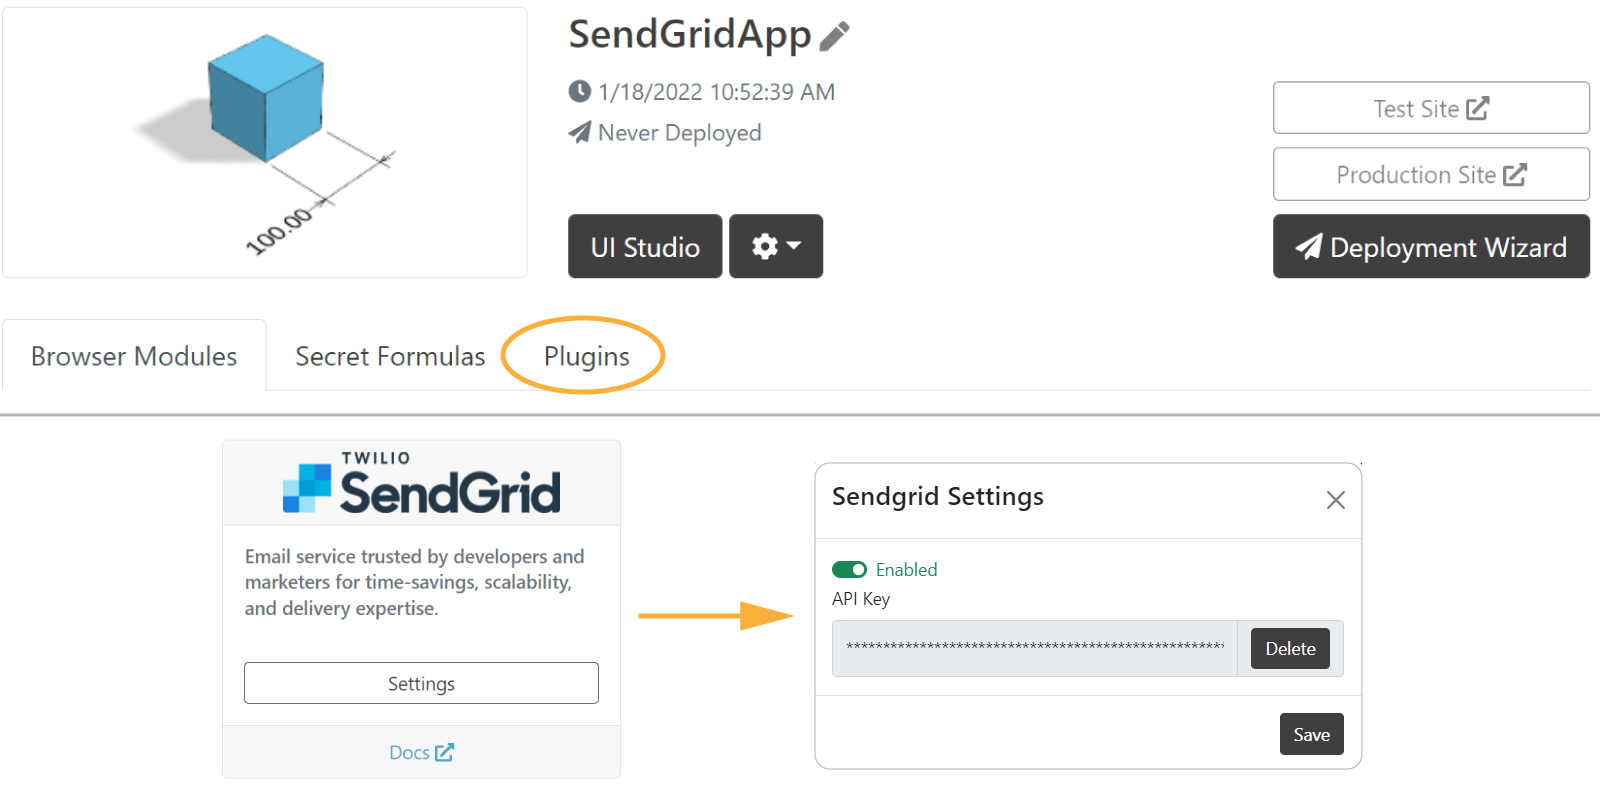
Remember that you can have the same API key for multiple product configurators. Also, each DynaMaker product configurator can use different email templates simultaneously. In the next step we will show how to create these templates.
1C. Create Dynamic Template
We will create a template intended for the user of the product configurator.
- Go back to the dashboard of your SendGrid account.
- Under Email API, go into Dynamic Templates and create a template with any name you want
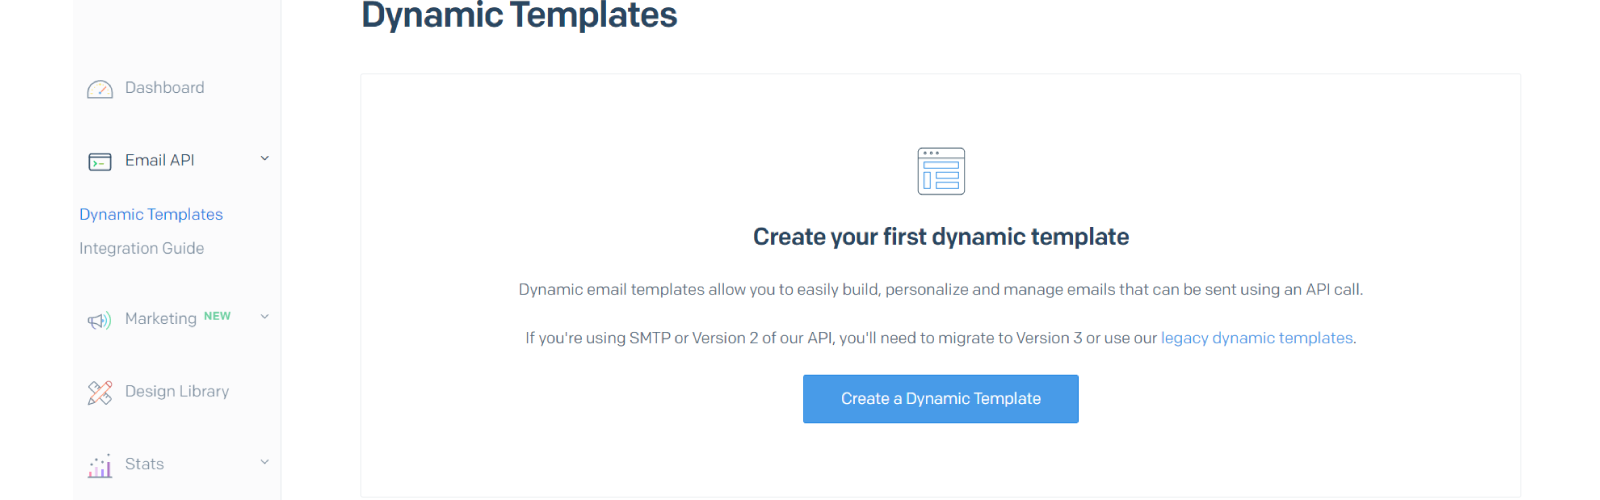
- Add a version with any name, e.g.
UserTemplate.
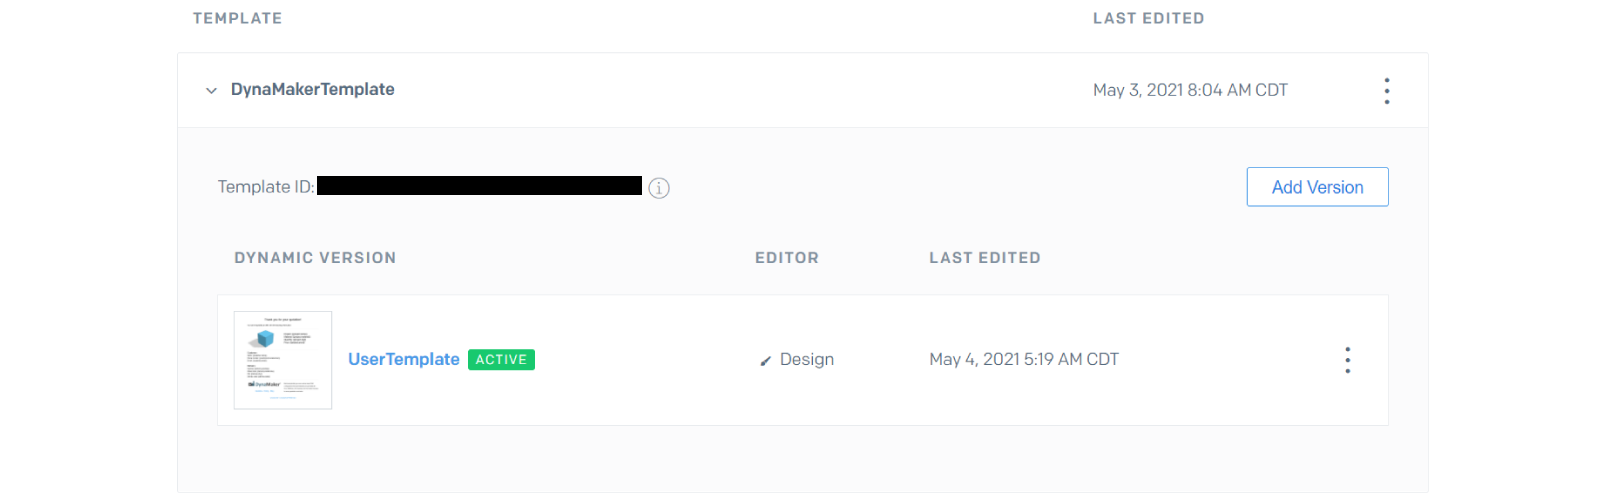
Keep the template ID for the DynaMaker product configurator later.
- Customize them however you want. The values from DynaMaker will be fetched correctly with the proper syntax (i.e.
{{ }}):
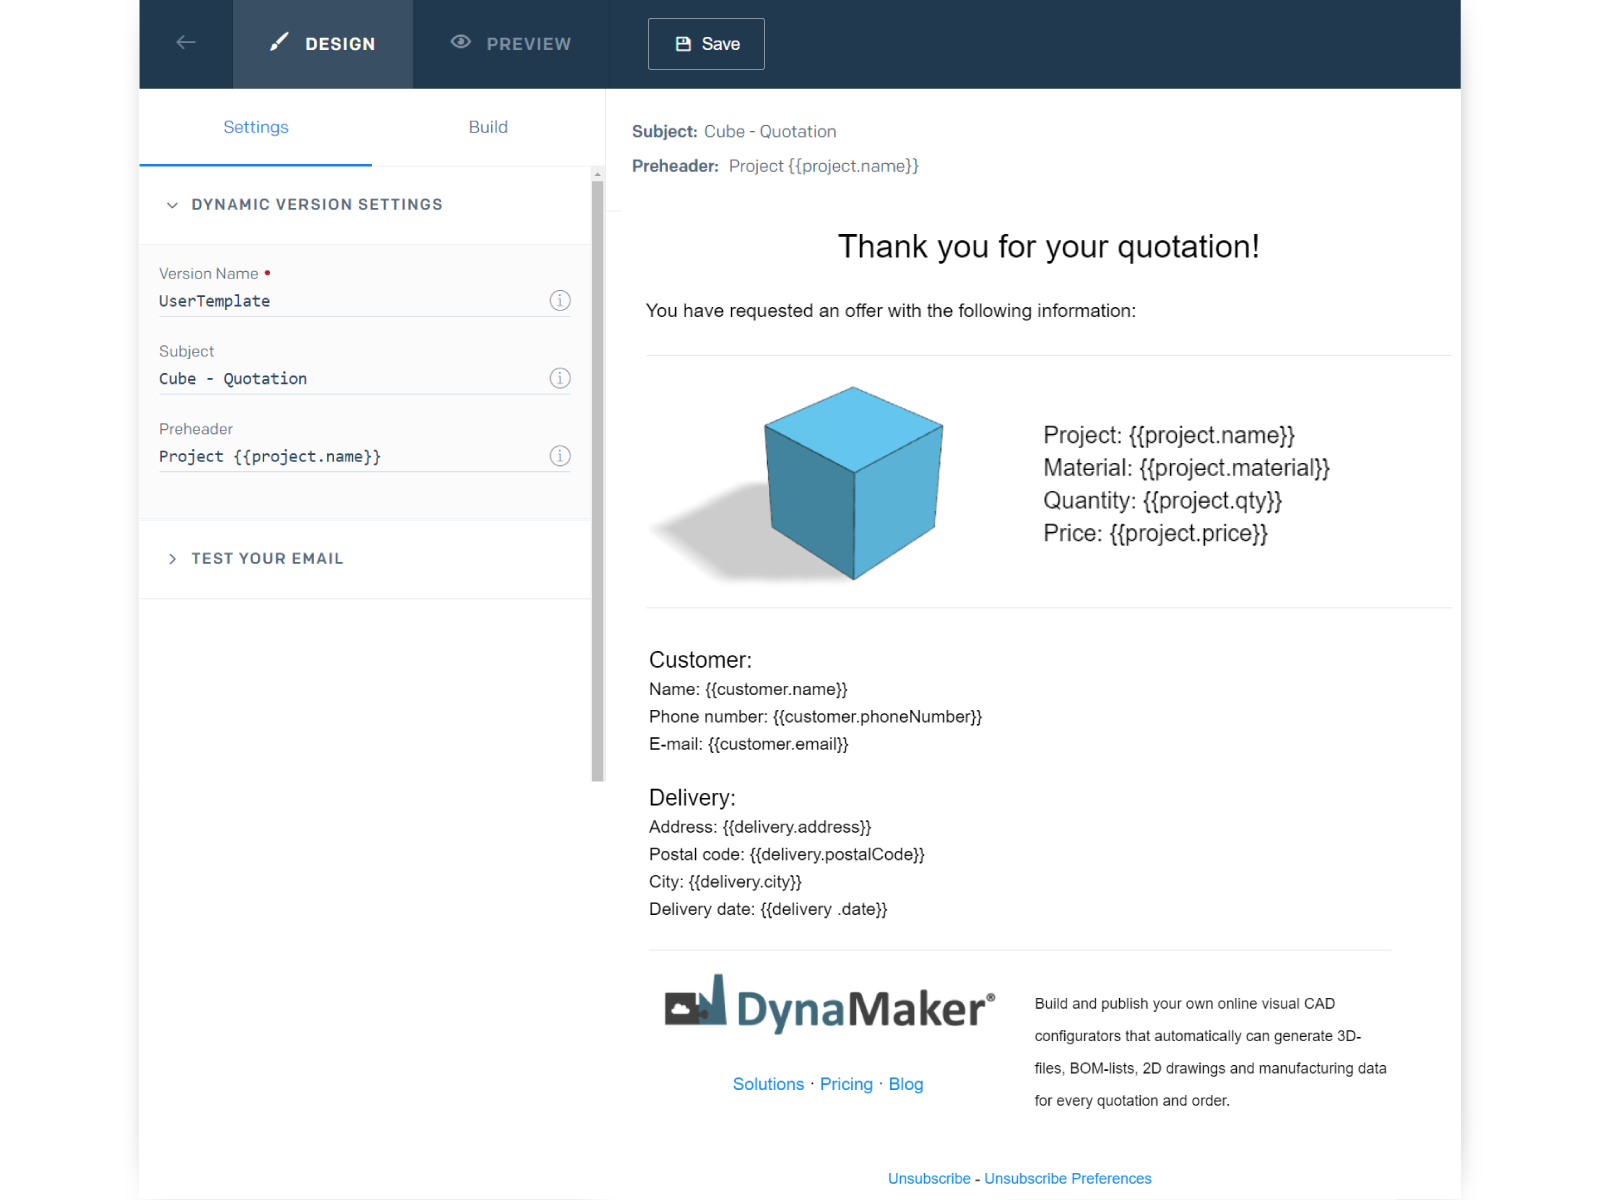
You can read more about the syntax here in case you want to use if statements in the email for example.
Great! There is a built-in functionality in the dynamic template (to the left) to send this template with a test email.
Try it and see that you get everything in place. Also, if you want to test the values within {{ }}, you can go under
Preview (at the top) in Show Test Data.
Before using this template in your product configurator, there is one more step left. You need to create a sender identity that SendGrid asks for.
1D. Create Sender Identity
You will find this option at the very top of your SendGrid dashboard as a green warning. Otherwise, you can also find it under Settings, in Sender Authentication.

Write a real email as sender, since you will need to verify it.
2. DynaMaker Plugin
Once we have enabled the plugin with the API key, it is ready to use in your product configurator.
2A. Import Plugin
First off, you need to import PLUGINS in your UI as if it was a subcomponent. Then you should be able to get the
code completion correctly and use the function PLUGINS.SENDGRID.sendMail().
2B. Send Mail
The function PLUGINS.SENDGRID.sendMail() needs a configuration as argument that should include the values you want to
read in the dynamic template of SendGrid (e.g. project, customer and delivery). You can try to create it in a function
that should return an object including the following for example, which includes 3 attachments - pdf, dxf and bom as
csv:
async function getMailConfig(attachmentContents: { pdfContent: string; dxfContent: string; bomContent: string }) {
  // Dynamic data (used in SendGrid template as {{project.name}}, {{customer.email}}, etc)
  const customerEmail = ACTIONS.getCustomerEmail()
  const dimensions = ACTIONS.getCubeDimensions()
  const { width, depth, height } = dimensions
  const projectName = `Cube - ${width} x ${depth} x ${height}`
  const deliveryDate = new Date(Date.now() + 12096e5) // 12096e5 is 2 weeks in milliseconds
  const deliveryDateString = deliveryDate.toISOString().split('T')[0]!

  const project = { name: projectName, material: 'PVC Blue', qty: 1 }
  const customer = { name: 'Mr Customer', phoneNumber: '0760000000', email: customerEmail }
  const delivery = { address: 'Stora Torget 1', postalCode: 58219, city: 'Linköping', date: deliveryDateString }

  return {
    template_id: 'your-dynamic-template-id',
    from: {
      email: 'your-sender-email-you-verified-in-sendgrid@theamazingcube.com',
    },
    personalizations: [
      {
        to: [
          {
            email: customer.email,
            name: 'Mr Customer',
          },
        ],
        cc: [{ email: 'sales@theamazingcube.com' }],
        dynamic_template_data: {
          project,
          customer,
          delivery,
        },
      },
    ],
    attachments: [
      {
        content: attachmentContents.pdfContent,
        type: 'application/pdf',
        filename: `The Amazing Cube.pdf`,
      },
      {
        content: attachmentContents.dxfContent,
        type: 'application/dxf',
        filename: `The Amazing Cube.dxf`,
      },
      {
        content: attachmentContents.bomContent,
        type: 'text/csv',
        filename: `The Amazing Cube.csv`,
      },
    ],
  }
}
Notice that the
template_idof the dynamic template in SendGrid can be seen in its dashboard next to the versions.
Now that you have the configuration defined, we can use this in a button to request a quotation typically followed by a form modal by:
const quotationButton = new SKYUI.Button(
  `Request Quotation`,
  () => {
    const formModal = Studio.createFormModal(
      [
        {
          type: 'text',
          id: 'customerName',
          label: 'Name',
          required: true,
        },
        {
          type: 'email',
          id: 'customerEmail',
          label: 'Email',
          required: true,
        },
      ],
      {
        animation: true,
        modalClassName: 'quotation-modal',
        texts: {
          title: 'Quotation Request',
          description: 'Fill in the details of your request',
          cancelButton: 'Cancel',
          okButton: 'Send',
        },
      },
    )

    formModal.open().then((formData) => {
      if (formData) {
        // Files to attach in email
        // --- PDF
        const pdfDrawing = await ACTIONS.generateQuotationDrawing({ fileType: COMPONENTDRAWING.FILE_TYPE.PDF })
        const pdfDataUrl = await pdfDrawing.generatePdfDataUrl()
        const pdfContent = pdfDataUrl.replace('data:application/pdf;base64,', '')

        // --- DXF
        const dxfDrawing = await ACTIONS.generateQuotationDrawing({ fileType: COMPONENTDRAWING.FILE_TYPE.DXF })
        const dxfDataUrl = await dxfDrawing.generateDxfDataUrl()
        const dxfContent = dxfDataUrl.replace('data:text/plain;base64,', '')

        // --- BOM (CSV)
        const bomData = ACTIONS.getBomData()
        const bomContent = btoa(bomData)

        const mailConfig = getMailConfig({ pdfContent, dxfContent, bomContent })
        PLUGINS.SENDGRID.sendMail(mailConfig)

        Studio.openInfoModal(
          'Thank you for your request!',
          'Your request has been sent!',
          'You will receive an email with information. You can close this pop-up.',
        )
      } else {
        // Form modal was canceled
      }
    })
  },
  { icon: 'send' },
)
Remember that the SendGrid template can be updated without saving or publishing the product configurator again.
As an example, we show it in a product configurator where the customer email is written as input together with a success notification.
Since sendMail() is a promise, you can display the message when it has completed:
PLUGINS.SENDGRID.sendMail(mailConfig).then((response) => {
  if (response.ok) {
    Studio.dispatchEvent({
      type: 'success-message',
      content: `Quotation requested successfully! Check the email sent to ${ACTIONS.getCustomerEmail()}`,
    })
  } else {
    throw new Error(response.statusText) // check console browser for possible errors (F12)
  }
  return response
})
CloudConvert
CloudConvert is an online file converter that supports nearly all audio, video, document, ebook, archive, image, spreadsheet, and presentation formats.
In DynaMaker CloudConvert exists as a plugin and it is very easy to use! In order to explain how it works, we will go through:
1. CloudConvert Account
1A. Register / Login
You need an account in CloudConvert to be able to use the DynaMaker plugin of all your product configurators you want to show in your website. You can register for free and try it yourself to follow this example. You can then log in at https://cloudconvert.com/login/.
Make sure to verify the email address connected with the CloudConvert account or the plugin will not work!
1B. Create API Key
The only thing that your DynaMaker product configurator needs from CloudConvert is a key. This can be created by following this steps:
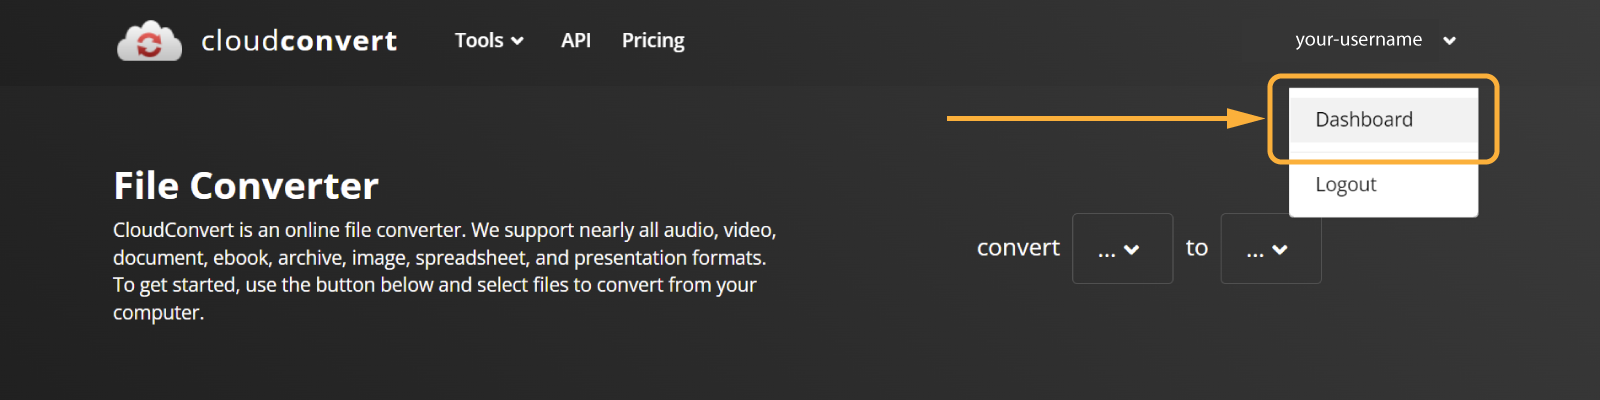
- Go to the dashboard of your account:
- Under Authorization, in API keys create a new API key in the button meant for that
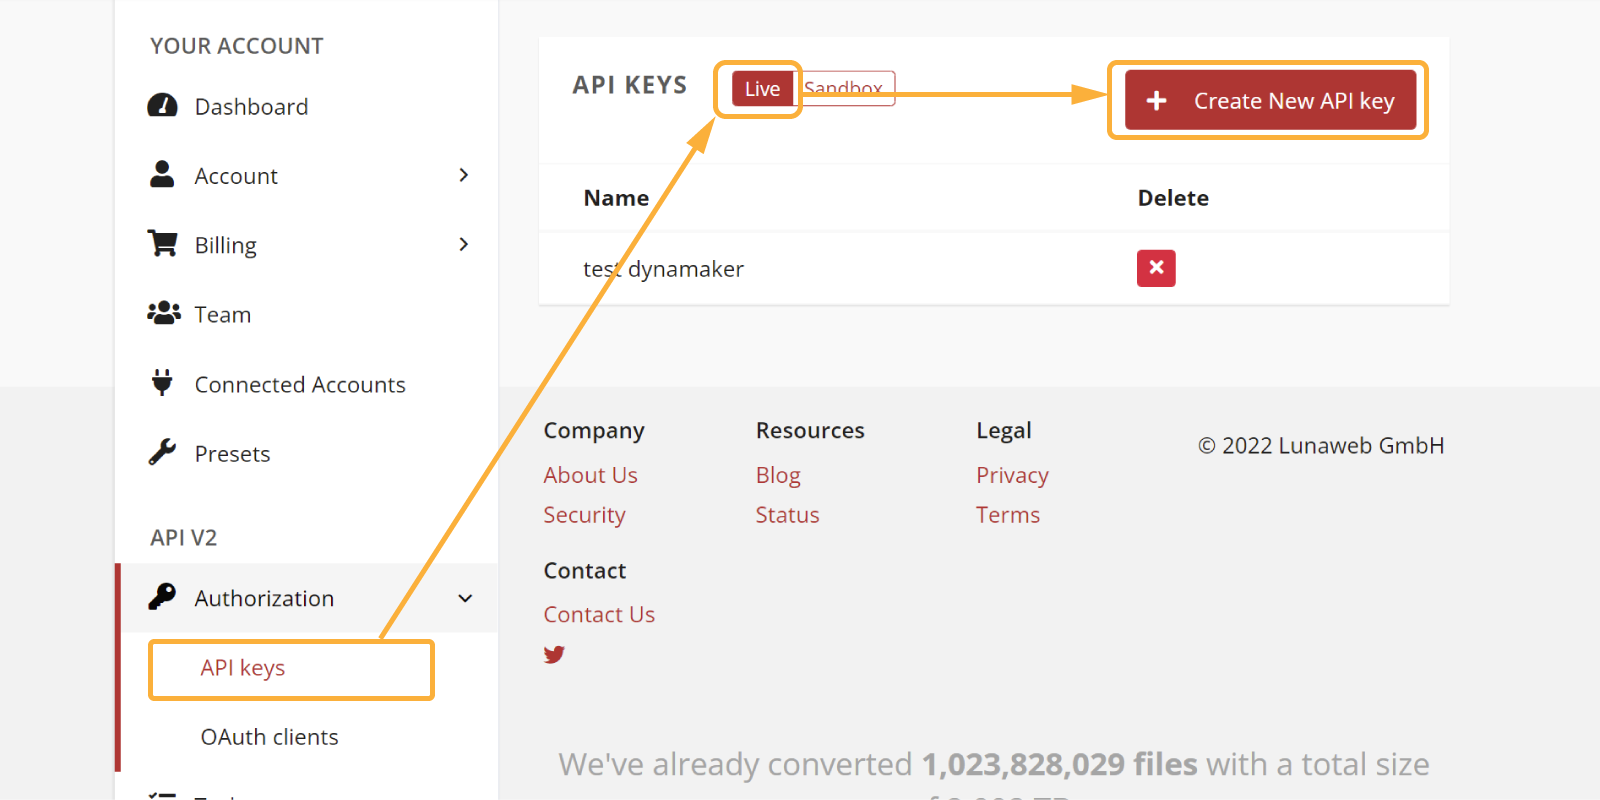
- Check both
task.readandtask.write, give it a name (to identify it easily within CloudConvert) and press Create. - Copy the API shown here since it is going to be used in the plugin in your DynaMaker product configurator.
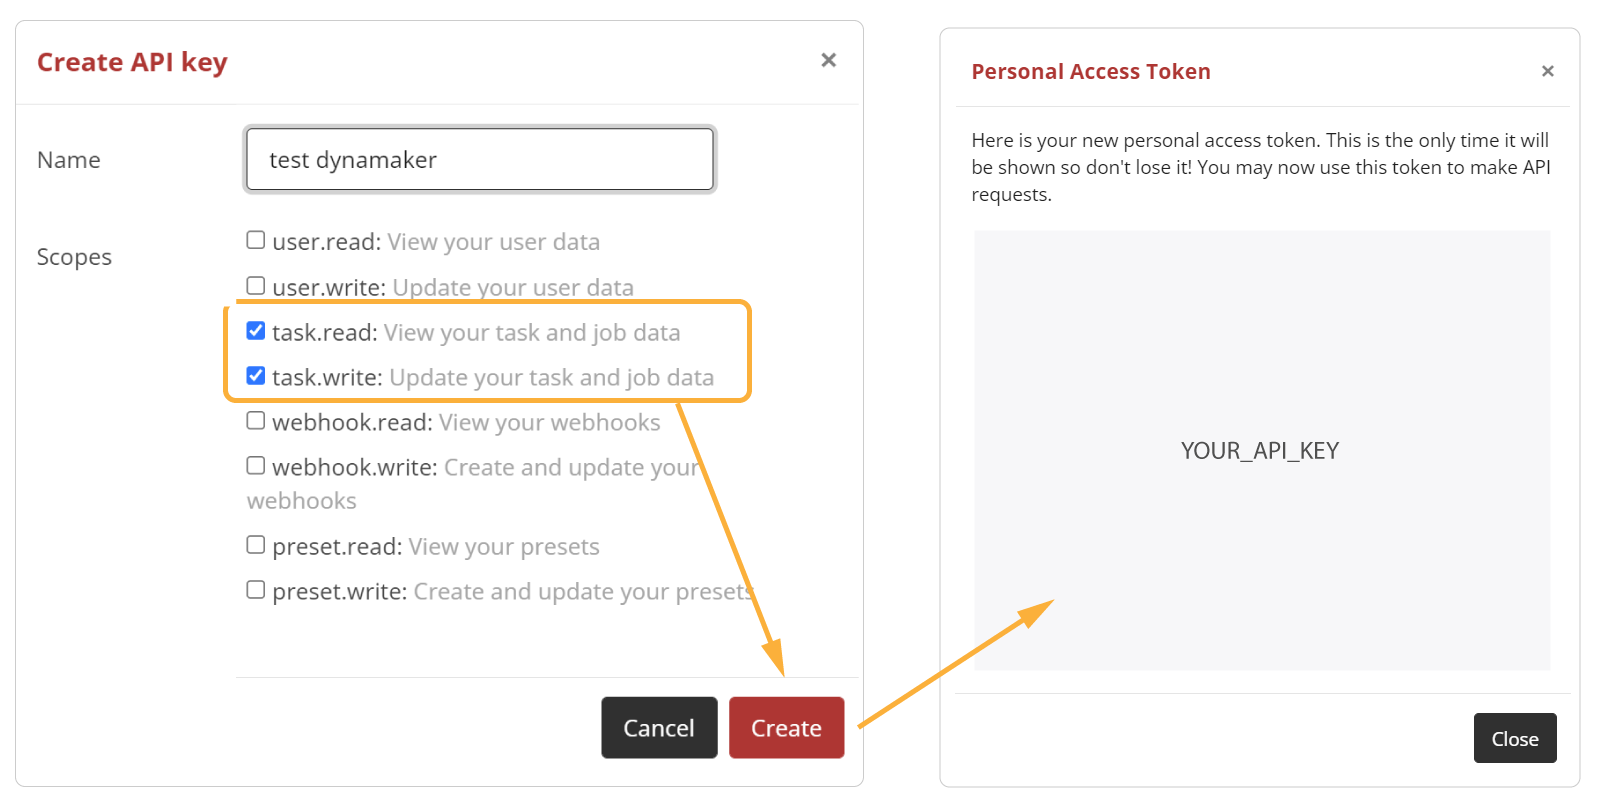
You are done with CloudConvert. Now it's time to enable the plugin in DynaMaker and use it!
2. DynaMaker Plugin
2A. Enable Plugin
Once you have your API key from CloudConvert:
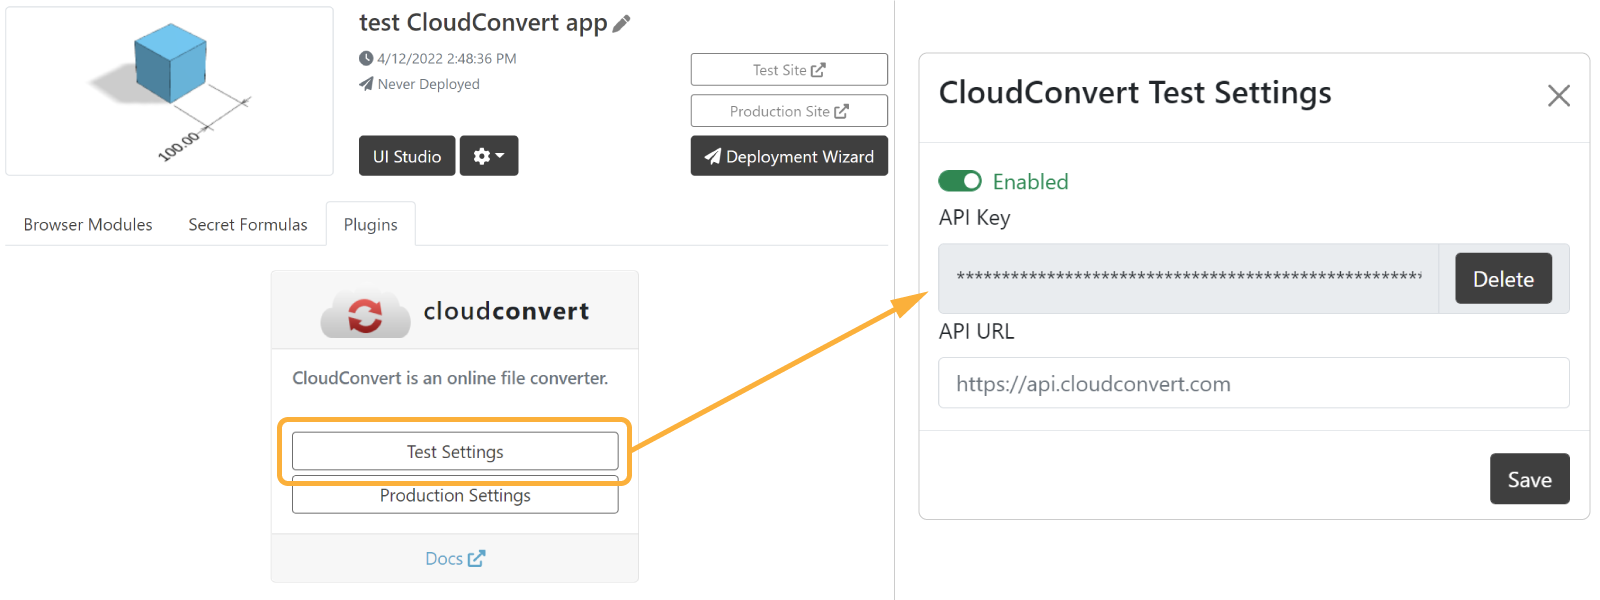
- Go to your dashboard, under Plugins, look for the plugin CloudConvert.
- Select which environment (test or production) you want to enable the plugin for.
- Paste the API key you got from CloudConvert, enable the plugin and save.
2B. Import Plugin
First off, you need to import PLUGINS in your UI as if it was a subcomponent. Then you should be able to get the
code completion correctly and use the function PLUGINS.CLOUDCONVERT.convert().
2C. Use Plugin
Before using the actual plugin you need to know which formats are available to be used in CloudConvert. This can be
easily check in https://cloudconvert.com/ once you are logged in. The available formats for conversion depend on the
first you want to convert from. 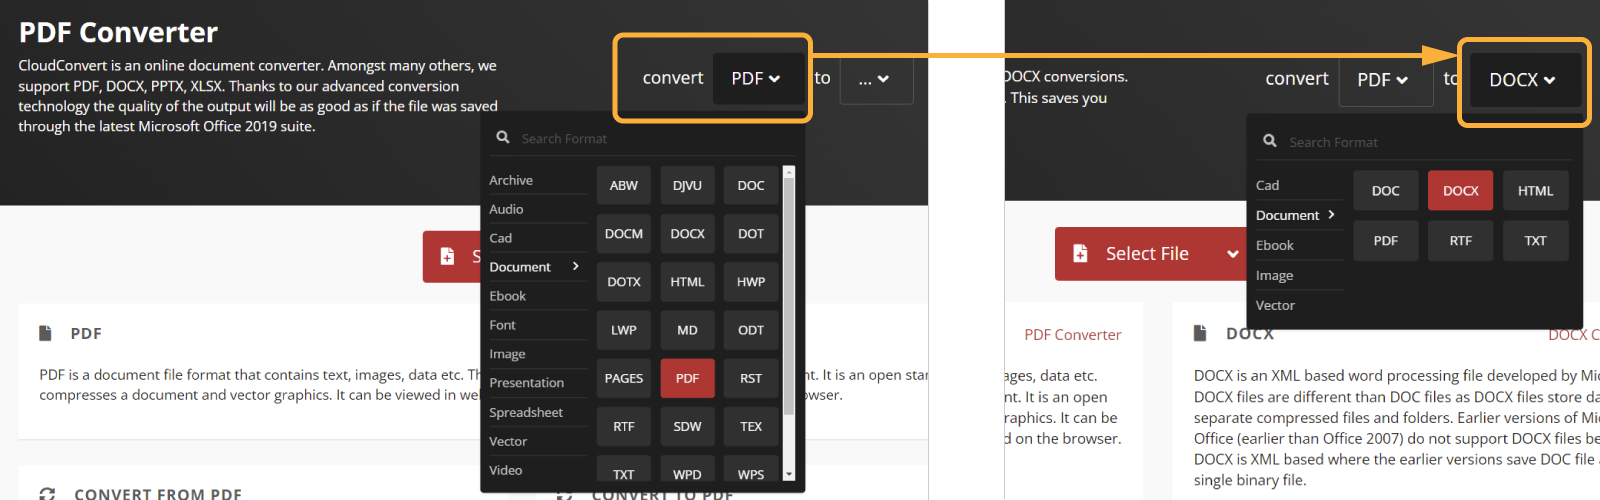
Try it out and see if you find the one you want. You can reach them at https://cloudconvert.com/contact to request more file conversions if they are missing or any other question you might have.
Once you have decided which formats to convert, you can use the plugin in a simple way. For example here we want to
convert from PDF generated in DynaMaker to TXT as an example. Then the code in UI would look like:
const drawing = MYDRAWING.generateDrawing(myComponent)
const pdfFile = await drawing.generatePdfFile()
const docxFile = await PLUGINS.CLOUDCONVERT.convert(pdfFile, 'pdf', 'docx')
Studio.downloadFile('my-drawing.docx', docxFile.blob)
Remember that in a free account there's 25 conversions included as trial. Naturally if you want more you need to check their pricing plans and find the one that suits you the best. Of course you can reach us at support@dynamaker.com if you have questions regarding this integration and/or other possible uses of this plugin.