Custom UI
This tutorial will be updated soon to reflect the new editor and workflow.
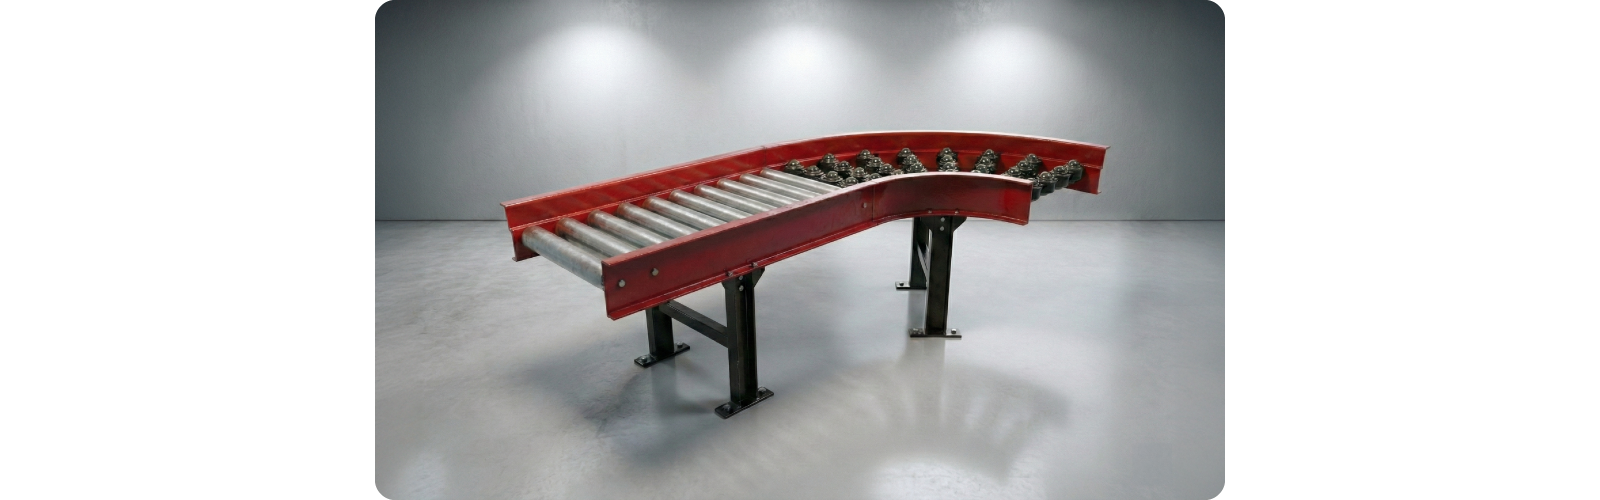
In this tutorial, you will learn the basics of customizing the User Interface in DynaMaker. As a product example, we will create an app to build custom conveyors from pre-designed parts. Each section of the whole conveyor will be able to be added manually so that any path can be created, pretty similar to the typical roller coaster builder but without any zero-g rolls, unfortunately.
For this we will follow 5 steps:
1. Prepare Components
For this project, we will create three components: Roller, Section & Assembly. You can start with a new project with three new components, as done in previous tutorials.
A. Roller
A1. Geometry
-
Download these two GLB files:
-
For the cylindrical type:
- In the component editor, click Model > From file... > Choose file ROLLER_BAR.glb, then Create.
- Do the same for ROLLER_CYLINDRICAL.glb for a second function.
- Merge both functions so that a single
geometryGrouphas both static models. - Rename function to
getCylindricalGeometryso that you have:
export function getCylindricalGeometry() {
  const geometryGroup = new SKYCAD.GeometryGroup()
  geometryGroup.addGeometry(ASSETS.STATIC_MODELS.ROLLER_BAR)
  geometryGroup.addGeometry(ASSETS.STATIC_MODELS.ROLLER_CYLINDRICAL)
  return geometryGroup
}
-
For the multidirectional type:
- In the component editor, click Model > From file... > Choose file ROLLER_MULTIDIRECTIONAL.glb, then Create.
- Rename function to
getMultidirectionalGeometry. - Add the bar in the same way done in
getCylindricalGeometry. - Duplicate the static model so that it consists of 4 pairs distributed along the Y-axis (within 200 mm), so like:
export function getMultidirectionalGeometry() {
  const geometryGroup = new SKYCAD.GeometryGroup()

  geometryGroup.addGeometry(ASSETS.STATIC_MODELS.ROLLER_BAR)

  const multidirectionModel = ASSETS.STATIC_MODELS.ROLLER_MULTIDIRECTIONAL

  geometryGroup.addGeometry(multidirectionModel, {
    position: new SKYMATH.Vector3D(0, -45, 0),
  })
  geometryGroup.addGeometry(multidirectionModel, {
    position: new SKYMATH.Vector3D(0, -71, 0),
    rotation: new SKYMATH.Vector3D(0, Math.PI / 5, 0),
  })
  geometryGroup.addGeometry(multidirectionModel, {
    position: new SKYMATH.Vector3D(0, 45, 0),
  })
  geometryGroup.addGeometry(multidirectionModel, {
    position: new SKYMATH.Vector3D(0, 71, 0),
    rotation: new SKYMATH.Vector3D(0, Math.PI / 5, 0),
  })
  geometryGroup.addGeometry(multidirectionModel, {
    position: new SKYMATH.Vector3D(0, 160, 0),
  })
  geometryGroup.addGeometry(multidirectionModel, {
    position: new SKYMATH.Vector3D(0, 186, 0),
    rotation: new SKYMATH.Vector3D(0, Math.PI / 5, 0),
  })
  geometryGroup.addGeometry(multidirectionModel, {
    position: new SKYMATH.Vector3D(0, -160, 0),
  })
  geometryGroup.addGeometry(multidirectionModel, {
    position: new SKYMATH.Vector3D(0, -186, 0),
    rotation: new SKYMATH.Vector3D(0, Math.PI / 5, 0),
  })

  return geometryGroup
}
A2. Constants
- In CONSTANTS add the following to define the type of
rollerTypelater:
export type RollerType = 'cylindrical' | 'multidirectional'
- In EXPORTS, make sure constants are exported for other components:
export * from './components.js'
export * from './constants.js'
// export * from './parameters.js' <-- this can be removed
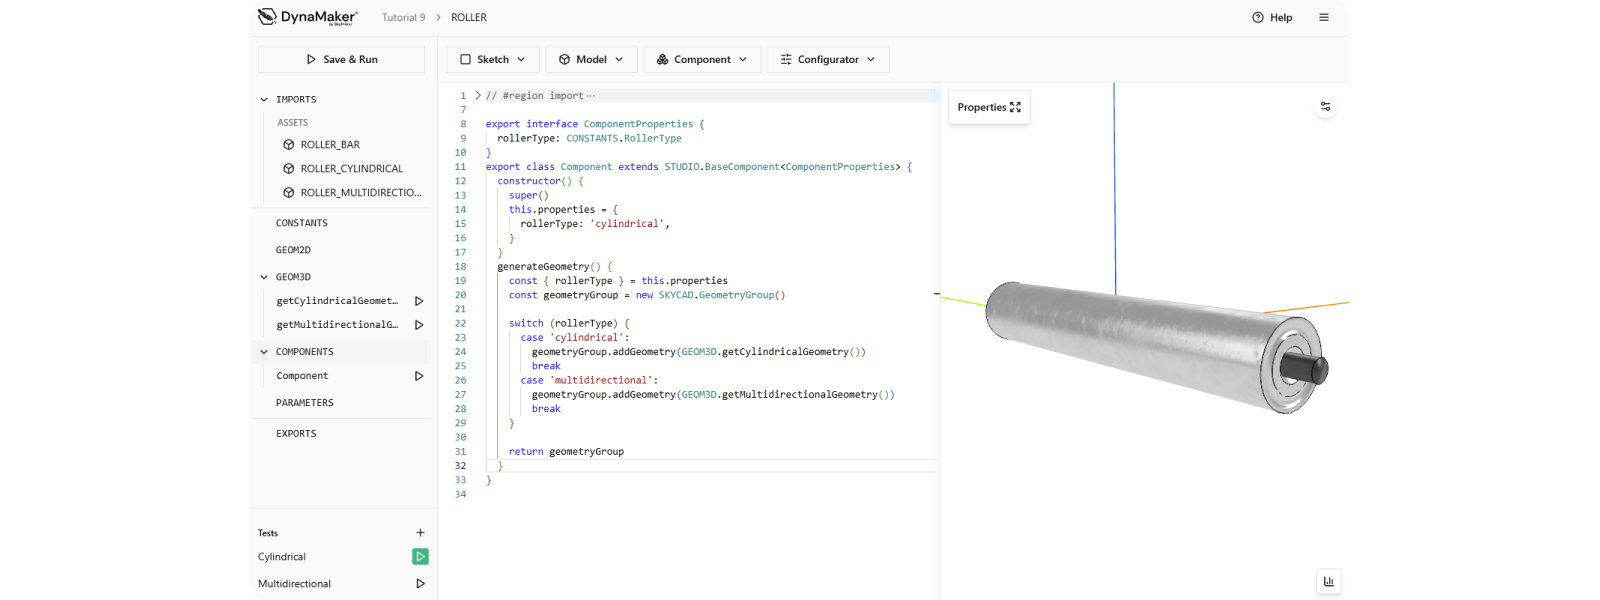
A3. Component
- Click Component > Part from e.g.
getCylindricalGeometry, then Create. - Create
rollerTypeproperty:- a) define it within
interface ComponentPropertieslike:
- a) define it within
export interface ComponentProperties {
  rollerType: CONSTANTS.RollerType
}
- b) in
constructorwithinthis.propertiesadd it with a default value:
this.properties = {
  rollerType: 'cylindrical',
}
- In
generateGeometry, fetch the correct geometry depending onrollerTypewith anif- orswitch-statement:
export interface ComponentProperties {
  rollerType: CONSTANTS.RollerType
}
export class Component extends STUDIO.BaseComponent<ComponentProperties> {
  constructor() {
    super()
    this.properties = {
      rollerType: 'cylindrical',
    }
  }
  generateGeometry() {
    const { rollerType } = this.properties
    const geometryGroup = new SKYCAD.GeometryGroup()

    switch (rollerType) {
      case 'cylindrical':
        geometryGroup.addGeometry(GEOM3D.getCylindricalGeometry())
        break
      case 'multidirectional':
        geometryGroup.addGeometry(GEOM3D.getMultidirectionalGeometry())
        break
    }

    return geometryGroup
  }
}
Although you can test right away by adjusting the default value of rollerType, it's best to create a Component Test
(bottom-left of editor) for each case like the following for an easier overview of both geometries without altering the
code:
export default function (): ROLLER.Component {
  const component = new ROLLER.Component()
  component.setProperties({ rollerType: 'cylindrical' })
  return component
}
export default function (): ROLLER.Component {
  const component = new ROLLER.Component()
  component.setProperties({ rollerType: 'multidirectional' })
  return component
}
Now that we have the rollers, let's add them to the Section.
B. Section
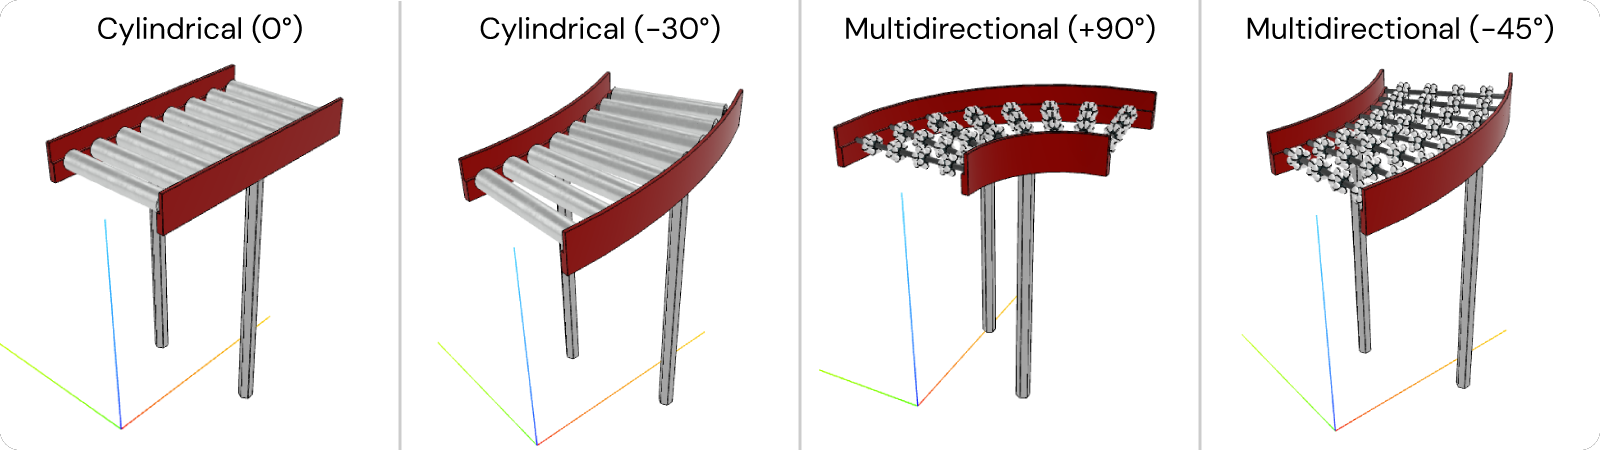
The conveyor can be divided into multiple sections. Each section will consist of a structure to hold the rollers, and the structure itself will be made of two legs (in the middle) and the bed (red rails) where the rollers are located. To avoid cluttering in the app with too many components, the models of the bed and legs will be created within the Section component. Also notice, the direction or angle will be parametric.
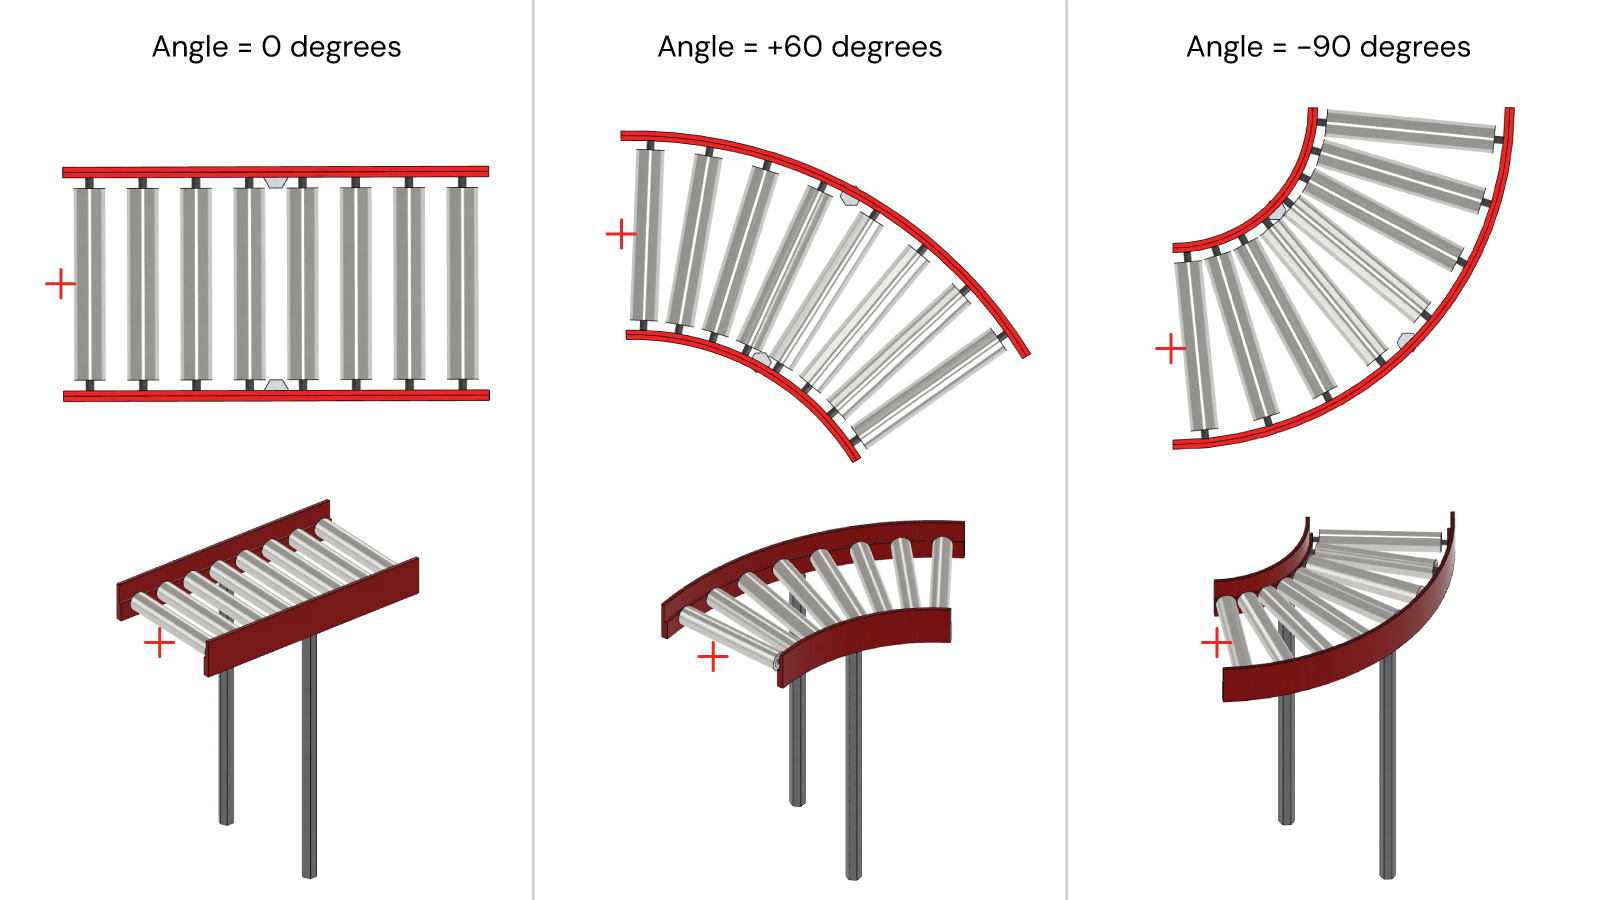
To have a clear idea of what we are about to build, here are some pictures of what the main dimensions will represent and how the angle will affect the curvature of the rollers, bed and legs positions & rotations. However, you can choose your own design for the profile of the legs and bed. Notice that we will have exactly 8 rollers so that they can fit the section with a specific set of default properties.
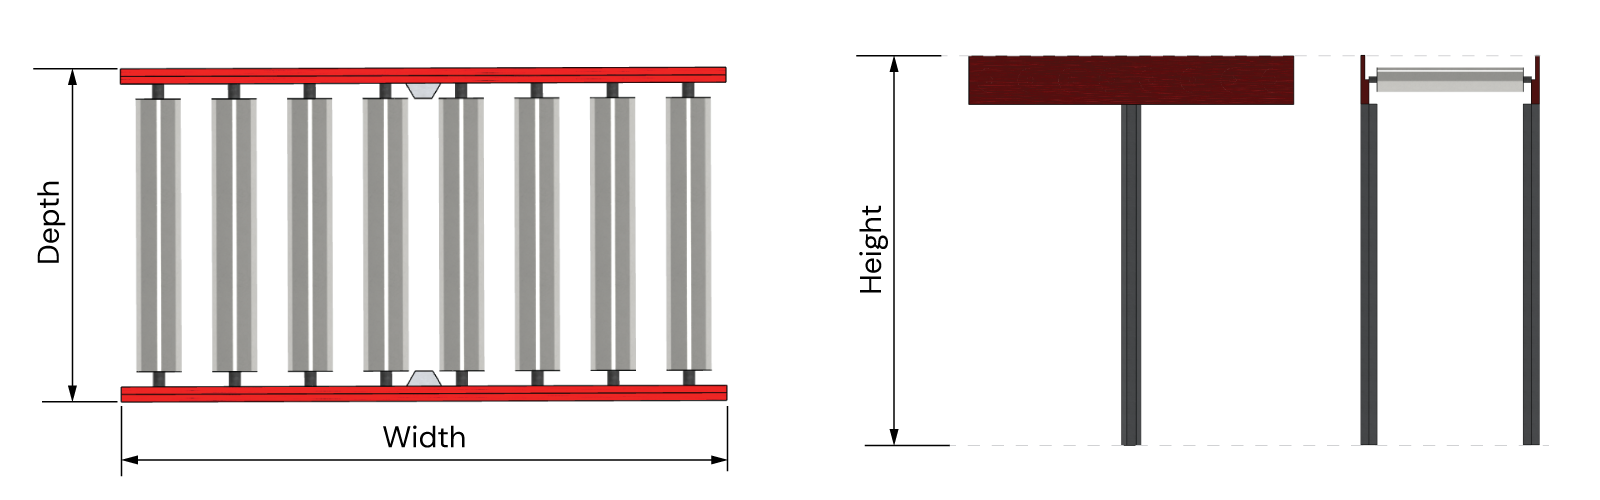
For the curved sections, the center line or neutral axis will have the exact same length as width.
B2. Properties
To make it simple, height, depth and width of the component Section will remain constant. Also, angle (in
radians!) and rollerType will be something that the user will be able to change in the app and therefore, will be part
of the properties.
- At the top of the left sidebar, open IMPORTS > Import other editors to use them here > Check ROLLER, then Apply changes.
- In CONSTANTS, make sure you have:
export interface Properties {
  angle: number
  rollerType: ROLLER.RollerType
}

export const DEPTH = 500
export const WIDTH = 1000
export const HEIGHT = 1200

export const BED_HEIGHT = 150
export const BED_THICKNESS = 25
export const LEG_WIDTH = 50
export const ROLLERS_CC_DISTANCE = 100
- Use snippet Component > Part for a faster setup.
- Make sure it takes the new
CONSTANTS.Propertiesinstead of the defaultComponentProperties. - Use the default values
angle: 0androllerType: 'cylindrical'. - Leave
generateGeometryempty for now, so like:
export class Component extends STUDIO.BaseComponent<CONSTANTS.Properties> {
  constructor() {
    super()

    this.properties = {
      angle: 0, // [rad]
      rollerType: 'cylindrical',
    }
  }

  generateGeometry() {
    const geometryGroup = new SKYCAD.GeometryGroup()
    return geometryGroup
  }
}
B3. Subcomponents
With a similar process as done in Tutorial 6. Assemblies:
- Add not-yet-created component-class functions
addRollersandupdatewithin theconstructorlike:
constructor() {
  super()

  this.properties = {
    angle: 0, // [rad]
    rollerType: 'cylindrical',
  }

  this.addRollers()
  this.update()
}
- Create
addRollers()to simply add the rollers to thecomponentHandler(no positioning orrollerTypeyet):
export class Component extends STUDIO.BaseComponent<CONSTANTS.Properties> {
  constructor() {
    super()

    // ...properties

    this.addRollers()
    this.update()
  }

  addRollers() {
    const nrRollers = 8
    const rollerComponent = new ROLLER.Component()
    for (let i = 0; i < nrRollers; i++) {
      this.componentHandler.add(rollerComponent)
      // you don't need to handle positions/rotations here since that will be done in update()
    }
  }

  generateGeometry() {
    // ...empty geometry
  }
- In CONSTANTS, add new function
getSectionRadiusbased onwidthandangle:
export function getSectionRadius(width: number, angle: number) {
  const R = width / angle
  return R
}
Be aware of the division by 0 in getSectionRadius(). In Typescript this will give Infinity, a value that can be
troublesome to work with if not handled with caution with some if-statements.
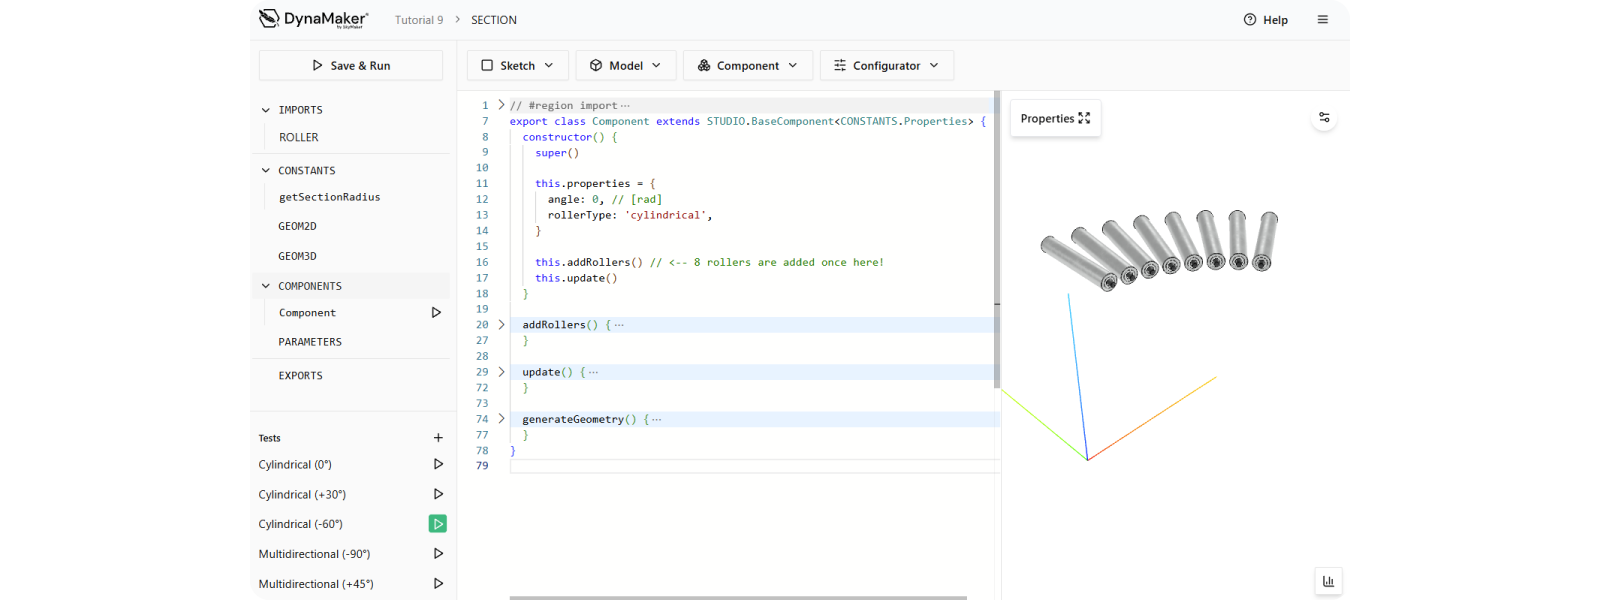
- Create
update()that handles the position and rotation of the rollers based on the properties.
See completed component with rollers updating properly:
Make sure to add tests that cover different values of angle in combination with rollerType.
export class Component extends STUDIO.BaseComponent<CONSTANTS.Properties> {
  constructor() {
    super()

    this.properties = {
      angle: 0, // [rad]
      rollerType: 'cylindrical',
    }

    this.addRollers() // <-- 8 rollers are added once here!
    this.update()
  }

  addRollers() {
    const nrRollers = 8
    const rollerComponent = new ROLLER.Component()
    for (let i = 0; i < nrRollers; i++) {
      this.componentHandler.add(rollerComponent) // <-- positioning is done in update()
    }
  }

  update() {
    const { rollerType, angle } = this.getProperties()

    // Rollers
    const rollerComponent: ROLLER.Component = this.componentHandler.getComponents(ROLLER.Component)[0]!
    rollerComponent.setProperties({ rollerType })
    const rollers = this.componentHandler.getInstances(ROLLER.Component)
    const nrRollers = rollers.length

    const stepPosX = CONSTANTS.WIDTH / nrRollers
    let posX = stepPosX / 2

    if (angle === 0) {
      rollers.forEach((roller) => {
        const position = new SKYMATH.Vector3D(posX, 0, CONSTANTS.HEIGHT - CONSTANTS.BED_HEIGHT / 2)
        roller.setPosition(position)
        roller.setRotation(new SKYMATH.Vector3D(0, 0, 0))
        posX += stepPosX
      })
    } else {
      const R = CONSTANTS.getSectionRadius(CONSTANTS.WIDTH, -angle)
      const rollerStepAngle = -angle / nrRollers
      let rotZ = rollerStepAngle / 2
      let posY = (R * (1 - Math.cos(rotZ))) / 2

      rollers.forEach((roller) => {
        const position = new SKYMATH.Vector3D(posX, posY, CONSTANTS.HEIGHT - CONSTANTS.BED_HEIGHT / 2)
        const rotation = new SKYMATH.Vector3D(0, 0, rotZ)
        roller.setPosition(position)
        roller.setRotation(rotation)
        rotZ += rollerStepAngle
        posX = R * Math.sin(rotZ)
        posY = R * (1 - Math.cos(rotZ))
      })
    }
  }

  generateGeometry() {
    const geometryGroup = this.componentHandler.generateAllGeometry()
    return geometryGroup
  }
}
See that we don't clear the rollers in update(). Since we always have 8, addRollers() creates them once, and
update() takes care of their properties and positioning. This improves vastly the app performance since the
geometry doesn't regenerate over and over, especially when it's only the position/rotation that changes.
B4. Legs & Bed
Technically the legs and the bed (rails) could be other subcomponents. However they have such a simple geometry that
it's enough to add them in the section's generateGeometry, simplifying the app structure by avoiding too many
unnecessary layers. This said let's create their geometry!
- In GEOM2D, create the base of the leg and the cross-section for the bed:
See completed GEOM2D with both sketches:
export function generateLegBaseSketch() {
  return SKYCAD.generateHexagonSketch(0, 0, CONSTANTS.LEG_WIDTH)
}

export function generateBedProfileSketch() {
  const H = CONSTANTS.BED_HEIGHT
  const T = CONSTANTS.BED_THICKNESS
  const sketch = new SKYCAD.Sketch()
  sketch.moveTo(0, 0)
  sketch.lineTo(0, H / 2)
  sketch.lineTo(T / 2, H / 2)
  sketch.lineTo(T / 2, H)
  sketch.lineTo(T, H)
  sketch.lineTo(T, 0)
  sketch.lineToId(0)
  return sketch
}
- In GEOM3D, create the leg model as an extrude and the bed railing as a revolve, separating the case for
angle = 0.
See completed GEOM3D with both geometry groups:
Feel free to add custom textures or change e.g. metalness for these parametric models as done in
previous tutorials.
const W = CONSTANTS.WIDTH
const D = CONSTANTS.DEPTH
const H = CONSTANTS.HEIGHT

export function getLegsGeometry(angle: number) {
  const geometryGroup = new SKYCAD.GeometryGroup()
  const legModel = generateLegModel(H)
  let leftLegPosition = new SKYMATH.Vector3D(W / 2, D / 2, 0)
  let rightLegPosition = new SKYMATH.Vector3D(W / 2, -D / 2, 0)
  if (angle !== 0) {
    const R = CONSTANTS.getSectionRadius(W, angle)
    leftLegPosition.x = (R + D / 2) * Math.sin(angle / 2)
    rightLegPosition.x = (R - D / 2) * Math.sin(angle / 2)
    leftLegPosition.y = D / 2 - (R + D / 2) * (1 - Math.cos(angle / 2))
    rightLegPosition.y = -D / 2 - (R - D / 2) * (1 - Math.cos(angle / 2))
  }
  const legMaterials = [new SKYCAD.Material({ color: 0xcccccc, metalness: 1, roughness: 0.3 })]
  geometryGroup.addGeometry(legModel, {
    materials: legMaterials,
    position: leftLegPosition,
  })
  geometryGroup.addGeometry(legModel, {
    materials: legMaterials,
    position: rightLegPosition,
  })
  return geometryGroup
}

export function getBedGeometry(angle: number) {
  const geometryGroup = new SKYCAD.GeometryGroup()
  const bedMaterials = [new SKYCAD.Material({ color: 0xad0000, metalness: 1, roughness: 0.3 })]
  if (angle === 0) {
    geometryGroup.addGeometry(generateBedStraightModel(W, { invertedProfile: false }), {
      materials: bedMaterials,
      position: new SKYMATH.Vector3D(0, -D / 2, 0),
    })
    geometryGroup.addGeometry(generateBedStraightModel(W, { invertedProfile: true }), {
      materials: bedMaterials,
      position: new SKYMATH.Vector3D(0, D / 2, 0),
    })
  } else {
    const R = CONSTANTS.getSectionRadius(W, angle)
    geometryGroup.addGeometry(
      generateBedRevolveModel(-R + D / 2, angle, {
        invertedProfile: false,
      }),
      {
        materials: bedMaterials,
        position: new SKYMATH.Vector3D(0, -R, 0),
      },
    )
    geometryGroup.addGeometry(
      generateBedRevolveModel(-R - D / 2, angle, {
        invertedProfile: true,
      }),
      {
        materials: bedMaterials,
        position: new SKYMATH.Vector3D(0, -R, 0),
      },
    )
  }
  return geometryGroup
}

function generateLegModel(height: number) {
  const model = new SKYCAD.ParametricModel()
  const legSketch = GEOM2D.generateLegBaseSketch()
  const plane = new SKYCAD.Plane(0, 0, 1, 0)
  model.addExtrude(legSketch, plane, height - CONSTANTS.BED_HEIGHT)
  return model
}

function generateBedStraightModel(width: number, { invertedProfile = false } = {}) {
  const model = new SKYCAD.ParametricModel()
  const plane = new SKYCAD.Plane(-1, 0, 0, 0)
  const profileSketch = GEOM2D.generateBedProfileSketch()
  if (invertedProfile) profileSketch.mirrorInYaxis()
  model.addExtrude(profileSketch, plane, -width)
  return model
}

function generateBedRevolveModel(radius: number, angle: number, { invertedProfile = false } = {}) {
  const model = new SKYCAD.ParametricModel()
  const plane = new SKYCAD.Plane(-1, 0, 0, 0)
  const profileSketch = GEOM2D.generateBedProfileSketch()
  if (invertedProfile) profileSketch.mirrorInYaxis()
  profileSketch.translate(radius, 0)
  model.addRevolve(profileSketch, plane, {
    revolveAngle: -angle,
    axisDirection: new SKYMATH.Vector2D(0, 1),
  })
  return model
}
- In COMPONENTS, add both
getLegsGeometryandgetBedGeometrytogether with the subcomponent's:
generateGeometry() {
  const { angle } = this.properties
  const geometryGroup = this.componentHandler.generateAllGeometry()

  geometryGroup.addGeometry(GEOM3D.getLegsGeometry(angle))

  geometryGroup.addGeometry(GEOM3D.getBedGeometry(angle), {
    position: new SKYMATH.Vector3D(
      0,
      0,
      CONSTANTS.HEIGHT - CONSTANTS.BED_HEIGHT,
    ),
  })
  return geometryGroup
}
Always doublecheck your component tests to make sure angle and rollerType are working as expected:
C. Assembly
The entire conveyor or assembly will consist of multiple sections. This component should handle the adding and removing
of sections, which will be subcomponents driven by properties rollerType & angle. Then a configurator is needed for
the application. However, the logic to add & remove sections will be explained later, together with the UI Editor.
C1. Component
- Open IMPORTS > Import other editors to use them here > Check ROLLER and SECTION, then Apply changes.
- Use the following component which has:
addSection()to add a new section component with the properties accordingly.removeSection()to remove the last existing section (if any).
interface ComponentProperties {
  sectionToAddAngle: number
  sectionToAddRollerType: ROLLER.RollerType
}

export class Component extends STUDIO.BaseComponent<ComponentProperties> {
  constructor() {
    super()

    this.properties = {
      sectionToAddAngle: 0,
      sectionToAddRollerType: 'cylindrical',
    }
  }

  addSection() {
    const { sectionToAddRollerType, sectionToAddAngle } = this.getProperties()
    const newSectionComponent = new SECTION.Component()
    newSectionComponent.setProperties({
      rollerType: sectionToAddRollerType,
      angle: sectionToAddAngle,
    })
    this.componentHandler.add(newSectionComponent, {
      // positioning will be handled later in the tutorial
    })
  }

  removeSection() {
    const sections = this.componentHandler.getInstances(SECTION.Component)
    if (sections.length > 0) {
      const lastSection = sections[sections.length - 1]!
      const sectionsToRemove = [lastSection]!
      this.componentHandler.removeInstances(sectionsToRemove)
    }
  }

  generateGeometry() {
    return this.componentHandler.generateAllGeometry()
  }
}
- Save for now this assembly which doesn't produce any visualization yet.
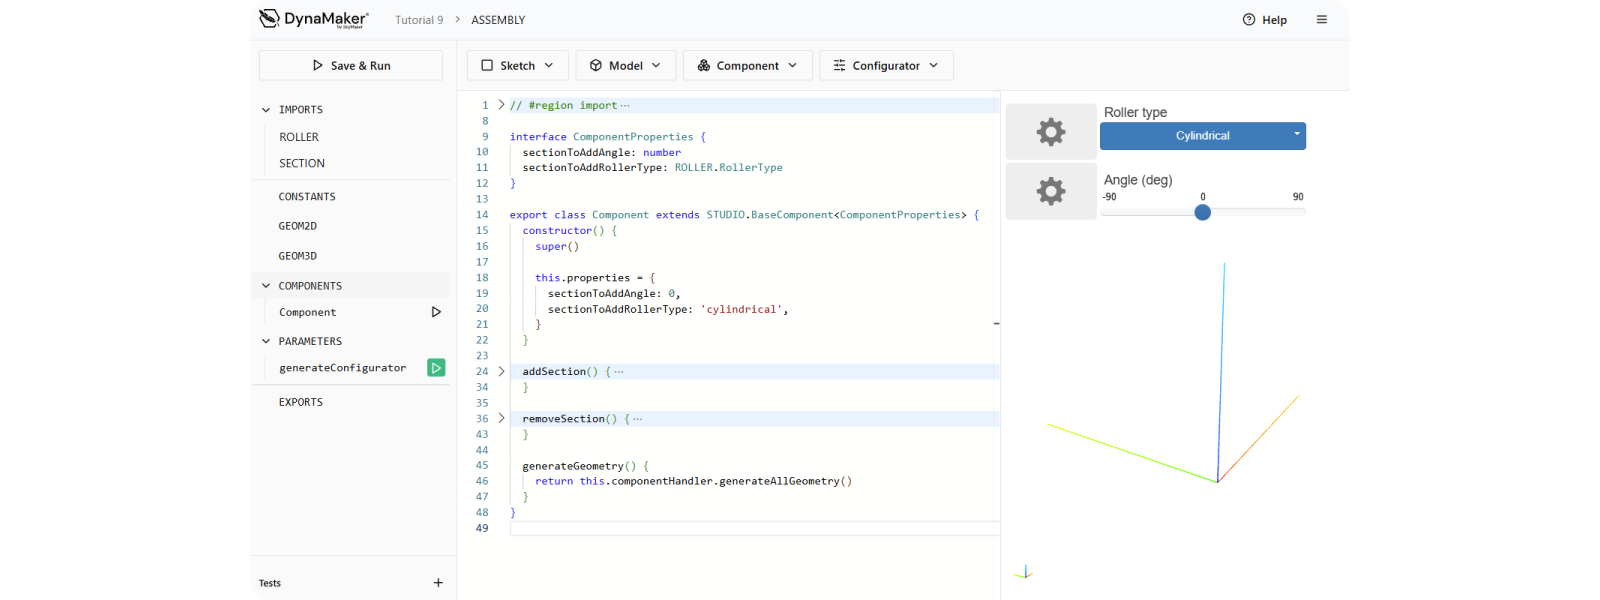
C2. Configurator
A configurator with two parameters (one for each property) will be created.
Note that angle is handled in radians throughout the subcomponents, but the user will use degrees, so a manual
conversion is needed to present its parameter properly. Don't forget to revert the unit-conversion when assigning the
new parameter values to the properties.
- In PARAMETERS, create a configurator for both properties:
Try yourself first and compare it with this new generateConfigurator():
const PARAMETER_ID = {
  ROLLER_TYPE: 'roller-type',
  ANGLE: 'angle',
}

export function generateConfigurator(assemblyComponent: COMPONENTS.Component): SKYPARAM.Configurator {
  const { sectionToAddAngle, sectionToAddRollerType } = assemblyComponent.getProperties()

  const rollerTypeParameter = SKYPARAM.generateDropdown(
    PARAMETER_ID.ROLLER_TYPE,
    'Roller type',
    [
      new SKYPARAM.DropdownItem('Cylindrical', 'cylindrical'),
      new SKYPARAM.DropdownItem('Multidirectional', 'multidirectional'),
    ],
    { defaultValue: sectionToAddRollerType },
  )

  const angleParameter = SKYPARAM.generateSlider(PARAMETER_ID.ANGLE, 'Angle (deg)', {
    defaultValue: Math.round((sectionToAddAngle * 180) / Math.PI),
    maxValue: 90,
    minValue: -90,
    stepSize: 1,
  })

  const configurableParameters = [rollerTypeParameter, angleParameter]

  const configurator = new SKYPARAM.Configurator(configurableParameters)

  configurator.addCompletionCallback((validUserInput, values) => {
    if (validUserInput) {
      assemblyComponent.setProperties({
        sectionToAddRollerType: values[PARAMETER_ID.ROLLER_TYPE],
        sectionToAddAngle: (values[PARAMETER_ID.ANGLE] * Math.PI) / 180,
      })
    }
  })

  return configurator
}
The assembly is now prepared for the User Interface!
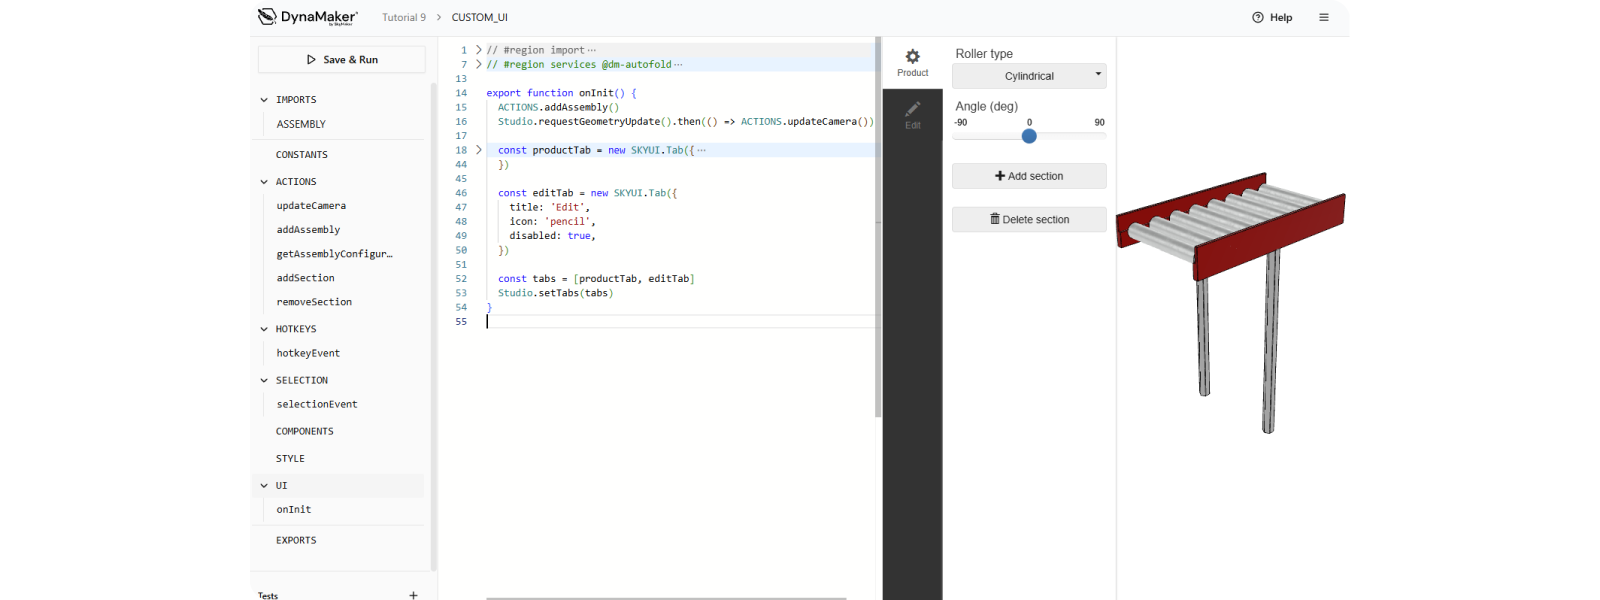
2. UI Editor
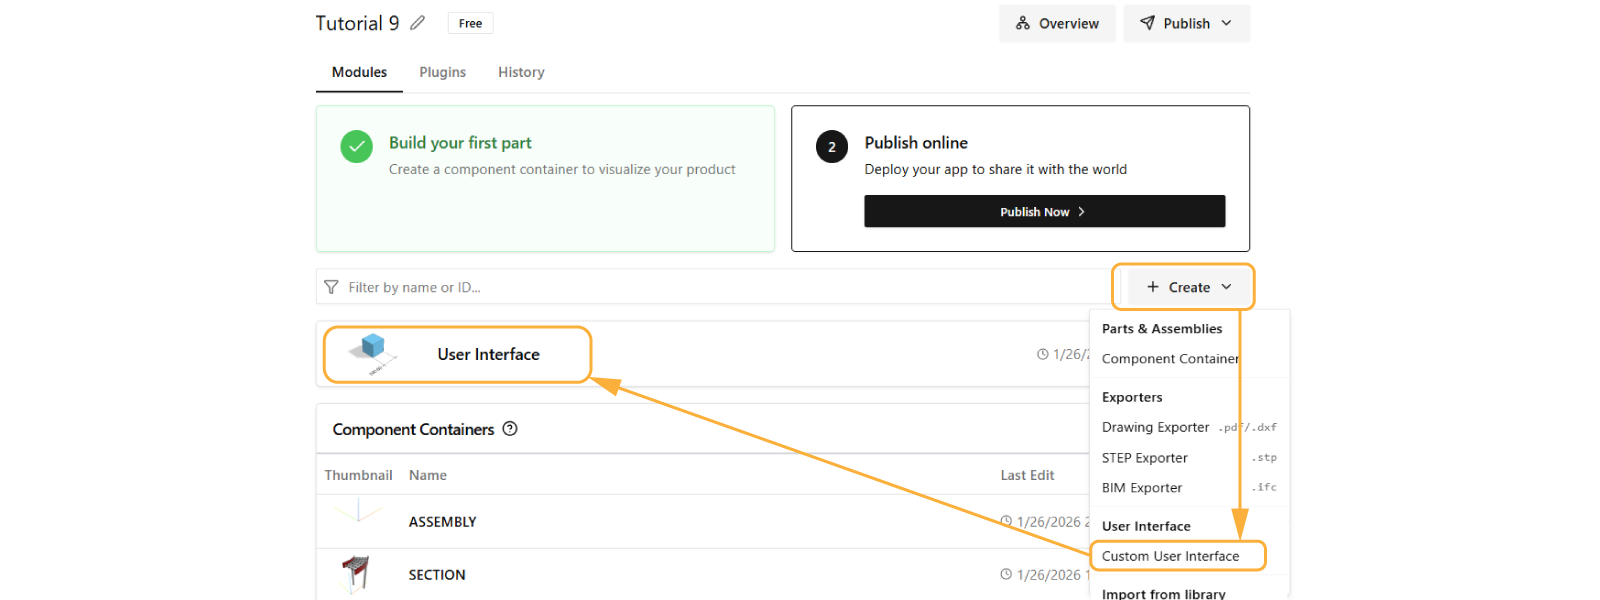
Once we have all the components, it's time for the User Interface:
- In the dashboard, click + Create > Custom User Interface, then open the new User Interface.
In this UI-editor we will focus on two places on the left sidebar:
- UI where the tabs with buttons and configurators are created.
- ACTIONS that trigger any behavior (e.g. when clicking a button).
Notice that the default user interface app has 1 tab with an input-field parameter and a button with a not-yet-added component. Let's change that so it takes the Assembly properly instead.
A. Actions
- Open IMPORTS, check ASSEMBLY, then Apply changes.
- In ACTIONS, add these functions that will be used later:
export function updateCamera() {
  manager.setCameraToFitBounds({
    direction: new SKYMATH.Vector3D(1, 1, -0.75),
  })
}

export function addAssembly() {
  const assemblyComponent = new ASSEMBLY.Component()
  assemblyComponent.addSection()
  manager.getComponentHandler().add(assemblyComponent)
}

export function getAssemblyConfigurator() {
  const assemblyComponent = getAssemblyComponent()
  const configurator = ASSEMBLY.generateConfigurator(assemblyComponent)
  return configurator
}

export function addSection() {
  const assemblyComponent = getAssemblyComponent()
  assemblyComponent.addSection()
}

export function removeSection() {
  const assemblyComponent = getAssemblyComponent()
  assemblyComponent.removeSection()
}

function getAssemblyComponent() {
  const assemblyComponents = manager.getComponentHandler().getComponents(ASSEMBLY.Component)
  if (assemblyComponents.length > 0) {
    return assemblyComponents[0]!
  } else {
    throw new Error(`No assemblies found!`)
  }
}
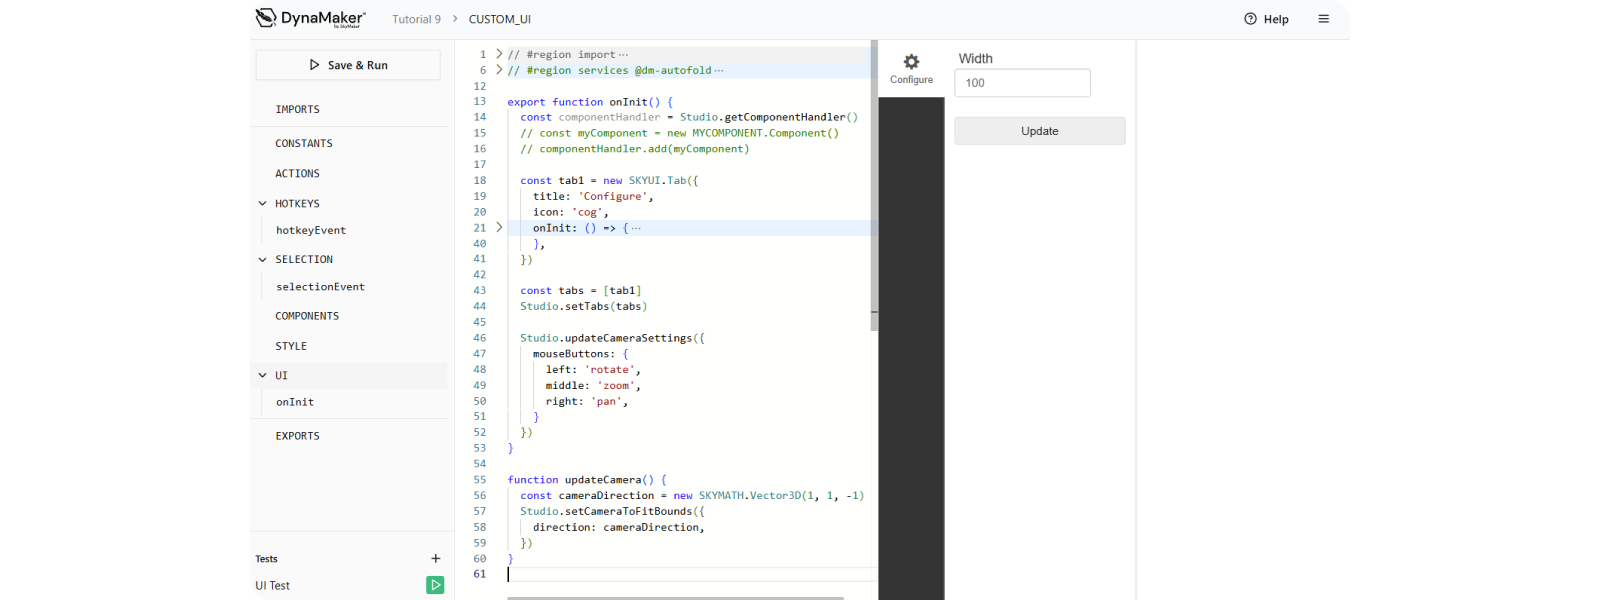
B. onInit
-
In UI update
onInit(), which is the function that is triggered when the app is opened for the first time, with the following so it includes a tab with the assembly configurator and two buttons to add and delete sections:tipA tab:
-
can be created as:
const tab1 = new SKYUI.Tab({
  title: 'Name on tab',
  icon: 'cog',
  onInit: () => {
    // whatever actions
  },
})-
can be added to the UI as:
const tabs = [tab1, tab2]
Studio.setTabs(tabs)
A button:
-
can be created as:
const button1 = new SKYUI.Button(
  'Name on button',
  () => {
    // whatever actions
  },
  { icon: 'plus' },
)-
can be added to a tab (within its
onInit())as:
const tabContent = [button1, button2, configurator1]
Studio.setTabContent(tabContent) -
export function onInit() {
  ACTIONS.addAssembly()
  Studio.requestGeometryUpdate().then(() => ACTIONS.updateCamera())

  const productTab = new SKYUI.Tab({
    title: 'Product',
    icon: 'cog',
    onInit: () => {
      const configurator = ACTIONS.getAssemblyConfigurator()

      const addButton = new SKYUI.Button(
        'Add section',
        () => {
          ACTIONS.addSection()
          Studio.requestGeometryUpdate()
        },
        { icon: 'plus' },
      )
      const deleteButton = new SKYUI.Button(
        'Delete section',
        () => {
          ACTIONS.removeSection()
          Studio.requestGeometryUpdate()
        },
        { icon: 'trash' },
      )

      const tabContent = [configurator, addButton, deleteButton]
      Studio.setTabContent(tabContent)
    },
  })

  const tabs = [productTab]
  Studio.setTabs(tabs)
}
- Save & Update to apply changes.
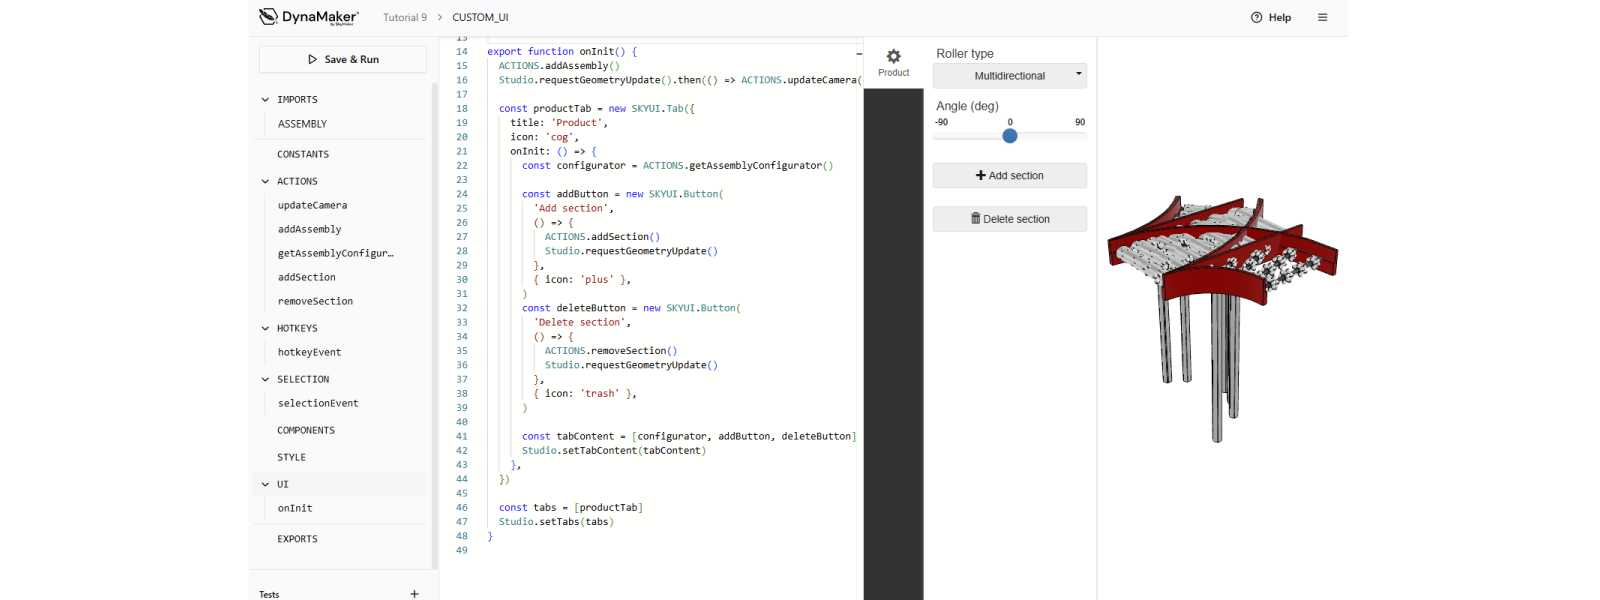
Now you have a fully functional UI: it adds sections with the chosen parameters and removes the last one (if any). However all new sections are added to the origin instead of at the end of each one - this we will fix in ASSEMBLY by using connectors.
3. Connectors
Each new section will be placed at the end point of the previous section. Instead of manually calculating the position and rotation of every single new section, we will use connectors to do the hard work.
A connector is a 3D point that consists of position and rotation that can be created as:
const connector1 = new SKYCAD.Connector3D({
  position: new SKYMATH.Vector3D(100, 200, 300),
  rotation: new SKYMATH.Vector3D(0, 0, Math.PI / 2),
})
We will:
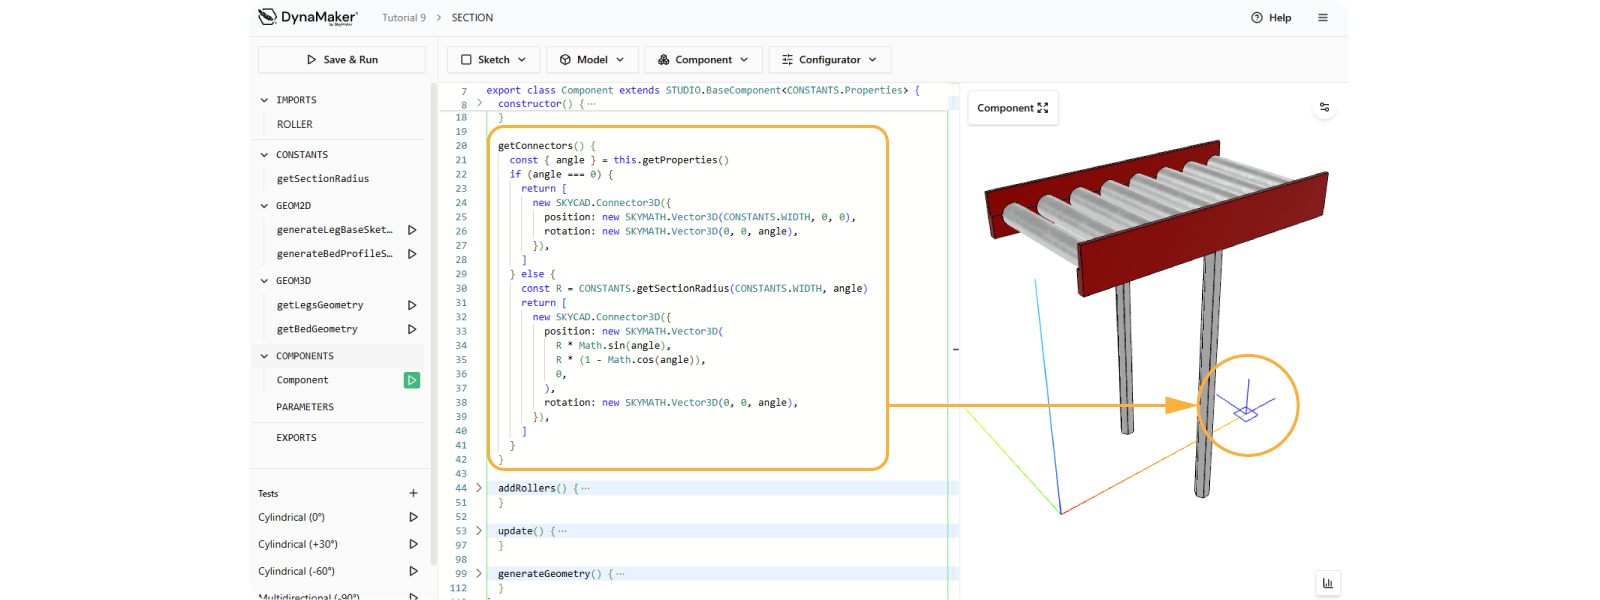
A. Section's Connectors
Create getConnectors() that returns a list with a single connector at the end of the section (on the ground):
- Go back to the SECTION component.
- In COMPONENTS within the
class, creategetConnectors()as:
export class Component extends STUDIO.BaseComponent<CONSTANTS.Properties> {
  constructor() {
    // logic of constructor
  }

  getConnectors() {
    const { angle } = this.getProperties()
    if (angle === 0) {
      return [
        new SKYCAD.Connector3D({
          position: new SKYMATH.Vector3D(CONSTANTS.WIDTH, 0, 0),
        }),
      ]
    } else {
      const R = CONSTANTS.getSectionRadius(CONSTANTS.WIDTH, angle)
      return [
        new SKYCAD.Connector3D({
          position: new SKYMATH.Vector3D(R * Math.sin(angle), -(R * (1 - Math.cos(angle))), 0),
          rotation: new SKYMATH.Vector3D(0, 0, -angle),
        }),
      ]
    }
  }

  addRollers() {
    // logic of addRollers
  }

  update() {
    // logic of update
  }

  generateGeometry() {
    // logic of generateGeometry
  }
}
Just like update(), getConnectors() is a built-in function in a DynaMaker component. It strictly expects a list of
SKYCAD.Connector3D, which are shown in the visualization as a mini coordinate system in blue.
B. Assemble Sections
- Go back to the ASSEMBLY component.
- In COMPONENTS, modify
addSection()so that the new section is added taking the previous section's connector, like:
addSection() {
  const { sectionToAddRollerType, sectionToAddAngle } = this.getProperties()

  let previousSectionConnector = new SKYCAD.Connector3D()
  const sections = this.componentHandler.getInstances(SECTION.Component)
  if (sections.length > 0) {
    const lastSection = sections[sections.length - 1]!
    const lastSectionConnector = lastSection.getConnectors()[0]!
    previousSectionConnector = lastSectionConnector
  }

  const newSectionComponent = new SECTION.Component()
  newSectionComponent.setProperties({
    rollerType: sectionToAddRollerType,
    angle: sectionToAddAngle,
  })
  this.componentHandler.add(newSectionComponent, {
    connector: previousSectionConnector,
  })
}
Ideally add some components tests to see how these new functions work. For example:
export default function (): ASSEMBLY.Component {
  const component = new ASSEMBLY.Component()
  return component
}
export default function (): ASSEMBLY.Component {
  const component = new ASSEMBLY.Component()
  component.setProperties({
    sectionToAddRollerType: 'cylindrical',
    sectionToAddAngle: (30 * Math.PI) / 180,
  })
  component.addSection()
  return component
}
export default function (): ASSEMBLY.Component {
  const component = new ASSEMBLY.Component()
  component.setProperties({
    sectionToAddRollerType: 'multidirectional',
    sectionToAddAngle: (-60 * Math.PI) / 180,
  })
  component.addSection() // section 1

  component.setProperties({
    sectionToAddRollerType: 'cylindrical',
    sectionToAddAngle: (45 * Math.PI) / 180,
  })
  component.addSection() // section 2

  component.addSection() // section 3

  component.removeSection()
  return component
}
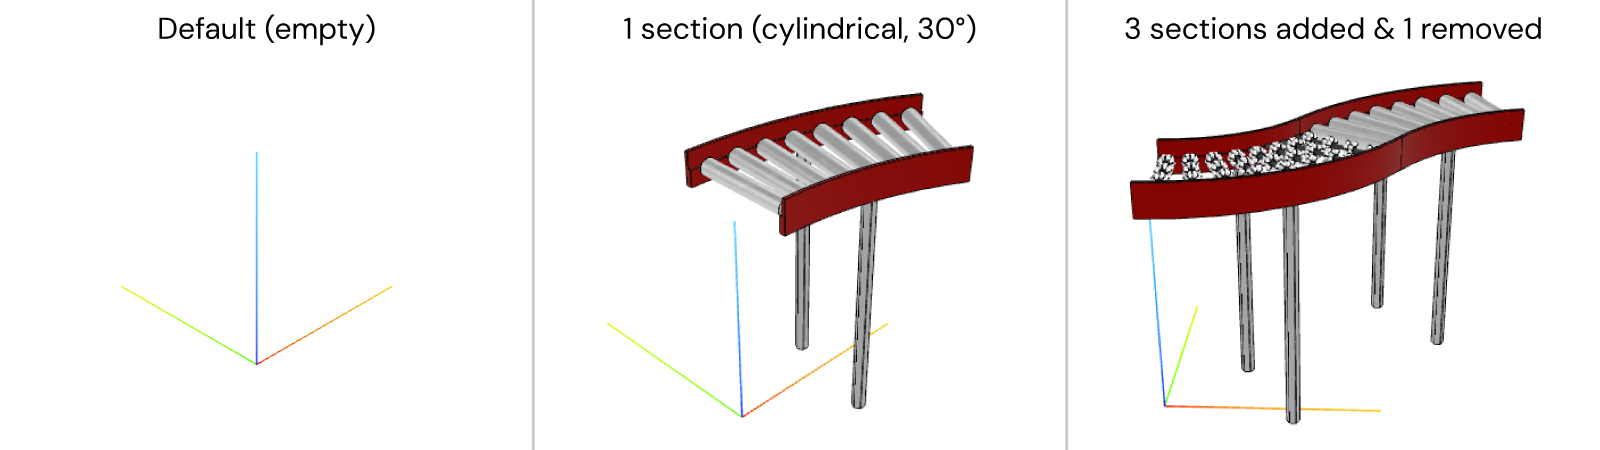
- Test back in the UI-editor with the new connectors, so that it looks like this app:
4. Polish App
As general polishing, we will go through:
- a) extra tabs
- b) camera
- c) metrics
- d) hotkeys
A. Extra Tabs
When you're building your first demo or prototype, it helps to sketch out the UI of what the final app might look like. This makes it easier to understand the user's workflow without having to build every feature right away. Using locked or disabled buttons can be a simple way to show what's planned while keeping the focus on the core flow.
So we could add:
- a1) 2nd tab Edit (disabled for now), meant for editing existing sections individually:
- add an extra tab to
tabswith its optional inputdisabled: true, like:
- add an extra tab to
export function onInit() {
  // ...logic to add assembly, generate geometry and update camera

  const productTab = new SKYUI.Tab({
    title: 'Product',
    icon: 'cog',
    onInit: () => {
      // ...logic for productTab
    },
  })

  const editTab = new SKYUI.Tab({
    title: 'Edit',
    icon: 'pencil',
    disabled: true,
  })

  const tabs = [productTab, editTab]
  Studio.setTabs(tabs)
}
- a2) 3rd tab Exports, meant for adding buttons to export (disabled for now) like:
- button to export a technical drawing (.pdf).
- button to export 3D geometry (.step).
- button to export Bill Of Materials or BOM table (.csv).
- button to take a picture of the visualization (.png).
- button to Add to cart (in case of a possible integration with a website).
export function onInit() {
  // ...logic to add assembly, generate geometry and update camera

  const productTab = new SKYUI.Tab({
    title: 'Product',
    icon: 'cog',
    onInit: () => {
      // ...logic for productTab
    },
  })

  const editTab = new SKYUI.Tab({
    title: 'Edit',
    icon: 'pencil',
    disabled: true,
  })

  const exportsTab = new SKYUI.Tab({
    title: 'Exports',
    icon: 'export',
    onInit: () => {
      const drawingButton = new SKYUI.Button('Drawing (.pdf)', () => {}, {
        icon: 'download',
        disabled: true,
        disabledTooltip: 'Disabled for demo',
      })
      const stepButton = new SKYUI.Button('3D Model (.step)', () => {}, {
        icon: 'download',
        disabled: true,
        disabledTooltip: 'Disabled for demo',
      })
      const bomButton = new SKYUI.Button('BOM (.csv)', () => {}, {
        icon: 'download',
        disabled: true,
        disabledTooltip: 'Disabled for demo',
      })
      const pictureButton = new SKYUI.Button('Picture (.png)', () => {}, {
        icon: 'download',
        disabled: true,
        disabledTooltip: 'Disabled for demo',
      })
      const addToCartButton = new SKYUI.Button('Add to cart', () => {}, {
        icon: 'shopping-cart',
        disabled: true,
        disabledTooltip: 'Disabled for demo',
      })

      Studio.setTabContent([drawingButton, stepButton, bomButton, pictureButton, addToCart])
    },
  })

  const tabs = [productTab, editTab, exportsTab]
  Studio.setTabs(tabs)
}

B. Camera
The camera could be adjusted so that it:
- b1) auto-zooms out when adding a new section:
- within
addButton, after updating the geometry withStudio.requestGeometryUpdate(), update the camera viaACTIONS.updateCamera(), like:
- within
const addButton = new SKYUI.Button(
  'Add section',
  () => {
    ACTIONS.addSection()
    Studio.requestGeometryUpdate().then(() => {
      ACTIONS.updateCamera()
    })
  },
  { icon: 'plus' },
)
- b2) can be rotated under the ground, panned perpendicular to the screen and with the mouse-left click:
- In UI, override the default camera settings with
Studio.updateCameraSettings()with its optional arguments:
- In UI, override the default camera settings with
export function onInit() {
  Studio.updateCameraSettings({
    groundLock: false, // allows panning perpendicular to screen (instead of to ground)
    maxPolarAngle: Math.PI, // unlocks rotation up to 180° (instead of default 90°)
    mouseButtons: {
      left: 'rotate', // overrides left-click to rotate camera (instead of default 'select')
    },
  })

  // ...rest of logic of onInit
}
-
b3) moves nicely from a higher point when opening the app for the first time:
- In ACTIONS, add optional input to
updateCamera()fortravelTimeto define the duration of the camera update in milliseconds, like:ACTIONSexport function updateCamera({ travelTime = 750 } = {}) {
manager.setCameraToFitBounds({
direction: new SKYMATH.Vector3D(1, 1, -0.75),
travelTime,
})
} - In UI, use
Studio.setCameraPosition(vector3D)to start from a high point, then increase travel time of the first camera update like:
UIexport function onInit() {
Studio.updateCameraSettings({
// ...camera settings
})
ACTIONS.addAssembly()
Studio.setCameraPosition(new SKYMATH.Vector3D(-1000, -1000, 10000), { travelTime: 0 })
Studio.requestGeometryUpdate().then(() => {
ACTIONS.updateCamera({ travelTime: 2000 }) // <-- the 1st camera movement will take 2s (instead of default 0.75s)
})
// ... rest of logic (tabs)
} - In ACTIONS, add optional input to
Explore all camera functionalities here.
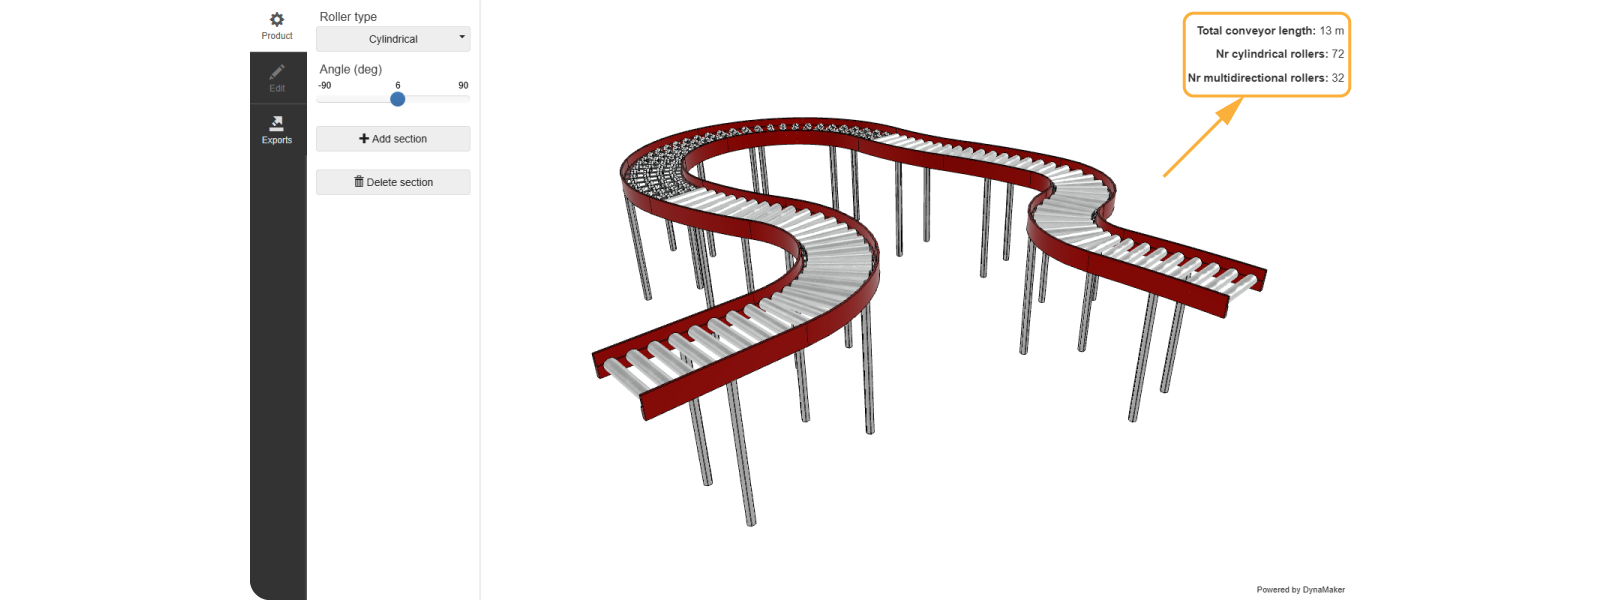
C. Metrics
In DynaMaker it's possible to add any element to the UI, apart from the tabs. Besides any custom HTML items, there are a few standard ones built-in like metrics. These can contain dynamic values usually help to show certain key choices of your configurator. In this case we will show the current number of rollers including type and total conveyor length.
Since we are going to read the rollers within a section from the assembly, we could create a function that returns the component handler of the section. For this, simply:
- Go to the SECTION component.
- In COMPONENTS, create a
classfunction that returns the roller instances:
export class Component extends STUDIO.BaseComponent<CONSTANTS.Properties> {
constructor() {
// ...logic of constructor
}
getRollers() {
return this.componentHandler.getInstances(ROLLER.Component)
}
// ...rest of class functions (getConnectors, addRollers, update, generateGeometry)
}
- In EXPORTS, make sure to export everything from its CONSTANTS like:
export * from './components.js'
export * from './constants.js'
- Go to the ASSEMBLY component.
- Create a
classfunction that gets e.g. the total length and roller quantity by type, the output can be wrapped in an object like:
export class Component extends STUDIO.BaseComponent<CONSTANTS.Properties> {
constructor() {
// ...properties
}
getMetrics() {
let totalConveyorLength = 0
let nrCylindricalRollers = 0
let nrMultidirectionalRollers = 0
const sections = this.componentHandler.getInstances(SECTION.Component)
sections.forEach((section) => {
const sectionComponent = section.getComponent()
// Length
const sectionLength = SECTION.WIDTH
totalConveyorLength += sectionLength
// Rollers
const rollers = sectionComponent.getRollers()
const nrRollers = rollers.length
const rollerType = sectionComponent.getProperty('rollerType')
if (rollerType === 'cylindrical') {
nrCylindricalRollers += nrRollers
} else if (rollerType === 'multidirectional') {
nrMultidirectionalRollers += nrRollers
}
})
return {
totalConveyorLength,
nrCylindricalRollers,
nrMultidirectionalRollers,
}
}
// ...rest of functions (addSection, removeSection, generateGeometry)
}
Time to implement metrics in the UI-editor:
- Go back to the UI-editor.
- In ACTIONS create a function that gets the metrics from the assembly, like:
export function updateMetrics() {
const assemblyComponent = getAssemblyComponent()
const metrics = assemblyComponent.getMetrics()
manager.defineVisibleMetrics([
{
id: 'totalConveyorlength',
label: 'Total conveyor length:',
value: `${Math.round(metrics.totalConveyorLength / 1000)} m`,
},
{
id: 'nrCylindricalRollers',
label: 'Nr cylindrical rollers:',
value: `${metrics.nrCylindricalRollers}`,
},
{
id: 'nrMultidirectionalRollers',
label: 'Nr multidirectional rollers:',
value: `${metrics.nrMultidirectionalRollers}`,
},
])
}
- In UI call this function in
onInit(), after creating the assembly (otherwise there will not be metrics to look at):
export function onInit() {
// ...camera settings
ACTIONS.addAssembly()
ACTIONS.updateMetrics()
// ...rest of the function
}
So far we update the metrics only once (when opening the app for the 1st time), but we also want them to be updated for every change:
- In UI, add
ACTIONS.updateMetrics()for within the actions of the buttons like
const addButton = new SKYUI.Button(
'Add section',
() => {
ACTIONS.addSection()
ACTIONS.updateMetrics()
Studio.requestGeometryUpdate().then(() => {
ACTIONS.updateCamera()
})
},
{ icon: 'plus' },
)
const deleteButton = new SKYUI.Button(
'Delete section',
() => {
ACTIONS.removeSection()
ACTIONS.updateMetrics()
Studio.requestGeometryUpdate()
},
{ icon: 'trash' },
)
D. Hotkeys
In DynaMaker you can assign action events to your keyboard keys or hotkeys and have your customized key-bindings, meaning faster designing and easier user experience in your app. Let's take advantage of already having an action for adding and deleting the sections and assign this behavior to the keys.
You can easily find the hotkey value here. Try pressing Delete
and see that it has the keycode 46.
We will add sections if we press +, and remove sections with - or Delete.
- In HOTKEYS, add the following code within
hotkeyEvent():
export function hotkeyEvent(event, manager: STUDIO.Manager) {
const keyMap = {
107: 'plus',
109: 'minus',
46: 'delete',
}
const key = keyMap[event.keyCode]
const keyFunctions = {
plus: () => {
ACTIONS.addSection()
ACTIONS.updateMetrics()
},
minus: () => {
ACTIONS.removeSection()
ACTIONS.updateMetrics()
},
delete: () => {
ACTIONS.removeSection()
ACTIONS.updateMetrics()
},
}
manager.requestGeometryUpdate()
return keyFunctions[key] && keyFunctions[key]()
}
Now you should be able to add and remove sections with these hotkeys.
Doublecheck your solution here:
- Component ROLLER:
export interface ComponentProperties {
rollerType: CONSTANTS.RollerType
}
export class Component extends STUDIO.BaseComponent<ComponentProperties> {
constructor() {
super()
this.properties = {
rollerType: 'cylindrical',
}
}
generateGeometry() {
const { rollerType } = this.properties
const geometryGroup = new SKYCAD.GeometryGroup()
switch (rollerType) {
case 'cylindrical':
geometryGroup.addGeometry(GEOM3D.getCylindricalGeometry())
break
case 'multidirectional':
geometryGroup.addGeometry(GEOM3D.getMultidirectionalGeometry())
break
}
return geometryGroup
}
}
export function getCylindricalGeometry() {
const geometryGroup = new SKYCAD.GeometryGroup()
geometryGroup.addGeometry(ASSETS.STATIC_MODELS.ROLLER_BAR)
geometryGroup.addGeometry(ASSETS.STATIC_MODELS.ROLLER_CYLINDRICAL)
return geometryGroup
}
export function getMultidirectionalGeometry() {
const geometryGroup = new SKYCAD.GeometryGroup()
geometryGroup.addGeometry(ASSETS.STATIC_MODELS.ROLLER_BAR)
const multidirectionModel = ASSETS.STATIC_MODELS.ROLLER_MULTIDIRECTIONAL
geometryGroup.addGeometry(multidirectionModel, {
position: new SKYMATH.Vector3D(0, -45, 0),
})
geometryGroup.addGeometry(multidirectionModel, {
position: new SKYMATH.Vector3D(0, -71, 0),
rotation: new SKYMATH.Vector3D(0, Math.PI / 5, 0),
})
geometryGroup.addGeometry(multidirectionModel, {
position: new SKYMATH.Vector3D(0, 45, 0),
})
geometryGroup.addGeometry(multidirectionModel, {
position: new SKYMATH.Vector3D(0, 71, 0),
rotation: new SKYMATH.Vector3D(0, Math.PI / 5, 0),
})
geometryGroup.addGeometry(multidirectionModel, {
position: new SKYMATH.Vector3D(0, 160, 0),
})
geometryGroup.addGeometry(multidirectionModel, {
position: new SKYMATH.Vector3D(0, 186, 0),
rotation: new SKYMATH.Vector3D(0, Math.PI / 5, 0),
})
geometryGroup.addGeometry(multidirectionModel, {
position: new SKYMATH.Vector3D(0, -160, 0),
})
geometryGroup.addGeometry(multidirectionModel, {
position: new SKYMATH.Vector3D(0, -186, 0),
rotation: new SKYMATH.Vector3D(0, Math.PI / 5, 0),
})
return geometryGroup
}
export type RollerType = 'cylindrical' | 'multidirectional'
export * from './components.js'
export * from './constants.js'
- Component SECTION:
export class Component extends STUDIO.BaseComponent<CONSTANTS.Properties> {
constructor() {
super()
this.properties = {
angle: 0, // [rad]
rollerType: 'cylindrical',
}
this.addRollers() // <-- 8 rollers are added once here!
this.update()
}
getConnectors() {
const { angle } = this.getProperties()
if (angle === 0) {
return [
new SKYCAD.Connector3D({
position: new SKYMATH.Vector3D(CONSTANTS.WIDTH, 0, 0),
}),
]
} else {
const R = CONSTANTS.getSectionRadius(CONSTANTS.WIDTH, angle)
return [
new SKYCAD.Connector3D({
position: new SKYMATH.Vector3D(R * Math.sin(angle), -(R * (1 - Math.cos(angle))), 0),
rotation: new SKYMATH.Vector3D(0, 0, -angle),
}),
]
}
}
addRollers() {
const nrRollers = 8
const rollerComponent = new ROLLER.Component()
for (let i = 0; i < nrRollers; i++) {
this.componentHandler.add(rollerComponent)
// you don't need to handle positions/rotations here since that will be done in update()
}
}
getRollers() {
return this.componentHandler.getInstances(ROLLER.Component)
}
update() {
const { rollerType, angle } = this.getProperties()
// Rollers
const rollerComponent: ROLLER.Component = this.componentHandler.getComponents(ROLLER.Component)[0]!
rollerComponent.setProperties({ rollerType })
const rollers = this.componentHandler.getInstances(ROLLER.Component)
const nrRollers = rollers.length
const stepPosX = CONSTANTS.WIDTH / nrRollers
let posX = stepPosX / 2
if (angle === 0) {
rollers.forEach((roller) => {
const position = new SKYMATH.Vector3D(posX, 0, CONSTANTS.HEIGHT - CONSTANTS.BED_HEIGHT / 2)
roller.setPosition(position)
roller.setRotation(new SKYMATH.Vector3D(0, 0, 0))
posX += stepPosX
})
} else {
const R = CONSTANTS.getSectionRadius(CONSTANTS.WIDTH, -angle)
const rollerStepAngle = -angle / nrRollers
let rotZ = rollerStepAngle / 2
let posY = (R * (1 - Math.cos(rotZ))) / 2
rollers.forEach((roller) => {
const position = new SKYMATH.Vector3D(posX, posY, CONSTANTS.HEIGHT - CONSTANTS.BED_HEIGHT / 2)
const rotation = new SKYMATH.Vector3D(0, 0, rotZ)
roller.setPosition(position)
roller.setRotation(rotation)
rotZ += rollerStepAngle
posX = R * Math.sin(rotZ)
posY = R * (1 - Math.cos(rotZ))
})
}
}
generateGeometry() {
const { angle } = this.properties
const geometryGroup = this.componentHandler.generateAllGeometry()
geometryGroup.addGeometry(GEOM3D.getLegsGeometry(angle))
geometryGroup.addGeometry(GEOM3D.getBedGeometry(angle), {
position: new SKYMATH.Vector3D(0, 0, CONSTANTS.HEIGHT - CONSTANTS.BED_HEIGHT),
})
return geometryGroup
}
}
const W = CONSTANTS.WIDTH
const D = CONSTANTS.DEPTH
const H = CONSTANTS.HEIGHT
export function getLegsGeometry(angle: number) {
const geometryGroup = new SKYCAD.GeometryGroup()
const legModel = generateLegModel(H)
let leftLegPosition = new SKYMATH.Vector3D(W / 2, D / 2, 0)
let rightLegPosition = new SKYMATH.Vector3D(W / 2, -D / 2, 0)
if (angle !== 0) {
const R = CONSTANTS.getSectionRadius(W, angle)
leftLegPosition.x = (R + D / 2) * Math.sin(angle / 2)
rightLegPosition.x = (R - D / 2) * Math.sin(angle / 2)
leftLegPosition.y = D / 2 - (R + D / 2) * (1 - Math.cos(angle / 2))
rightLegPosition.y = -D / 2 - (R - D / 2) * (1 - Math.cos(angle / 2))
}
const legMaterials = [new SKYCAD.Material({ color: 0xcccccc, metalness: 1, roughness: 0.3 })]
geometryGroup.addGeometry(legModel, {
materials: legMaterials,
position: leftLegPosition,
})
geometryGroup.addGeometry(legModel, {
materials: legMaterials,
position: rightLegPosition,
})
return geometryGroup
}
export function getBedGeometry(angle: number) {
const geometryGroup = new SKYCAD.GeometryGroup()
const bedMaterials = [new SKYCAD.Material({ color: 0xad0000, metalness: 1, roughness: 0.3 })]
if (angle === 0) {
geometryGroup.addGeometry(generateBedStraightModel(W, { invertedProfile: false }), {
materials: bedMaterials,
position: new SKYMATH.Vector3D(0, -D / 2, 0),
})
geometryGroup.addGeometry(generateBedStraightModel(W, { invertedProfile: true }), {
materials: bedMaterials,
position: new SKYMATH.Vector3D(0, D / 2, 0),
})
} else {
const R = CONSTANTS.getSectionRadius(W, angle)
geometryGroup.addGeometry(
generateBedRevolveModel(-R + D / 2, angle, {
invertedProfile: false,
}),
{
materials: bedMaterials,
position: new SKYMATH.Vector3D(0, -R, 0),
},
)
geometryGroup.addGeometry(
generateBedRevolveModel(-R - D / 2, angle, {
invertedProfile: true,
}),
{
materials: bedMaterials,
position: new SKYMATH.Vector3D(0, -R, 0),
},
)
}
return geometryGroup
}
function generateLegModel(height: number) {
const model = new SKYCAD.ParametricModel()
const legSketch = GEOM2D.generateLegBaseSketch()
const plane = new SKYCAD.Plane(0, 0, 1, 0)
model.addExtrude(legSketch, plane, height - CONSTANTS.BED_HEIGHT)
return model
}
function generateBedStraightModel(width: number, { invertedProfile = false } = {}) {
const model = new SKYCAD.ParametricModel()
const plane = new SKYCAD.Plane(-1, 0, 0, 0)
const profileSketch = GEOM2D.generateBedProfileSketch()
if (invertedProfile) profileSketch.mirrorInYaxis()
model.addExtrude(profileSketch, plane, -width)
return model
}
function generateBedRevolveModel(radius: number, angle: number, { invertedProfile = false } = {}) {
const model = new SKYCAD.ParametricModel()
const plane = new SKYCAD.Plane(-1, 0, 0, 0)
const profileSketch = GEOM2D.generateBedProfileSketch()
if (invertedProfile) profileSketch.mirrorInYaxis()
profileSketch.translate(radius, 0)
model.addRevolve(profileSketch, plane, {
revolveAngle: -angle,
axisDirection: new SKYMATH.Vector2D(0, 1),
})
return model
}
export function generateLegBaseSketch() {
return SKYCAD.generateHexagonSketch(0, 0, CONSTANTS.LEG_WIDTH)
}
export function generateBedProfileSketch() {
const H = CONSTANTS.BED_HEIGHT
const T = CONSTANTS.BED_THICKNESS
const sketch = new SKYCAD.Sketch()
sketch.moveTo(0, 0)
sketch.lineTo(0, H / 2)
sketch.lineTo(T / 2, H / 2)
sketch.lineTo(T / 2, H)
sketch.lineTo(T, H)
sketch.lineTo(T, 0)
sketch.lineToId(0)
return sketch
}
export interface Properties {
angle: number
rollerType: ROLLER.RollerType
}
export const DEPTH = 500
export const WIDTH = 1000
export const HEIGHT = 1200
export const BED_HEIGHT = 150
export const BED_THICKNESS = 25
export const LEG_WIDTH = 50
export const ROLLERS_CC_DISTANCE = 100
export function getSectionRadius(width: number, angle: number) {
const R = width / angle
return R
}
export * from './components.js'
export * from './constants.js'
- Component ASSEMBLY
interface ComponentProperties {
sectionToAddAngle: number
sectionToAddRollerType: ROLLER.RollerType
}
export class Component extends STUDIO.BaseComponent<ComponentProperties> {
constructor() {
super()
this.properties = {
sectionToAddAngle: 0,
sectionToAddRollerType: 'cylindrical',
}
}
getMetrics() {
let totalConveyorLength = 0
let nrCylindricalRollers = 0
let nrMultidirectionalRollers = 0
const sections = this.componentHandler.getInstances(SECTION.Component)
sections.forEach((section) => {
const sectionComponent = section.getComponent()
// Length
const sectionLength = SECTION.WIDTH
totalConveyorLength += sectionLength
// Rollers
const rollers = sectionComponent.getRollers()
const nrRollers = rollers.length
const rollerType = sectionComponent.getProperty('rollerType')
if (rollerType === 'cylindrical') {
nrCylindricalRollers += nrRollers
} else if (rollerType === 'multidirectional') {
nrMultidirectionalRollers += nrRollers
}
})
return {
totalConveyorLength,
nrCylindricalRollers,
nrMultidirectionalRollers,
}
}
addSection() {
const { sectionToAddRollerType, sectionToAddAngle } = this.getProperties()
let previousSectionConnector = new SKYCAD.Connector3D()
const sections = this.componentHandler.getInstances(SECTION.Component)
if (sections.length > 0) {
const lastSection = sections[sections.length - 1]!
const lastSectionConnector = lastSection.getConnectors()[0]!
previousSectionConnector = lastSectionConnector
}
const newSectionComponent = new SECTION.Component()
newSectionComponent.setProperties({
rollerType: sectionToAddRollerType,
angle: sectionToAddAngle,
})
this.componentHandler.add(newSectionComponent, {
connector: previousSectionConnector,
})
}
removeSection() {
const sections = this.componentHandler.getInstances(SECTION.Component)
if (sections.length > 0) {
const lastSection = sections[sections.length - 1]!
const sectionsToRemove = [lastSection]!
this.componentHandler.removeInstances(sectionsToRemove)
}
}
generateGeometry() {
return this.componentHandler.generateAllGeometry()
}
}
export * from './components.js'
export * from './constants.js'
const PARAMETER_ID = {
ROLLER_TYPE: 'roller-type',
ANGLE: 'angle',
}
export function generateConfigurator(assemblyComponent: COMPONENTS.Component): SKYPARAM.Configurator {
const { sectionToAddAngle, sectionToAddRollerType } = assemblyComponent.getProperties()
const rollerTypeParameter = SKYPARAM.generateDropdown(
PARAMETER_ID.ROLLER_TYPE,
'Roller type',
[
new SKYPARAM.DropdownItem('Cylindrical', 'cylindrical'),
new SKYPARAM.DropdownItem('Multidirectional', 'multidirectional'),
],
{ defaultValue: sectionToAddRollerType },
)
const angleParameter = SKYPARAM.generateSlider(PARAMETER_ID.ANGLE, 'Angle (deg)', {
// defaultValue: -Math.round((sectionToAddAngle * 180) / Math.PI),
defaultValue: Math.round((sectionToAddAngle * 180) / Math.PI),
maxValue: 90,
minValue: -90,
stepSize: 1,
})
const configurableParameters = [rollerTypeParameter, angleParameter]
const configurator = new SKYPARAM.Configurator(configurableParameters)
configurator.addCompletionCallback((validUserInput, values) => {
if (validUserInput) {
assemblyComponent.setProperties({
sectionToAddRollerType: values[PARAMETER_ID.ROLLER_TYPE],
// sectionToAddAngle: (-values[PARAMETER_ID.ANGLE] * Math.PI) / 180,
sectionToAddAngle: (values[PARAMETER_ID.ANGLE] * Math.PI) / 180,
})
}
})
return configurator
}
export * from './components.js'
export * from './parameters.js'
- UI-Editor:
export function onInit() {
Studio.updateCameraSettings({
groundLock: false,
maxPolarAngle: Math.PI,
mouseButtons: {
left: 'rotate',
},
})
ACTIONS.addAssembly()
ACTIONS.updateMetrics()
Studio.setCameraPosition(new SKYMATH.Vector3D(-1000, -1000, 10000), {
travelTime: 0,
})
Studio.requestGeometryUpdate().then(() => ACTIONS.updateCamera({ travelTime: 2000 }))
const productTab = new SKYUI.Tab({
title: 'Product',
icon: 'cog',
onInit: () => {
const configurator = ACTIONS.getAssemblyConfigurator()
const addButton = new SKYUI.Button(
'Add section',
() => {
ACTIONS.addSection()
ACTIONS.updateMetrics()
Studio.requestGeometryUpdate().then(() => {
ACTIONS.updateCamera()
})
},
{ icon: 'plus' },
)
const deleteButton = new SKYUI.Button(
'Delete section',
() => {
ACTIONS.removeSection()
ACTIONS.updateMetrics()
Studio.requestGeometryUpdate()
},
{ icon: 'trash' },
)
const tabContent = [configurator, addButton, deleteButton]
Studio.setTabContent(tabContent)
},
})
const editTab = new SKYUI.Tab({
title: 'Edit',
icon: 'pencil',
disabled: true,
})
const exportsTab = new SKYUI.Tab({
title: 'Exports',
icon: 'export',
onInit: () => {
const drawingButton = new SKYUI.Button('Drawing (.pdf)', () => {}, {
icon: 'download',
disabled: true,
disabledTooltip: 'Disabled for demo',
})
const stepButton = new SKYUI.Button('3D Model (.step)', () => {}, {
icon: 'download',
disabled: true,
disabledTooltip: 'Disabled for demo',
})
const bomButton = new SKYUI.Button('BOM (.csv)', () => {}, {
icon: 'download',
disabled: true,
disabledTooltip: 'Disabled for demo',
})
const pictureButton = new SKYUI.Button('Picture (.png)', () => {}, {
icon: 'download',
disabled: true,
disabledTooltip: 'Disabled for demo',
})
const addToCartButton = new SKYUI.Button('Add to cart', () => {}, {
icon: 'shopping-cart',
disabled: true,
disabledTooltip: 'Disabled for demo',
})
Studio.setTabContent([drawingButton, stepButton, bomButton, pictureButton, addToCartButton])
},
})
const tabs = [productTab, editTab, exportsTab]
Studio.setTabs(tabs)
}
export function updateMetrics() {
const assemblyComponent = getAssemblyComponent()
const metrics = assemblyComponent.getMetrics()
manager.defineVisibleMetrics([
{
id: 'totalConveyorlength',
label: 'Total conveyor length:',
value: `${Math.round(metrics.totalConveyorLength / 1000)} m`,
},
{
id: 'nrCylindricalRollers',
label: 'Nr cylindrical rollers:',
value: `${metrics.nrCylindricalRollers}`,
},
{
id: 'nrMultidirectionalRollers',
label: 'Nr multidirectional rollers:',
value: `${metrics.nrMultidirectionalRollers}`,
},
])
}
export function updateCamera({ travelTime = 750 } = {}) {
  manager.setCameraToFitBounds({
    direction: new SKYMATH.Vector3D(1, 1, -0.75),
    travelTime,
  })
}
export function addAssembly() {
const assemblyComponent = new ASSEMBLY.Component()
assemblyComponent.addSection()
manager.getComponentHandler().add(assemblyComponent)
}
export function getAssemblyConfigurator() {
const assemblyComponent = getAssemblyComponent()
const configurator = ASSEMBLY.generateConfigurator(assemblyComponent)
return configurator
}
export function addSection() {
const assemblyComponent = getAssemblyComponent()
assemblyComponent.addSection()
}
export function removeSection() {
const assemblyComponent = getAssemblyComponent()
assemblyComponent.removeSection()
}
function getAssemblyComponent() {
const assemblyComponents = manager.getComponentHandler().getComponents(ASSEMBLY.Component)
if (assemblyComponents.length > 0) {
return assemblyComponents[0]!
} else {
throw new Error(`No assemblies found!`)
}
}
export function hotkeyEvent(event, manager: STUDIO.Manager) {
  const keyMap = {
    107: 'plus',
    109: 'minus',
    46: 'delete',
  }

  const key = keyMap[event.keyCode]

  const keyFunctions = {
    plus: () => {
      ACTIONS.addSection()
      ACTIONS.updateMetrics()
    },
    minus: () => {
      ACTIONS.removeSection()
      ACTIONS.updateMetrics()
    },
    delete: () => {
      ACTIONS.removeSection()
      ACTIONS.updateMetrics()
    },
  }
  manager.requestGeometryUpdate()

  return keyFunctions[key] && keyFunctions[key]()
}
Congratulations! You have learned the basics of the user interface, with a quick walkthrough of connectors, hotkeys and camera updates. The final application could look something like this with addtional UI features described below:
Do you want to extend this demo and implement the currently disabled exports? Check these docs-sections for:
- generate PDF drawing.
- export 3D model in STEP format
- export BOM table in CSV format
- take pictures of visualization
- add to cart as sending data to web page (integration).
Now that you know the basics of creating a Custom UI, it's time to learn how to find and fix your errors easily in the next short tutorial Debugging.