Static Assets
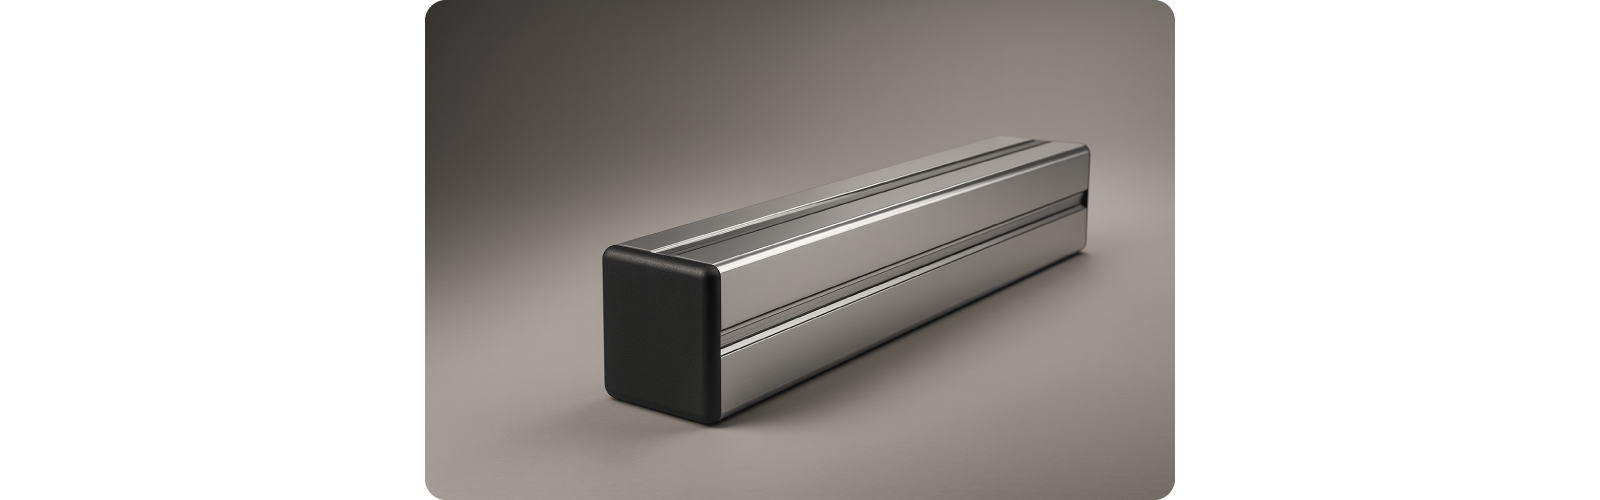
In this tutorial you learn the basics of combining multiple models into one geometry and reusing 2D and 3D assets from other software. You build a metallic beam with a parametric length and fixed end caps.
You complete this in five steps:
1. Create Component
Create a component block as usual via + Create:

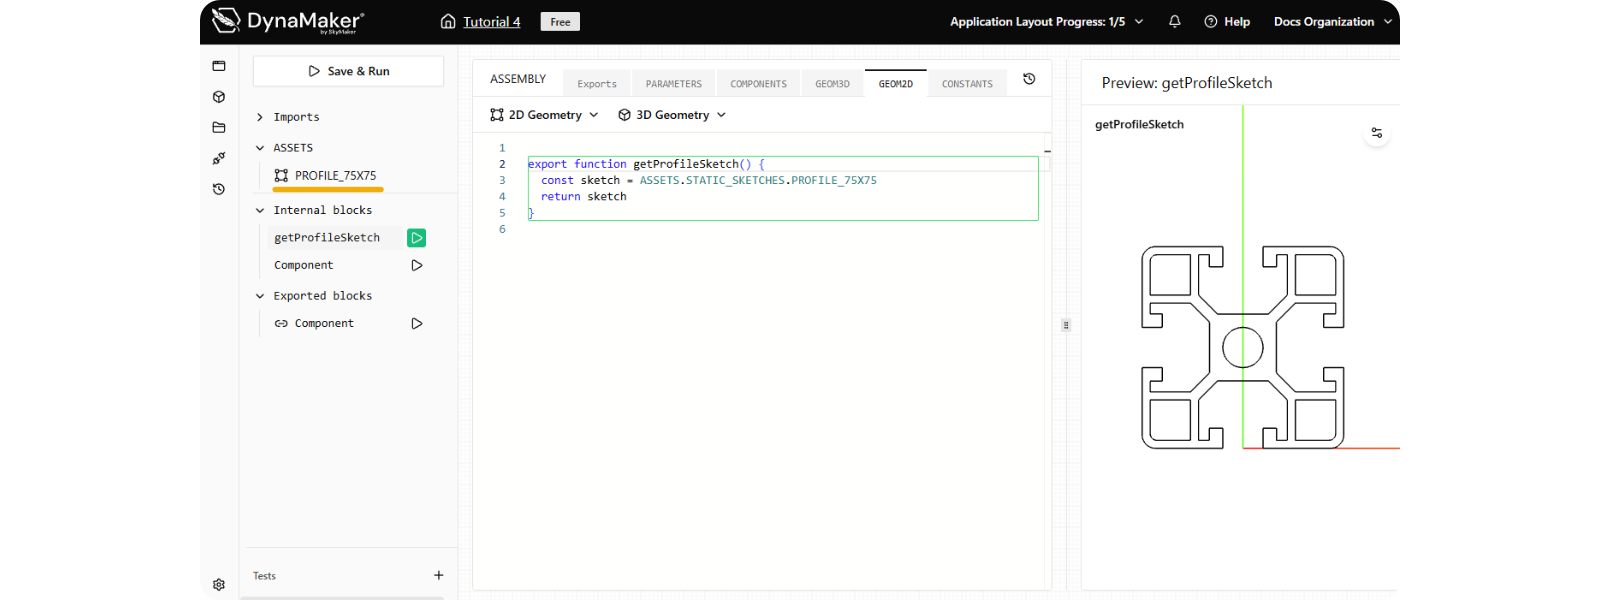
2. Create Sketch
For the profile beam:
- Download this beam profile (.dxf).
- At the top of the editor, click 2D Geometry > Sketch > Upload (.dxf) PROFILE_75X75.dxf > Create.
- Rename function to getProfileSketch through the sidebar, so that you have the following:
export function getProfileSketch() {
  const sketch = ASSETS.STATIC_SKETCHES.PROFILE_75X75
  return sketch
}
3. Create Models
A. Beam
Create an extrusion from the sketch:
- Click 3D Geometry > Extrude > Template, select getProfileSketch, then Create.
- Rename the function to
getProfileModelthrough the left sidebar:
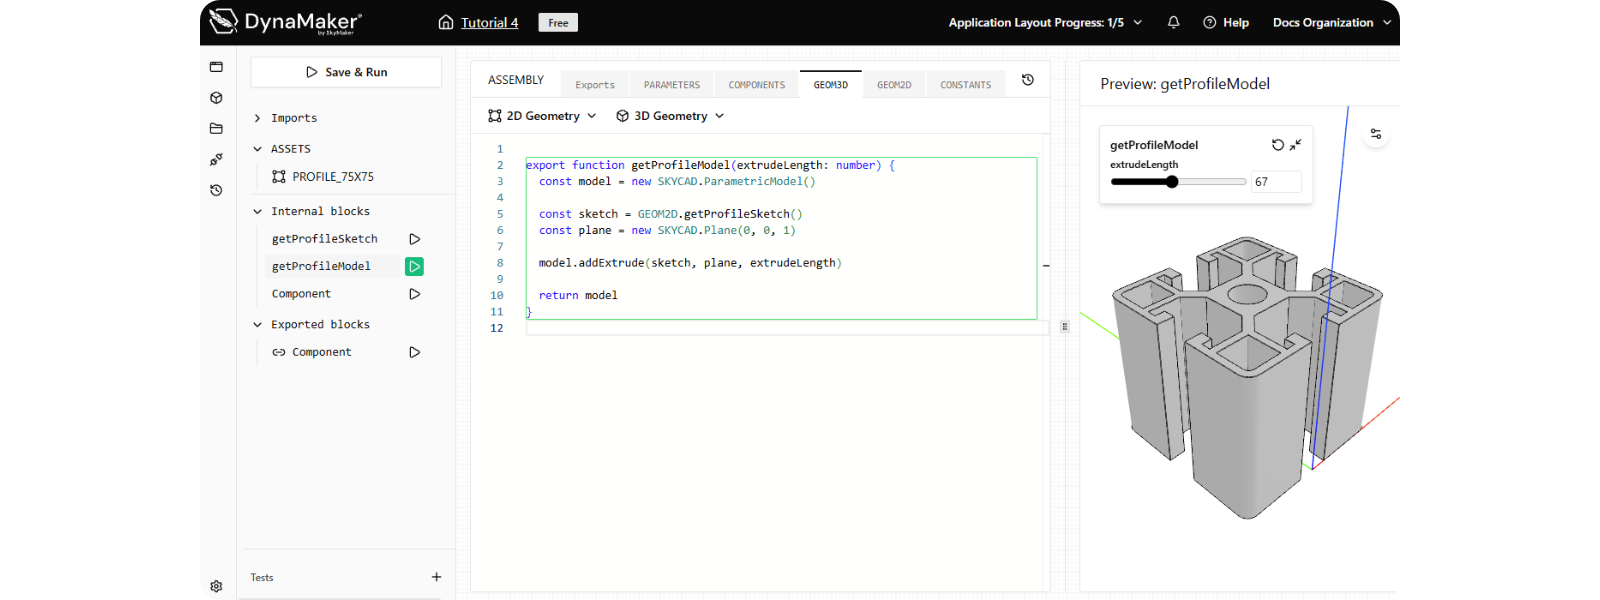
You could also do it via 3D Geometry > Extrude > Upload (.dxf) and select the DXF
sketch directly. However it's good practice to create a GEOM2D function (i.e. getProfileSketch) for the 2D asset to
doublecheck that it looks good.
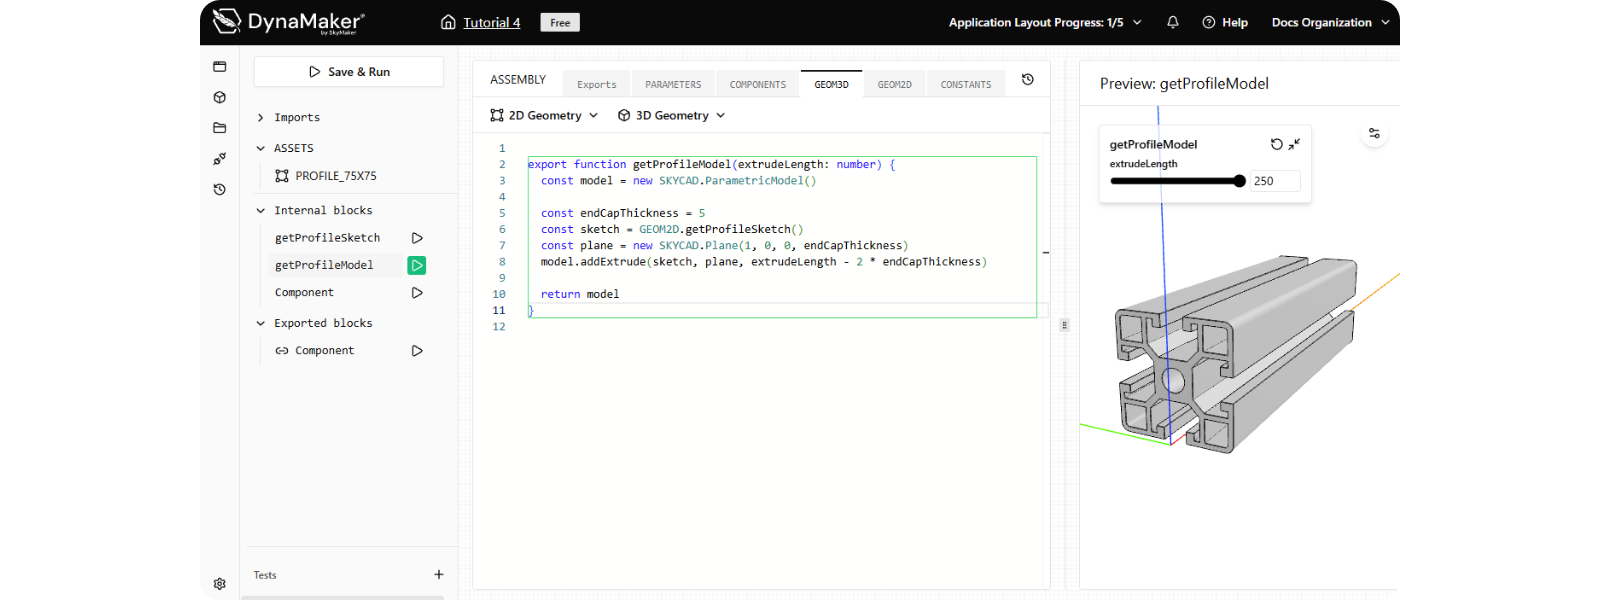
Adjust the profile so it accounts for the end cap thickness and orientation:
- Add the constant:
const endCapThickness = 5 - Set the plane on the x-axis with the offset:
const plane = new SKYCAD.Plane(1, 0, 0, endCapThickness) - Adjust the extrusion length:
model.addExtrude(sketch, plane, extrudeLength - 2 * endCapThickness) - Remove
sizefrom the function (onlyextrudeLengthis used). - Click Save & Run with this finished version:
export function getProfileModel(extrudeLength: number) {
  const model = new SKYCAD.ParametricModel()

  const endCapThickness = 5
  const sketch = GEOM2D.getProfileSketch()
  const plane = new SKYCAD.Plane(1, 0, 0, endCapThickness)
  model.addExtrude(sketch, plane, extrudeLength - 2 * endCapThickness)

  return model
}
B. End Cap
- Download this end cap (.glb).
- Click 3D Geometry > Upload (.glb, .stl, .step) > Choose File PROFILE_END_CAP.glb > Create.
- Rename the function to getEndCapModel, so that it looks like:
export function getEndCapModel() {
  const geometryGroup = new SKYCAD.GeometryGroup()
  geometryGroup.addGeometry(ASSETS.STATIC_MODELS.PROFILE_END_CAP)
  return geometryGroup
}
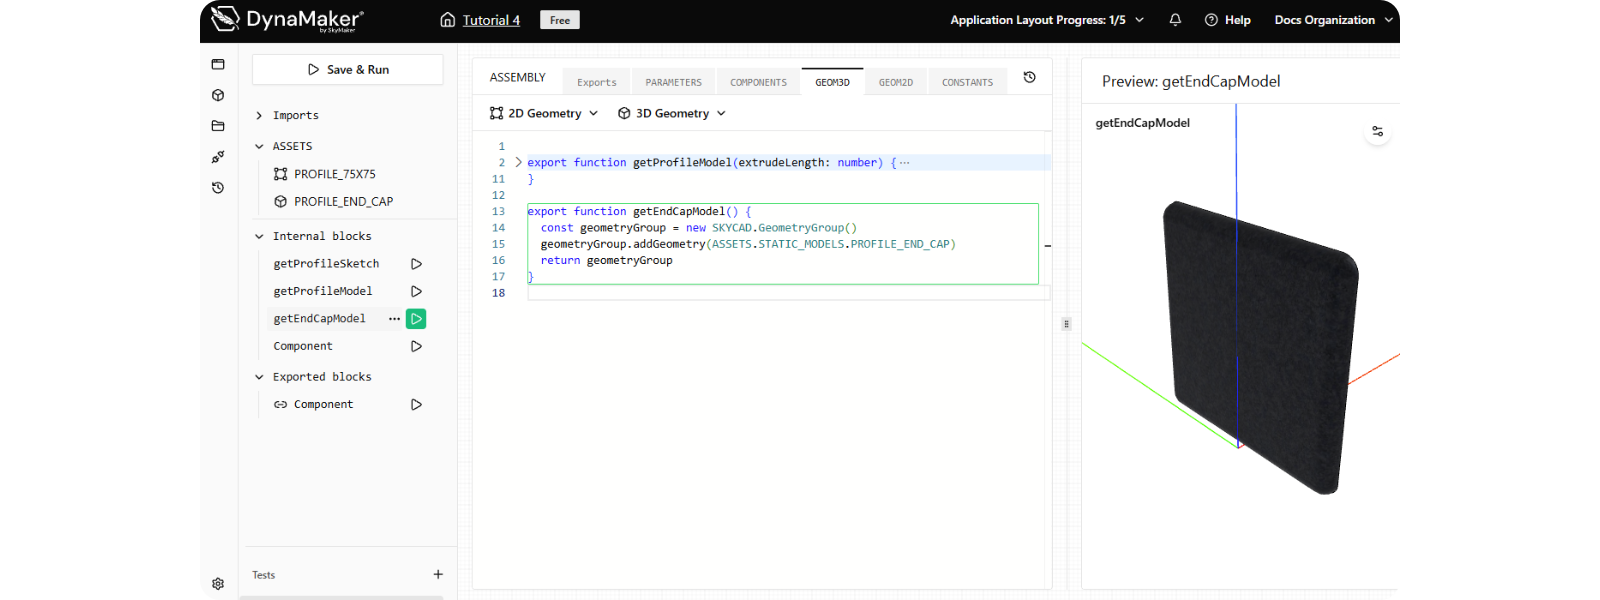
This model comes with a texture already, thanks to the GLB format supporting textures.
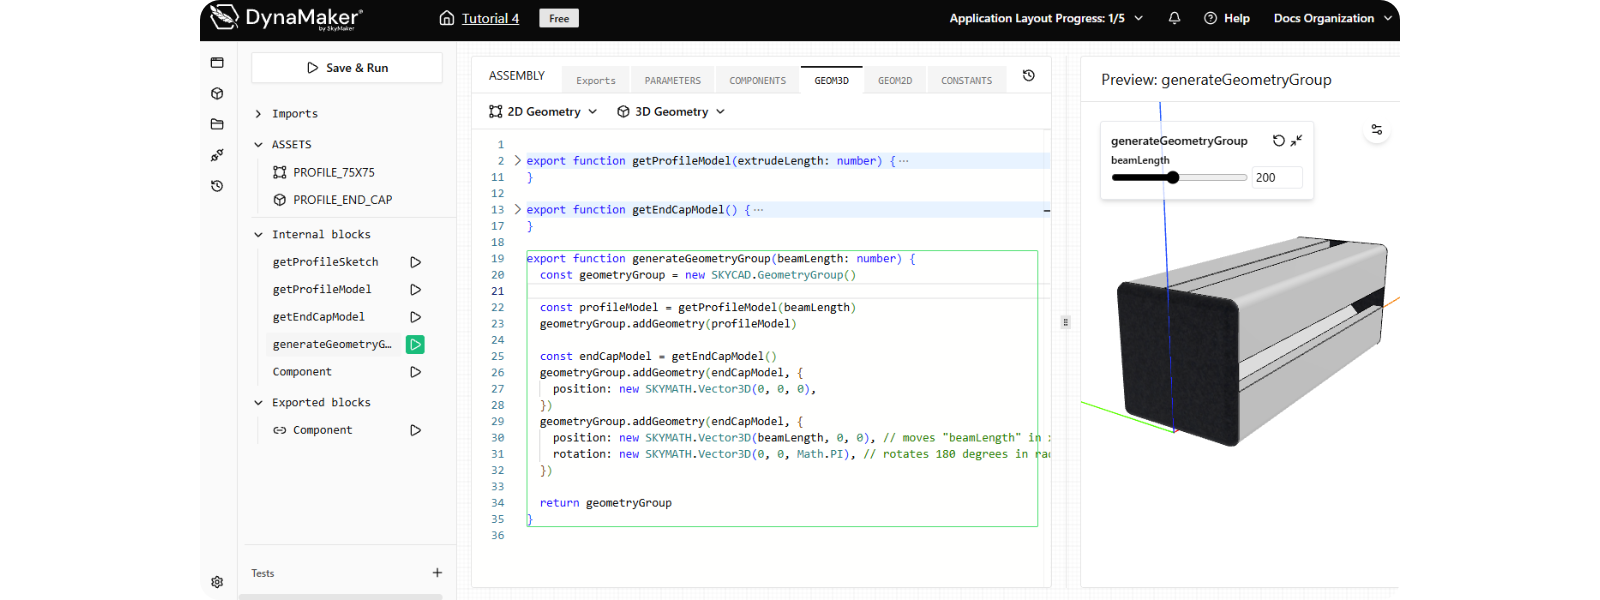
4. Create Geometry
Assemble both models into a single geometry.
Two or more models can be assembled via a 3D container or geometry group:
const geometryGroup = new SKYCAD.GeometryGroup()
geometryGroup.addGeometry(model1, { position: P1, rotation: R1 })
geometryGroup.addGeometry(model2, { position: P2, rotation: R2, scale: 3 }) // "scale: 3" means 3 times bigger
Optional arguments position and rotation, as 3D vectors, define placement in 3D world:
const P1 = new SKYMATH.Vector3D(150, 0, 0) // translated 150 mm in x-direction
const R1 = new SKYMATH.Vector3D(0, 0, Math.PI / 2) // rotated 90 degrees in radians around z-axis
Build the geometry group:
- Create a function
generateGeometryGroupthat returns a geometry group and takesbeamLength:
export function generateGeometryGroup(beamLength: number) {}
- Inside it, create the geometry group:
const geometryGroup = new SKYCAD.GeometryGroup()
- Get the profile model and add it:
const profileModel = getProfileModel(beamLength)
geometryGroup.addGeometry(profileModel)
- Get the end cap model:
const endCapModel = getEndCapModel()
- Add the first end cap:
geometryGroup.addGeometry(endCapModel, {
  position: new SKYMATH.Vector3D(0, 0, 0),
})
- Add the second end cap with translated position and 180 degree rotation:
geometryGroup.addGeometry(endCapModel, {
  position: new SKYMATH.Vector3D(beamLength, 0, 0),
  rotation: new SKYMATH.Vector3D(0, 0, Math.PI),
})
- Return the geometry group, to end up with this finished function:
export function generateGeometryGroup(beamLength: number) {
  const geometryGroup = new SKYCAD.GeometryGroup()

  const profileModel = getProfileModel(beamLength)
  geometryGroup.addGeometry(profileModel)

  const endCapModel = getEndCapModel()
  geometryGroup.addGeometry(endCapModel, {
    position: new SKYMATH.Vector3D(0, 0, 0),
  })
  geometryGroup.addGeometry(endCapModel, {
    position: new SKYMATH.Vector3D(beamLength, 0, 0), // moves "beamLength" in x-direction
    rotation: new SKYMATH.Vector3D(0, 0, Math.PI), // rotates 180 degrees in radians around z-axis
  })

  return geometryGroup
}
5. Add Materials
Customize the appearance by giving the profile a metallic material. A material can be added only when adding a model to
a geometry group. Inside generateGeometryGroup:
-
Create the material:
const metalMaterial = new SKYCAD.Material({ color: 0xcccccc, metalness: 1, roughness: 0 }) -
Create a list (you can have more than one material):
const beamMaterials = [metalMaterial] -
Assign the material when adding the profile model:
geometryGroup.addGeometry(profileModel, { materials: beamMaterials }) -
Final function with material:
export function generateGeometryGroup(beamLength: number) {
  const geometryGroup = new SKYCAD.GeometryGroup()

  const profileModel = getProfileModel(beamLength)
  const metalMaterial = new SKYCAD.Material({
    color: 0xcccccc, // grey in hexadecimal
    metalness: 1, // value ranges from 0 (non-metal) to 1 (metal)
    roughness: 0, // value ranges from 0 (smooth/glossy) to 1 (rough/matte)
  })
  const beamMaterials = [metalMaterial]
  geometryGroup.addGeometry(profileModel, { materials: beamMaterials })

  const endCapModel = getEndCapModel()
  geometryGroup.addGeometry(endCapModel, {
    position: new SKYMATH.Vector3D(0, 0, 0),
  })
  geometryGroup.addGeometry(endCapModel, {
    position: new SKYMATH.Vector3D(beamLength, 0, 0),
    rotation: new SKYMATH.Vector3D(0, 0, Math.PI),
  })

  return geometryGroup
}
You have learned the basics of modeling. Turn your models into a component with customizable properties in the next tutorial: Parts.