Quote File Service (QFS)
It is common to want to add some files from DynaMaker to another system, for example a CPQ, when a configuration is completed or a quote changes status. While using the client-side postMessage API is the most simple way of sending quotation files between DynaMaker and your other systems, it is not always possible to use. If the files need to be generated and sent at some point after the user has ended their browser session, Quote File Service can be used to generate the files on the server via a simple REST API.
Plugin
The first step in setting up QFS for your DynaMaker application is to enable its plugin in the dashboard. Simply follow the QFS plugin's tutorial to do so.
REST API
After the plugin has been enabled and at least one task has been implemented as per the section above, we can use the
Quote File Service REST API to create jobs. A job is defined by a task, for example generate-pdf, and some
configuration data.
Authentication
To authenticate your requests to QFS, copy the API Key from the QFS plugin in the dashboard and include it in the header of your requests. Be mindful of how you store and share your key!
qfs-api-key: <my-qfs-api-key>
Create job
To create a job, send a POST request to https://qfs.dynamaker.com/jobs with your API Key in the header and with the
following data in the JSON body:
- applicationId The ID of your DynaMaker application
- environment Either test or production
- task The name of the task that you implemented in your application code using the QFS plugin
- configuration The configuration data that should be used for this particular job. This is the same configuration data that you get as an argument to the task callback inside your DynaMaker code.
Example request:
POST https://qfs.dynamaker.com/jobs
{
  "applicationId": "SaOrCvlMUl3",
  "environment": "test",
  "task": "generate-pdf",
  "configuration": {
    "height": 500,
    "width": 2000
  }
}
Example response:
{
  "id": "5IhgHvhnn3quGuDvtxWirDtl4PwkJhJbxlCO",
  "url": "https://qfs.dynamaker.com/jobs/5IhgHvhnn3quGuDvtxWirDtl4PwkJhJbxlCO"
}
Get job status
By doing a GET request to the url specified in the response of the POST request above, we can check the status, which
can be one of the following:
- queued The job has been created but has not started yet.
- processing The job is currently running.
- finished The job has finished and the response will include a
resultproperty with an URL where the resulting data can be fetched. - failed The job failed and an error message is included in the
messageproperty of the response JSON. - expired The job finished more than 24 hours ago and the result is no longer available.
Example request:
GET https://qfs.dynamaker.com/jobs/5IhgHvhnn3quGuDvtxWirDtl4PwkJhJbxlCO
Example response:
{
  "id": "5IhgJvhnn2quGuDvtxVirDtl8PwkJhJbxlCM",
  "status": "finished",
  "result": "https://qfs.dynamaker.com/jobs/5IhgHvhnn3quGuDvtxWirDtl4PwkJhJbxlCO/result"
}
Get job result
Example request:
GET https://qfs.dynamaker.com/jobs/5IhgHvhnn3quGuDvtxWirDtl4PwkJhJbxlCO/result
The response will be the PDF data.
Webhook
By including a callbackUrl when creating a job, QFS will send a POST request with the result to that URL when the job
has finished. If the job was successful, QFS will include success=true in the
URL parameters and the body
be the data produced by the job. If there was an error, success=false will be sent instead and the body will be a JSON
object including a message property.
Successful example
Create job request
POST https://qfs.dynamaker.com/jobs
{
  "applicationId": "SaOrCvlMUl3",
  "environment": "test",
  "task": "generate-pdf",
  "callbackUrl": "https://mycompany.com/api/webhook?id=abc123",
  "configuration": {
    "height": 500,
    "width": 2000
  }
}
Responding webhook request
POST https://mycompany.com/api/webhook?id=abc123&success=true
<pdf data>
Example where task name was misspelled
Create job request
POST https://qfs.dynamaker.com/jobs
{
  "applicationId": "SaOrCvlMUl3",
  "environment": "test",
  "task": "generate-pd",
  "callbackUrl": "https://mycompany.com/api/webhook?id=abc124",
  "configuration": {
    "height": 500,
    "width": 2000
  }
}
Responding webhook request
POST https://mycompany.com/api/webhook?id=abc124&success=false
{
  "success": false,
  "message": "'The task generate-pd' is not implemented in the DynaMaker application"
}
Power Automate
The REST API described in the section above can be used together with no-code solutions such as Microsoft Power Automate for easy integration.
Free template for Elfsquad integration
To help you get started using QFS together with Elfsquad, we have created a template flow that you can use. At the very least, you will have to update the "Flow Settings" block with your specifics to get it running. When that information is filled in, you may of course modify the flow freely to make it suit your specific needs; please refer to the official documentation for that.
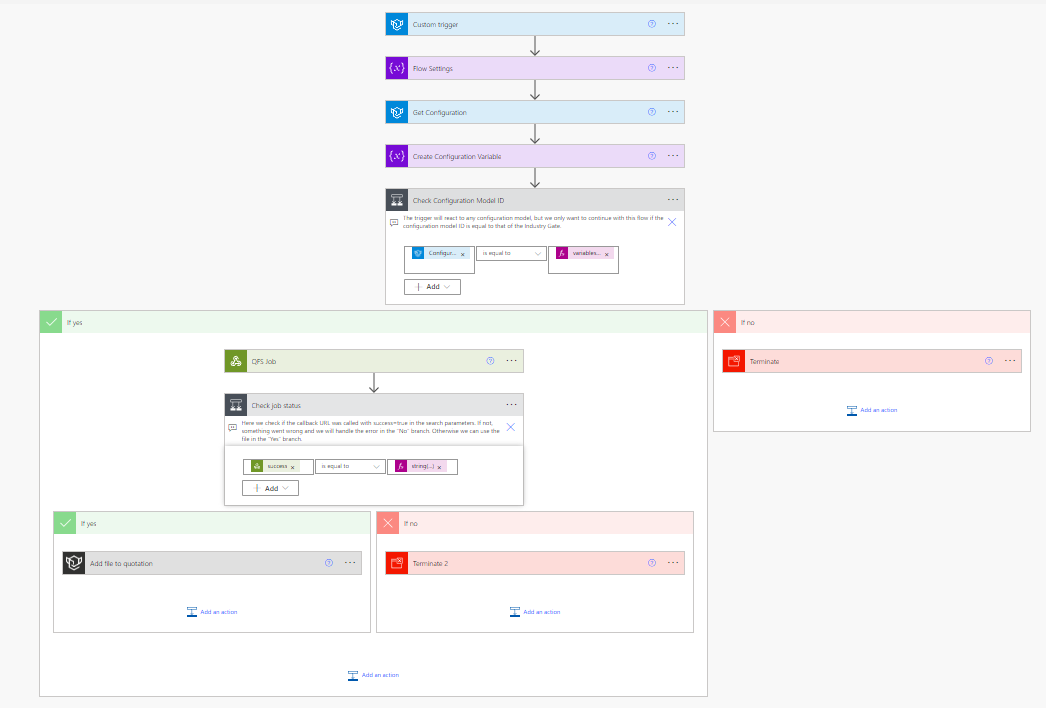
Here is a step-by-step guide on how you can get started with the template:
-
Download the template flow.
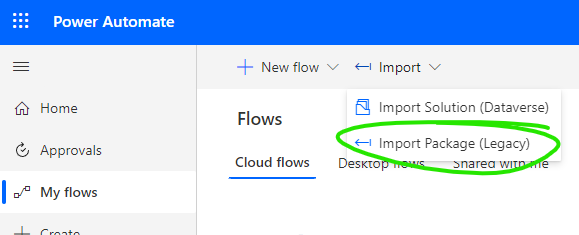
-
Go to "My flows" and click "Import Package".
-
Select your Elfsquad Data and Elfsquad Product Configurator connectors.

-
Click on the Import button to import the flow.
-
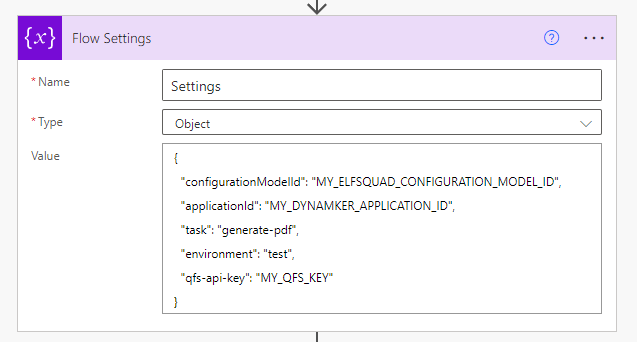
Update the "Flow Settings" block and save your flow.
- configurationModelId - This is the same as the "Feature Model ID" that you specified in your Elfsquad Plugin settings.
- applicationId - The ID of your DynaMaker application.
- task - The QFS task that should be used.
- environment - Specifies which version of your deployed app should be used,
testorproduction. - qfs-api-key - The API Key that can be found in your QFS Plugin settings in the dashboard of your DynaMaker application.
-
Enable your flow from the flow info page.
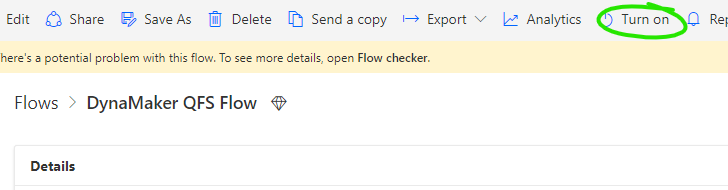
-
Test your flow by using the button in the upper right corner while on the edit flow page.

As usual, feel free to send an email to support@dynamaker.com if you get stuck or have questions.