PRESET
This page has not yet been updated to show the new component editor. Read about the changes here.
Do you want to see how your product behaves for specific edge-case configurations? In DynaMaker, you can "store" a specific set of properties and behaviors by using presets. Presets can be created in the tab SPEC for each editor:
- Component Editor:
- Presets component for your component presets.
- Presets 2D for your layouts and individual sketches.
- Presets 3D for your models and geometries.
- Drawing Editor:
- Presets drawing for your drawing presets.
Component Editor
There are 3 different types of presets within the Component Editor:
ComponentPreset
Create a component preset as PRESET.ComponentPreset(). Each case can be added to the ComponentPreset with
addCase(), which requires a list of properties that the constructor of the class could take (empty for the
template). Also:
- in
PRESET.ComponentPreset()use the optional argument insetCameraOnUpdateto update the camera when switching presets. - in every
myPreset.addCase()use the optional argument inpostProcessorto trigger any function(s) from the component andlabelto identify it easily in the dropdown of presets components.
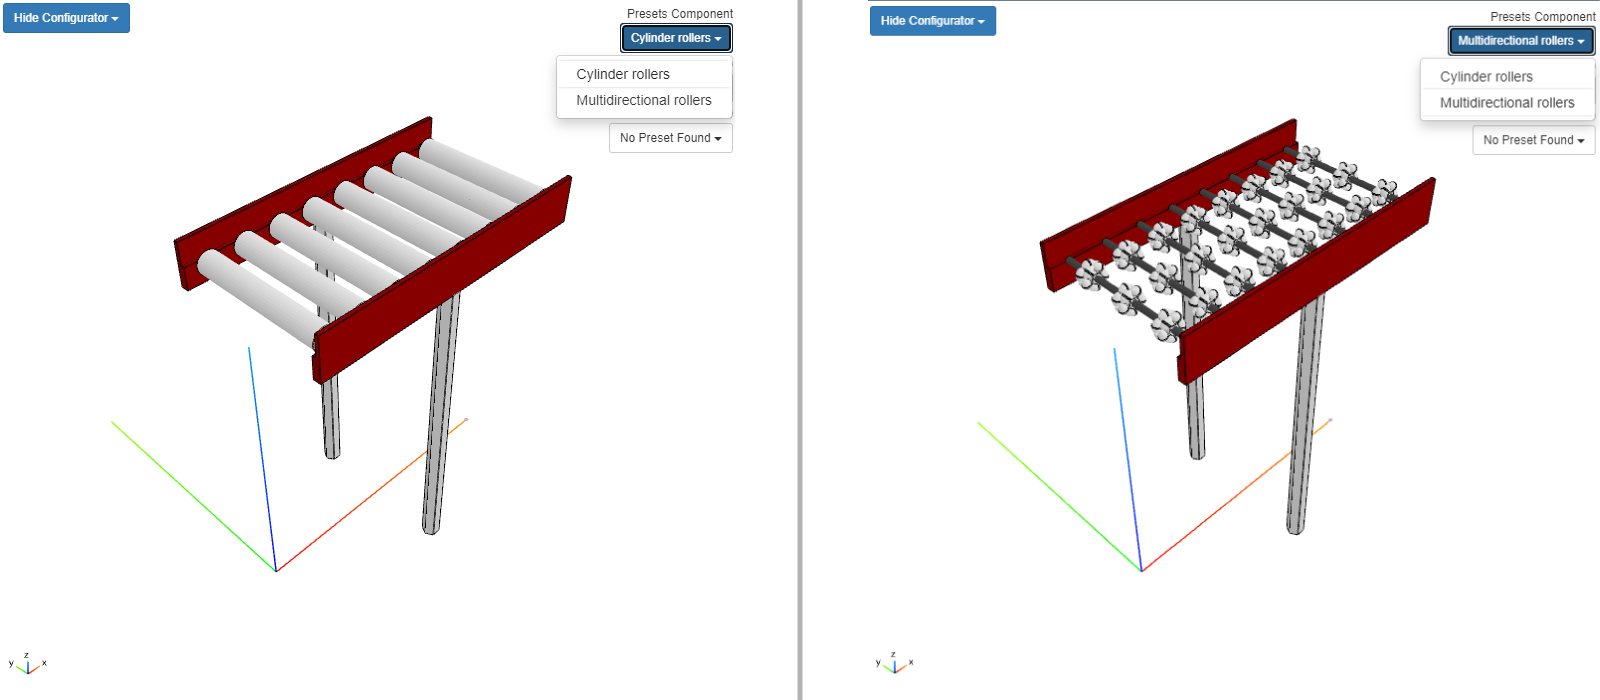
Switch presets by using the dropdown Presets Component at the top-right corner of the preview section.
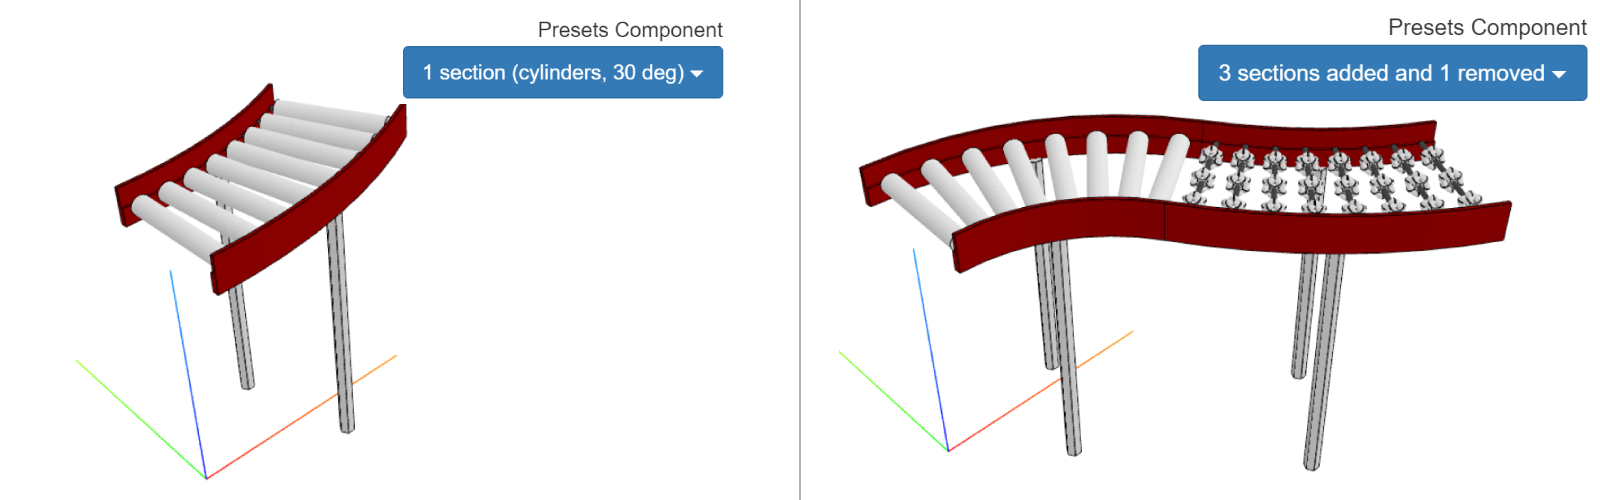
Here is an example of creating a PRESET.ComponentPreset() with two cases of the conveyor app from the tutorial
User Interface, that uses more than one function of the component within the
postProcessor:
-
- Case for a section with 30 degrees and cylindrical rollers.
-
- Case for 3 sections with different degrees that are added and 1 is removed.
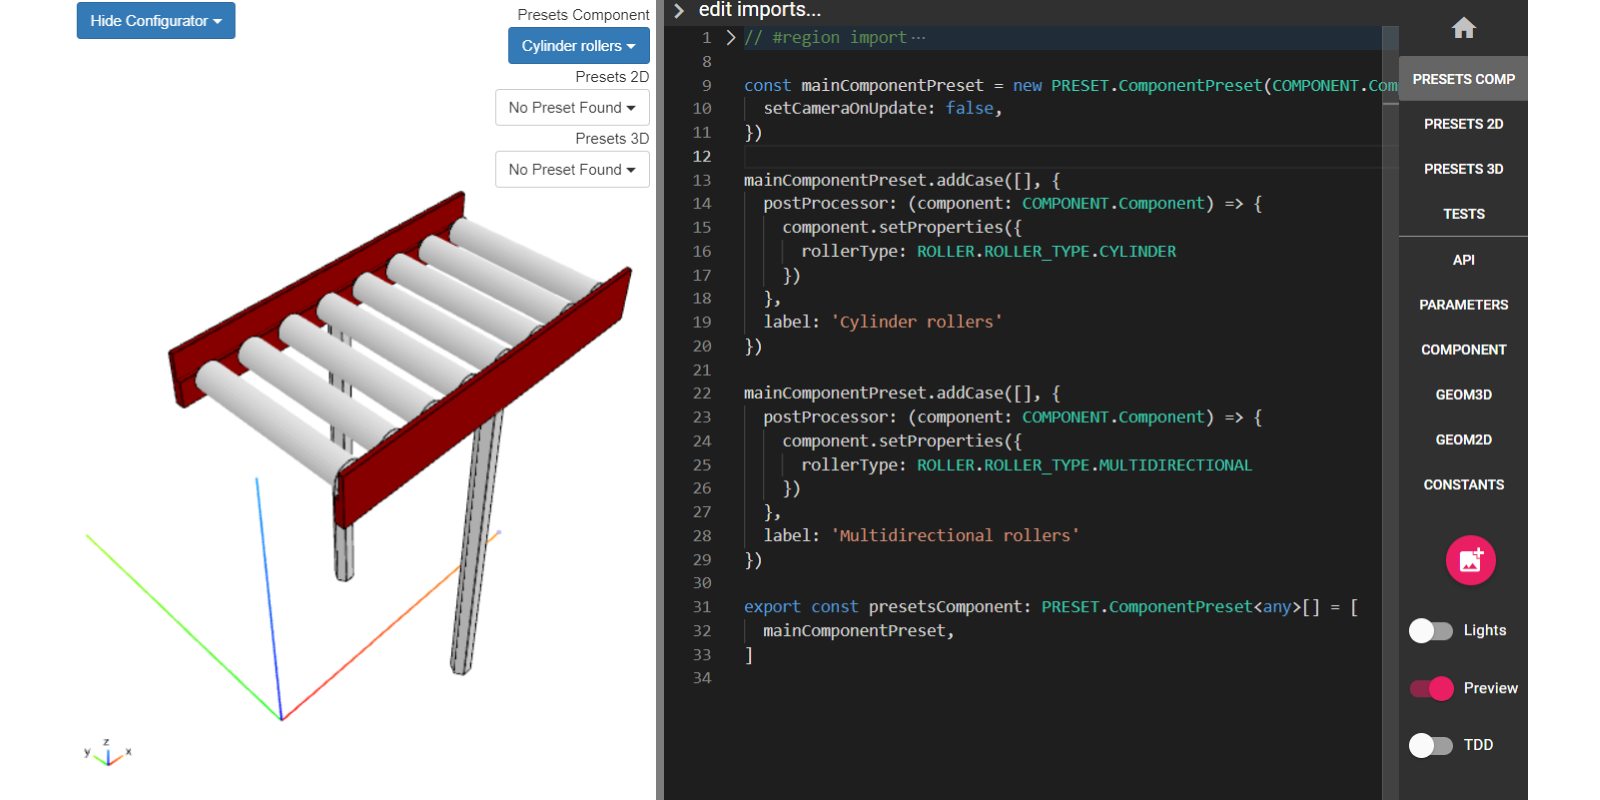
const mainComponentPreset = new PRESET.ComponentPreset(COMPONENT.Component, {
  setCameraOnUpdate: false,
})

mainComponentPreset.addCase([], {
  postProcessor: (component: COMPONENT.Component) => {
    component.setProperties({
      rollerType: ROLLER.ROLLER_TYPE.CYLINDER,
      angle: (30 * Math.PI) / 180,
    })
    component.addSection()
  },
  label: '1 section (cylinders, 30 deg)',
})

mainComponentPreset.addCase([], {
  postProcessor: (component: COMPONENT.Component) => {
    component.setProperties({
      rollerType: ROLLER.ROLLER_TYPE.CYLINDER,
      angle: (-60 * Math.PI) / 180,
    })
    component.addSection()

    component.setProperties({
      rollerType: ROLLER.ROLLER_TYPE.MULTIDIRECTIONAL,
      angle: (30 * Math.PI) / 180,
    })
    component.addSection()

    component.setProperties({
      rollerType: ROLLER.ROLLER_TYPE.MULTIDIRECTIONAL,
      angle: (-90 * Math.PI) / 180,
    })
    component.addSection()

    component.removeSection()
  },
  label: '3 sections added and 1 removed',
})

export const presetsComponent: PRESET.ComponentPreset<any>[] = [mainComponentPreset]
Here
component.addSection()andcomponent.removeSection()are custom functions that were added to the api of the class in the tutorial (see here), and are on the same level as the common ones likecomponent.generateGeometry().
Preset2D
Create a 2D preset as PRESET.Preset2D() for each particular function that generates a sketch or a layout from the tab
GEOM2D. Each case can be added to the Preset2D with addCase(), which requires a list of the values that
the function needs as arguments. Also:
- in
PRESET.Preset2D()use the optional argument insetCameraOnUpdateto update the camera when switching presets. - in every
myPreset.addCase()uselabelto identify it easily in the dropdown of presets 2D.
Here is an example of creating two PRESET.Preset2D() with 1 & 2 cases respectively of the profile of a beam from the
tutorial Configurators. In this case, the functions we want to do presets on takes 4
arguments in a specific order:
// GEOM2D

export function generateProfileTypeISketch(profileWidth: number, profileHeight: number, webThickness: number, flangeThickness: number) {
  ...
}

export function generateProfileTypeOSketch(profileWidth: number, profileHeight: number, hollow: boolean, pipeThickness: number) {
  ...
}
then the case of the preset must take 4 arguments as a list:
// PRESETS 2D

const profileTypeISketchPreset = new PRESET.Preset2D(GEOM2D.generateProfileTypeISketch, { setCameraOnUpdate: false })
profileTypeISketchPreset.addCase([50, 80, 20, 5], { label: 'Profile I - thick web' })
profileTypeISketchPreset.addCase([50, 80, 5, 20], { label: 'Profile I -  thick flanges' })

const profileTypeOSketchPreset = new PRESET.Preset2D(GEOM2D.generateProfileTypeOSketch, { setCameraOnUpdate: false })
profileTypeOSketchPreset.addCase([40, 90, false, undefined], { label: 'Profile O' }) // 'pipeThickness' is irrelevant since 'hollow' is false

export const presets2D: PRESET.Preset2D<any>[] = [profileTypeISketchPreset, profileTypeOSketchPreset]
Switch presets by using the dropdown Presets 2D at the top-right corner of the preview section.
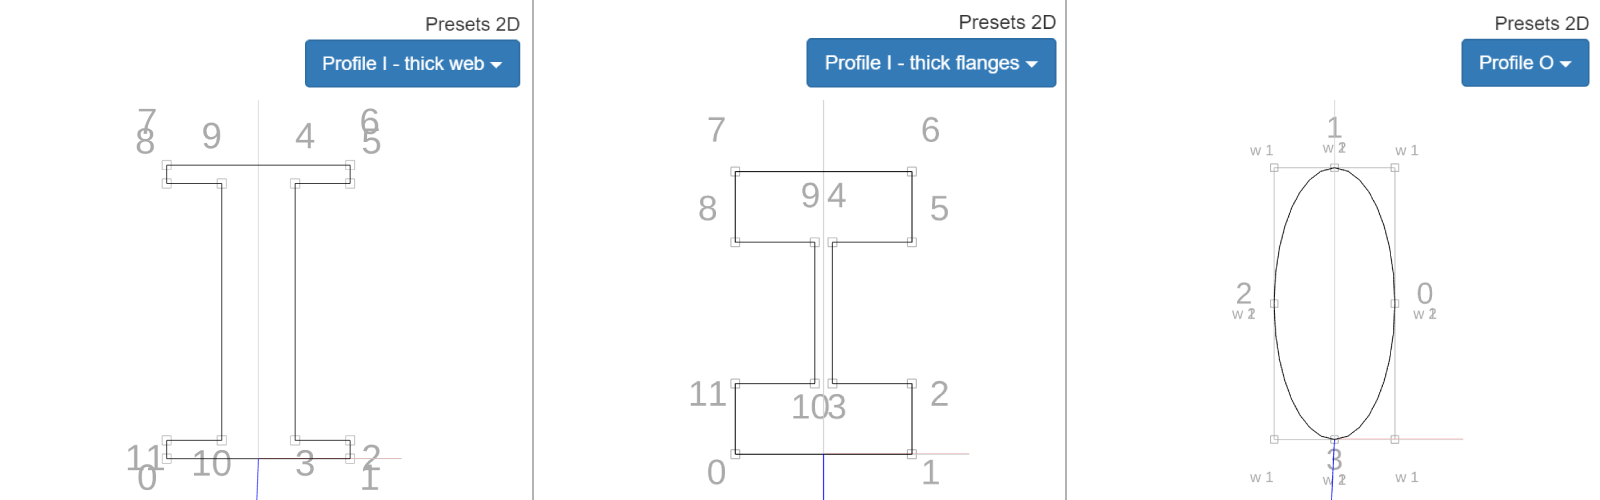
Notice that the camera cannot be rotated for these presets and that each node is highlighted with its id number. Extra information is given for curves such as the anchor points (
w1&w2) and auxiliary lines of tangency.
Preset3D
Create a 3D preset as PRESET.Preset3D() for each particular function that generates a model or a geometry group from
the tab GEOM3D. Each case can be added to the Preset3D with addCase(), which requires a list of the
values that the function needs as arguments. Also:
- in
PRESET.Preset3D()use the optional argument insetCameraOnUpdateto update the camera when switching presets. - in every
myPreset.addCase()uselabelto identify it easily in the dropdown of presets 2D.
Here is an example a PRESET.Preset3D() that generates a geometry group from predefined models (stl here) with 3
different cases that takes a boolean to turn a lightbulb on or off, and the color as second argument.
Since the function that we want to do a preset on takes 2 arguments in a specific order:
// GEOM3D

export function generateLightbulbGeometry(on: boolean, color: SKYCAD.RgbColor) {
  ...
}
then the preset 3D should take those 2 arguments in a list.
// PRESETS 3D

const lightbulbPreset = new PRESET.Preset3D(GEOM3D.generateLightbulbGeometryGroup, { setCameraOnUpdate: false })
lightbulbPreset.addCase([false, undefined], { label: 'Off' }) // 'color' here is irrelevant since 'on' is false
lightbulbPreset.addCase([true, new SKYCAD.RgbColor(255, 0, 0)], { label: 'On - Red' })
lightbulbPreset.addCase([true, new SKYCAD.RgbColor(0, 0, 255)], { label: 'On - Blue' })

export const presets3D: PRESET.Preset3D<any>[] = [lightbulbPreset]
Switch presets by using the dropdown Presets 3D at the top-right corner of the preview section.
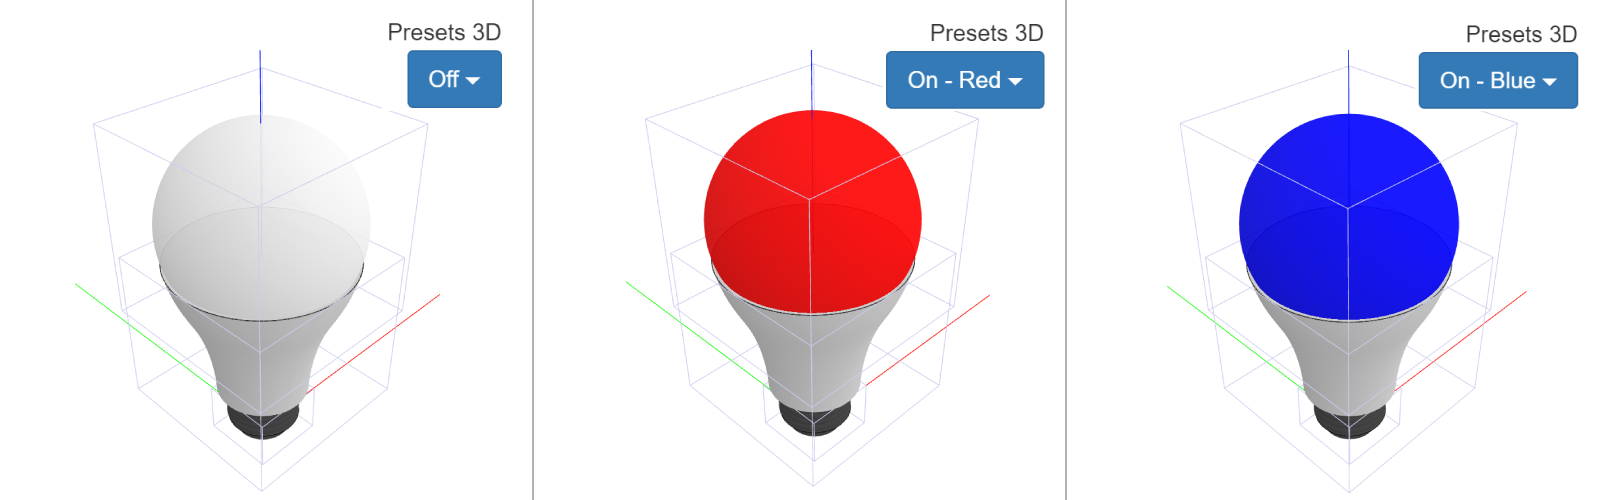
Notice that the bounds of each model presented in the preview are highlighted. Also, in this example a
SKYCAD.GeometryGroupis used for presets, but it is also possible to do presets on functions that generate models (e.g.SKYCAD.ParametricModel) instead. However, the color of the resulting preset will be white by default, since the material is applied toSKYCAD.GeometryGroup.
Drawing Editor
In the Drawing Editor, there is just one type of preset:
PresetDrawing
Create a drawing preset as PRESET.PresetDrawing() for any function from DRAWING (generateDrawing() in the
default template). Each case can be added to the PresetDrawing with addCase(), which requires a list of the values
that the function needs as arguments. Any function of the component can be called previously. A label can be added to
identify the preset easily in the dropdown.
Here is an example of creating a PRESET.PresetDrawing() with three cases of the staircase app from the tutorial
My First Drawing Interface.
Since the function that we want to do presets on takes 1 argument (component) and 1 optional argument (fileType):
export function generateDrawing(component: ASSEMBLY.Component, args: { fileType?: 'pdf' | 'dxf' } = {}) {
  ...
}
then every case must take at least that 1 argument and optionally the 2nd in a list:
const drawingPreset = new PRESET.PresetDrawing(DRAWING.generateDrawing)

const assemblyComponentA = new ASSEMBLY.Component()
assemblyComponentA.setProperties({ width: 2500, depth: 500, height: 3000 })
drawingPreset.addCase([assemblyComponentA, { fileType: 'pdf' }], { label: 'PDF: 2500 x 500 x 3000' })

const assemblyComponentB = new ASSEMBLY.Component()
assemblyComponentB.setProperties({ width: 4000, depth: 1000, height: 2000 })
drawingPreset.addCase([assemblyComponentB, { fileType: 'pdf' }], { label: 'PDF: 4000 x 1000 x 2000' })

const assemblyComponentC = new ASSEMBLY.Component()
assemblyComponentC.setProperties({ width: 2000, depth: 800, height: 1500 })
drawingPreset.addCase([assemblyComponentC, { fileType: 'dxf' }], { label: 'DXF: 2000 x 800 x 1500' })

export const presetsDrawing: PRESET.PresetDrawing<any>[] = [drawingPreset]
Switch presets by using the dropdown at the top-left corner of the preview section.
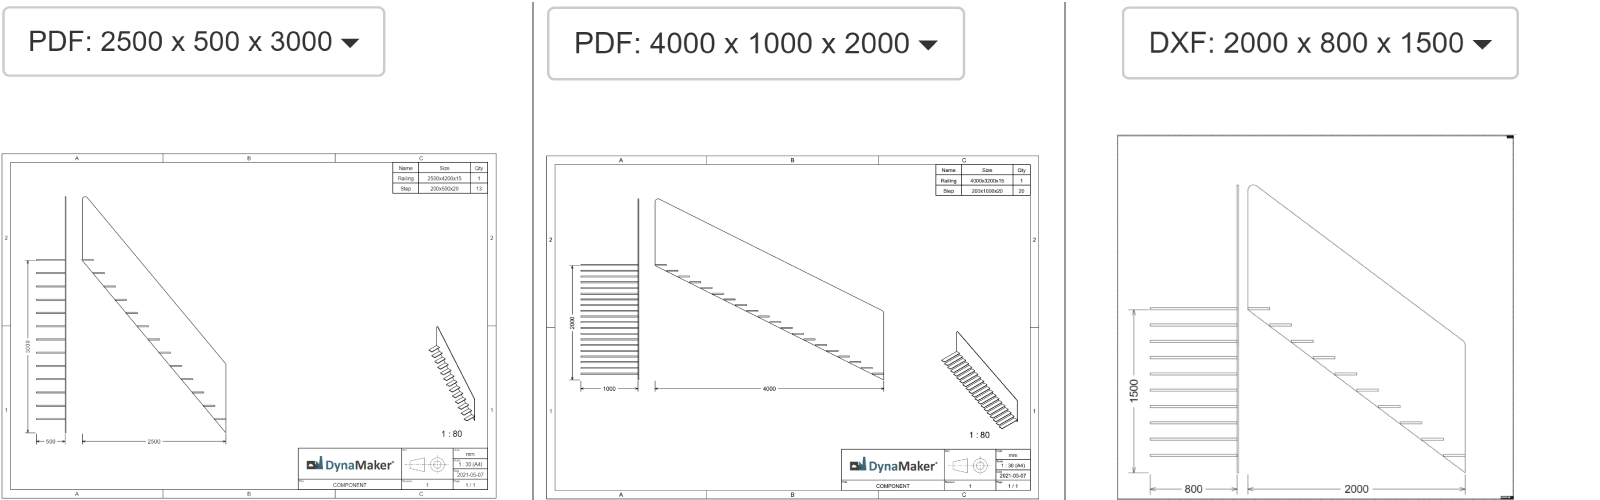
Remember that you can download the drawing that is currently in the preview as PDF or DXF by clicking on the buttons next to the drawing presets dropdown, and it has to do nothing with the variable/argument
fileTypeas explained in the tutorial.