My First Assembly
This page has not yet been updated to show the new component editor. Read about the changes here.
Let's create your first assembly in DynaMaker!
In this tutorial, you will learn how to create an assembly, which is essentially a component with subcomponents, following the configurable size. As a product example, we will use a configurable indoor staircase consisting of steps and glass railings.
For this we will follow 3 steps:
Don't forget to check the common mistakes if you get stuck. Good luck!
1. Create App
- Create a new project and name it for example StaircaseApp.
- Create 3 new components:
- StairStep
- Railing
- Assembly
2. Prepare Subcomponents
Starting from the cube template, we will change the model for the StairStep and Railing needed for the Assembly.
A. StairStep
As for the step, we will only change its default properties and its color.
- Go to the app dashboard and go into the component StairStep.
- Go to COMPONENTS and update the default property values, e.g. with these values:
constructor() {
  super()

  this.properties = {
   width: 200,
   depth: 500,
   height: 20,
  }
}
- In
generateGeometry(), you can change quickly thecolorof thematerialto e.g. light brown. - In
generateGeometry(), remove the dimension and itslayoutfor now. - Doing this,
generateGeometry()could look like this:
generateGeometry() {
  const { width, depth, height } = this.getProperties()

  const model = new SKYCAD.ParametricModel()
  const baseSketch = SKYCAD.generateRectangleSketch(0, 0, width, depth)
  const plane = new SKYCAD.Plane()
  model.addExtrude(baseSketch, plane, height)

  const geometryGroup = new SKYCAD.GeometryGroup()
  geometryGroup.addGeometry(model, {
    materials: [new SKYCAD.Material({ color: new SKYCAD.RgbColor(196, 164, 132) })]
  })

  return geometryGroup
}
See that we have wrapped the properties in a line with
getProperties()and createdmaterialsin-line together withcolor. Feel free to extract each value to a separate constant instead if that's clearer for you.
- Save & Update to apply the changes.
- Publish to be able to use it later in Assembly.
Don't worry about the configurator here, we will use the one of the Assembly instead.
 Dimensions were added to the picture to
help you understand the size.
Dimensions were added to the picture to
help you understand the size.
B. Railing
Here we will add a fourth property railingHeight, remove depth, and change its shape and material.
- Go back to the app dashboard and go into the component Railing.
- Go to COMPONENTS, create a new property
railingHeightand removedepth. Make sure you have:
constructor() {
  super()

  this.properties = {
    width: 5000,
    height: 3000,
    railingHeight: 1200,
  }
}
- You will see an IntelliSense error in
railingHeight(highlighted in red), saying that this property does not exist inproperties. Sincepropertiesare defined at the top of COMPONENTS, make sure you have:
export interface Properties {
  height: number
  width: number
  railingHeight: number
}
You will survive if you don't update the IntelliSense, but its purpose is to assist you when coding and make sure you are accessing the right functions. E.g. now you know that, within the class
Component(COMPONENTS), when you typethis.properties.you only seeheight,width&railingHeightas available options. This will not only avoid problems within this component but also wherever is used throughout the whole app!
-
Save & Update to apply changes (expect an error).
-
Let's fix the unexisting properties
depth, together with the shape:- In COMPONENTS, it is up to you to remove or adjust the dimension created at the end of
generateGeometry()since we won't use it. - In COMPONENTS, in
generateGeometry(), sendheight,width&railingHeightas arguments, so that:
 generateGeometry() {
  const { height, width, railingHeight } = this.getProperties()
  const model = GEOM3D.generateModel(height, width, railingHeight)

  const geometryGroup = new SKYCAD.GeometryGroup()
  geometryGroup.addGeometry(model, {
    materials: [new SKYCAD.Material({ color: new SKYCAD.RgbColor(83, 165, 199) })]
  })

  return geometryGroup
}- In GEOM2D, create the sketch (side view) for the railing in a function:
export function generateRailingSideViewSketch(height: number, width: number, railingHeight: number) {
  const sketch = new SKYCAD.Sketch()
  sketch.moveTo(0, 0)
  sketch.lineTo(0, railingHeight)
  sketch.lineTo(width, height + railingHeight)
  sketch.lineTo(width, height)
  sketch.lineToId(0)

  const CORNER_RADIUS = 50
  sketch.getNodes().forEach((node, nodeId) => {
    if (nodeId === 1 || nodeId === 2) {
      sketch.addFillet(CORNER_RADIUS, nodeId)
    }
  })

  return sketch
}-
In GEOM3D:
- update the arguments of
generateModel(), so it matches what you wrote ingenerateGeometry(): - use the sketch you created in GEOM2D instead, change the plane direction and make the extrusion as thick as the glass (e.g. 15 mm):
export function generateModel(height: number, width: number, railingHeight: number) {
  const model = new SKYCAD.ParametricModel()

  const GLASS_THICKNESS = 20
  const railingSideViewSketch = GEOM2D.generateRailingSideViewSketch(height, width, railingHeight)
  const plane = new SKYCAD.Plane(0, -1, 0, 0)
  model.addExtrude(railingSideViewSketch, plane, GLASS_THICKNESS)

  return model
} - update the arguments of
- In COMPONENTS, it is up to you to remove or adjust the dimension created at the end of
-
In COMPONENTS, change the material directly in
generateGeometry()to light blue and make it slightly transparent with the material settingopacity(0 = invisible, 1 = opaque):geometryGroup.addGeometry(model, {
materials: [new SKYCAD.Material({ color: new SKYCAD.RgbColor(173, 216, 230), opacity: 0.5 })],
}) -
Save & Update to apply changes
-
Publish to be able to use it later in Assembly.
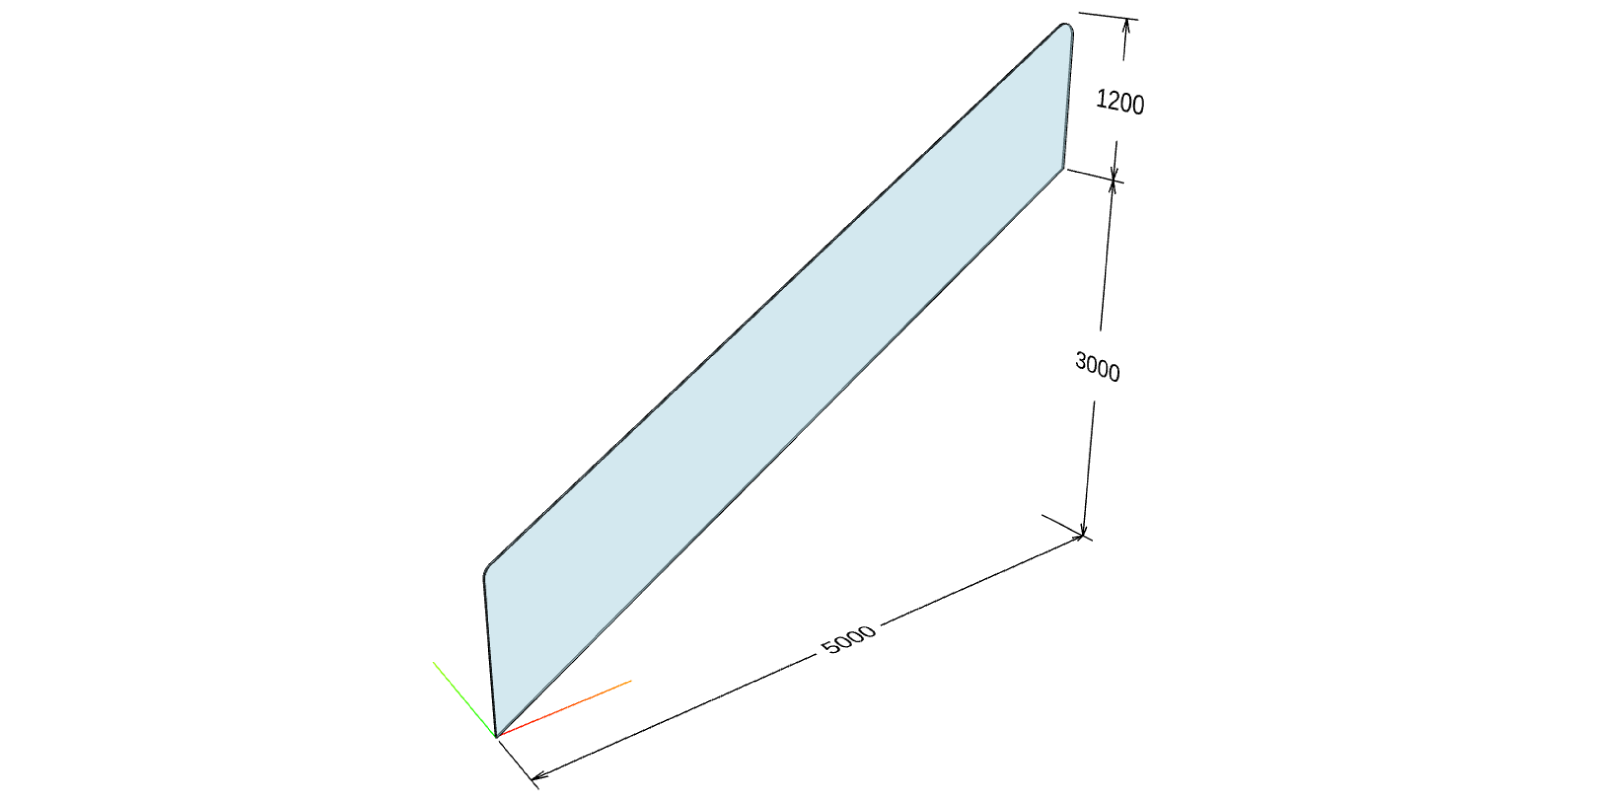 Dimensions were added to help you
understand the size. They won't be visible later.
Dimensions were added to help you
understand the size. They won't be visible later.
Notice that when you Save & Update a component, this will be flagged with a
*in the app dashboard, meaning that the component has changed and needs to be published (viaPublish) if you want to see the latest version of your component in other components that might use it.
3. Build Assembly
To build the Assembly from other components, let's start by importing them.
A. Import Components
First off, to be able to use the components Railing & StairStep in Assembly, you need to import them.
- Go to the app dashboard and go into the component Assembly.
- In edit/hide imports... above the code editor, add StairStep and Railing from the imports dropdown.

Notice that the
#region import(on top of the code) has been updated automatically. This region should not be edited manually.
B. Clean Assembly
We will start cleaning the functions in the component Assembly and then we will add the subcomponents.
Let's start by cleaning the component Assembly and its parameters:
- In COMPONENTS, give reasonable default values to the properties.
this.properties = {
  width: 3000,
  depth: 800,
  height: 2500,
}
- In PARAMETERS, replace the current generic configurator with one with feasible (e.g. sliders) parameters. As an example:
const PARAMETER_KEY = {
  WIDTH: 'WIDTH',
  DEPTH: 'DEPTH',
  HEIGHT: 'HEIGHT',
}

export function generateConfigurator(component: COMPONENT.Component): SKYPARAM.Configurator {
  const { width, depth, height } = component.getProperties()

  const widthParameter = SKYPARAM.generateSlider(PARAMETER_KEY.WIDTH, 'Width (x)', {
    defaultValue: width,
    maxValue: 5000,
    minValue: 2500,
    stepSize: 100,
    unit: 'mm',
  })

  const depthParameter = SKYPARAM.generateSlider(PARAMETER_KEY.DEPTH, 'Depth (y)', {
    defaultValue: depth,
    maxValue: 1000,
    minValue: 300,
    stepSize: 100,
    unit: 'mm',
  })

  const heightParameter = SKYPARAM.generateSlider(PARAMETER_KEY.HEIGHT, 'Height (z)', {
    defaultValue: height,
    maxValue: 3000,
    minValue: 1000,
    stepSize: 100,
    unit: 'mm',
  })

  const configurator = new SKYPARAM.Configurator([widthParameter, depthParameter, heightParameter])

  configurator.addCompletionCallback((validUserInput, values) => {
    if (validUserInput) {
      component.setProperties({
        width: values[PARAMETER_KEY.WIDTH],
        depth: values[PARAMETER_KEY.DEPTH],
        height: values[PARAMETER_KEY.HEIGHT],
      })
    }
  })

  return configurator
}
- Save & Update and the Preview should still have the cube but with the updated configurator.
C. Component Handler Basics
So now that we have the Assembly ready, how do we handle the components? In DynaMaker we use the Component Handler. You can think of it as a smart container of components that that comes with certain functionalities to help you as a developer.
Why using Component Handler? It provides several advantages compared to regular product or component handling from other common CAD software solutions:
- Use the same component to create multiple copies or instances.
- Getting or removing all the instances that share the same component.
- Adding components with their own Component Handler into other components.
- Using as many components in the app as required.
- Things to consider:
- Instances can refer to the same component while having different positions and rotations.
- A component never has a position. This is handled by the instance instead.
- What you see in the app is always instances, whose geometries are generated from their component.
- The Part and Assembly/Product levels, common in other CAD software solutions, do not exist here.
- You decide how the component level looks like through the Component Handler.
With that said, let's jump into it. We will create an Assembly with multiple StairSteps and one Railing.
D. Add subcomponents
To add the subcomponents, we need to make sure to:
- add them to the
componentHandlerof the Assembly component (usually done inupdate()) - call
update()when loading the Assembly component (at the end of itsconstructor), so the subcomponents are created and added. - generate the geometry of the subcomponents in
generateGeometry()of the Assembly component.
You could of course name this function
update()differently. However, the Component Editor is built in such a way that it will detect if there's a function calledupdate()and automatically trigger that functionupdate()when updating the properties ifcomponent.setProperties()is used, i.e. in the configurator callback.
Let's start with update(). Ideally you should avoid regenerating components when it is not needed, and actually it is
preferable to try to pick them up from the component handler if they exist and modify their properties instead. However,
if your assembly consists of simple calculations and geometry, it is ok to regenerate everything since DynaMaker handles
cached components and its geometry. Because of this, a good pattern to begin with is usually to start by clearing all
components, then create them, set the properties and finally add them back.
Starting with the railing it would be like:
export class Component extends STUDIO.BaseComponent<Properties> {
  constructor() {
    super()

    // properties

    this.update() // don't forget to add this!
  }

  update() {
    const { width, height, depth } = this.properties

    // Railing
    this.componentHandler.clear(RAILING.Component)
    const railingComponent = new RAILING.Component()
    railingComponent.setProperties({ width, height })
    this.componentHandler.add(railingComponent, {
      position: new SKYMATH.Vector3D(0, 0, 0),
    })

    // StairSteps to be added
  }

  generateGeometry() {
    // logic for geometry
  }
}
Great, let's include the steps as well with a small design automation to distribute them evenly along the railing. You can try the following, but feel free to be creative with your own rules.
update() {
  const { width, height, depth } = this.properties

  // Railing
  // logic to create & add the railing

  // StairSteps
  this.componentHandler.clear(STAIRSTEP.Component)
  const stepComponent = new STAIRSTEP.Component()
  stepComponent.setProperties({ depth })

  const stepWidth = stepComponent.getProperty('width')
  const MAX_STEP_RISE = 220

  const nrSteps = Math.max(Math.floor(height / MAX_STEP_RISE), Math.floor(width / stepWidth))

  const stepRise = height / nrSteps // z-space between steps
  const stepRun = width / nrSteps // x-space between steps

  for (let i = 0; i < nrSteps; i++) {
    this.componentHandler.add(stepComponent, {
      position: new SKYMATH.Vector3D(i * stepRun, 0, (i + 1) * stepRise)
    })
  }
}
Notice that what adding a component into the
componentHandlerreally does is creating a copy or instance of the component and then placing it in the world with aposition(androtationif any). Also, it's ok to clear all the instances at the beginning ofupdate(), DynaMaker has already an internal optimization for generating the same geometry over and over that won't affect the app performance.
You won't see the subcomponents if you Save & Update because we have not generated their geometry yet.
E. Subcomponents geometry
Here comes one of best features of the componentHandler: generate all subcomponents geometries from the
componentHandler in generateGeometry() as:
generateGeometry() {
  return this.componentHandler.generateAllGeometry()
}
- If you added
this.update()in theconstructoras mentioned before, Save & Update to see the fully functional staircase!
Since we have not gone through the configurator (PARAMETERS) in this tutorial, you could try as a challenge to add
Railing heightas the fourth parameter of the configurator of the Assembly and try to connect it with the property that we created in the component Railing.
Congratulations! You have created your first assembly. Having it in an app would look like this:
Do you want to have a copy of this app in your team? Let us know at support@dynamaker.com! Remember that everyone has their own way of developing and there are multiple valid ways to do things as long as anyone can understand the code!
Now that you know how to create assemblies, it's time to autogenerate drawings of this staircase at the click of a button in the next tutorial My First Drawing.