Power Automate
Microsoft Power Automate allows you to automate workflows between your systems and services. With the Power Automate plugin in DynaMaker, you can trigger Power Automate flows directly from your DynaMaker application, sending data such as quotation forms, drawings and images. This enables you to integrate your DynaMaker application with hundreds of other services, such as ERP, CRM, and more.
In this guide, we will go through:
1. Power Automate Setup
A. Create a Power Automate Flow
- Sign in to Power Automate or create an account if you don't have one yet.
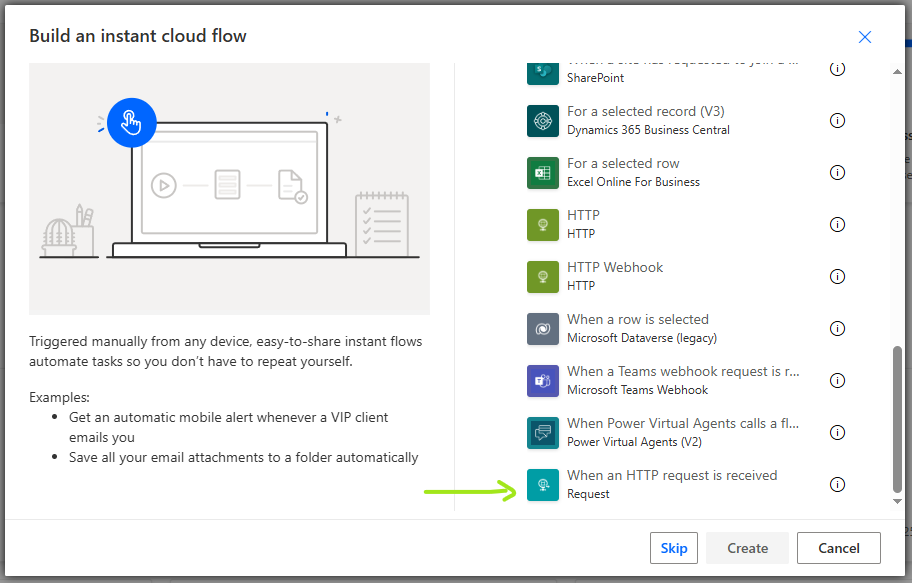
- Create a new instant cloud flow with a "When an HTTP request is received" trigger.
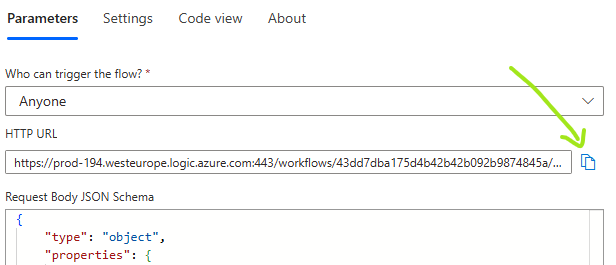
B. Get the Flow HTTP Trigger URL
After saving your flow, you will be provided with a HTTP trigger URL. Copy this URL as you'll need to paste it into the DynaMaker plugin configuration.
2. DynaMaker Plugin
A. Configure Plugin
Go to your app dashboard, under Plugins, look for the plugin Power Automate. Click on the plugin to open the settings modal.
In the plugin settings modal:
- Paste the trigger URL from your Power Automate flow into the "Trigger URL" field.
- Define the fields you want to send to Power Automate by clicking "Add Field".
- For each field, provide a name (e.g., "customerName", "quotationPdf")
- Select the appropriate field type:
- Text: For sending text values
- PDF: For sending PDF files
- DXF: For sending DXF files
- PNG: For sending PNG images
- Copy the generated "Request Body JSON Schema" and paste it into your Power Automate flow's HTTP trigger configuration if you haven't already.
- Click "Save" to enable and configure the plugin.
C. Use Plugin in Your Application
After configuring the plugin, you can use it in your application code:
// Get the data that you want to send to your flow
const formData = await openQuotationFormModal()
const quotationPdf = ACTIONS.generateQuotationPdf()

// Use the triggerFlow method to send the data to your flow
const response = await PLUGINS.POWER_AUTOMATE.triggerFlow({
  customerName: formData.customerName,
  customerEmail: formData.customerEmail,
  quotationPdf,
})

if (response.success) {
  Studio.openInfoModal(
    'Thank you for your request!',
    'Your quotation request has been sent!',
    'You will receive further information via email shortly.',
  )
} else {
  Studio.openInfoModal(
    'Error',
    'Something went wrong while processing your request.',
    'Please try again later or contact support.',
  )
}
Use a form modal to gather contact information from your users.
3. Using DynaMaker Files in Power Automate
One of the most common use cases for the Power Automate plugin is sending files generated in DynaMaker as email attachments. Here's how to set up a flow that receives a PDF quotation from DynaMaker and sends it as an email attachment using Gmail.
A. Configure the Flow to Handle File Data
When your flow is triggered by the HTTP request from DynaMaker, the PDF data will be received as a base64-encoded string. You'll need to decode this before you can use it as an email attachment.
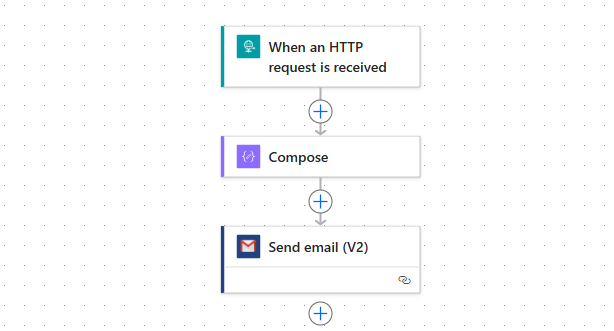
- After the HTTP trigger, add a "Compose" action
- If your field is named
"quotationPdf", set the input to be the following functional expression:
base64ToBinary(triggerBody()?['quotationPdf']) - This composition will contain the PDF data that can be used as an email attachment
B. Send Email with PDF Attachment
Now, let's add a Gmail action to send this PDF as an attachment:
-
Add a "Gmail - Send email (V2)" action to your flow
-
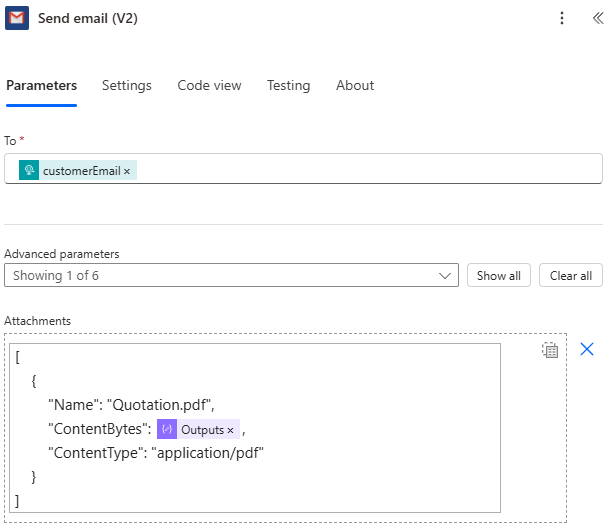
Configure the basic email details:
- To: You can use the customer email from your trigger:
triggerBody()?['customerEmail'] - Subject: Enter a subject like "Your Quotation from [Company Name]"
- Body: Compose your email message
- To: You can use the customer email from your trigger:
-
In the Attachments section:
- Name: Enter a name for the PDF (e.g., "Quotation.pdf")
- Content: Select the output from your Compose action
- Content-type: This should be the MIME
type
of your file,
application/pdfin this case.
You can add more actions to your flow, such as saving the quotation to SharePoint, updating a CRM record, or notifying your sales team through Teams.
With the Power Automate plugin, you can integrate your DynaMaker application with hundreds of other services, creating automated workflows that streamline your business processes. The possibilities are virtually endless - from sending quotation emails and updating CRM records to storing files in SharePoint and notifying teams in Microsoft Teams.