SendGrid
SendGrid provides a cloud-based service that assists businesses with email delivery. On this page you will learn how to use the SendGrid plugin to send emails from your DynaMaker app. You can read more about sending emails with SendGrid in their official documentation here.
In DynaMaker, SendGrid exists as a plugin and it is very easy to use! In order to explain how it works, we will go through:
1. SendGrid Account
A. Register / Login
You need an account in SendGrid to be able to use it in DynaMaker. You can use the same account for multiple applications and have custom templates for each one. If you don't have an account yet, you can create one for free at https://signup.sendgrid.com.
Once you have set up your SendGrid account, there are a few steps to follow regarding the account and its access before going into the DynaMaker app. First off, a SendGrid API key needs to be created for the plugin in DynaMaker. Then, different email templates can be created for the same app (e.g. one for the users and one for the Sales department). Finally, the DynaMaker app can use these templates and send the custom product values we need to show.
B. Create API Key
- In your SendGrid account, to the left under Settings, go into API Keys.
- Create a new API key with restricted access with Mail Send enabled.
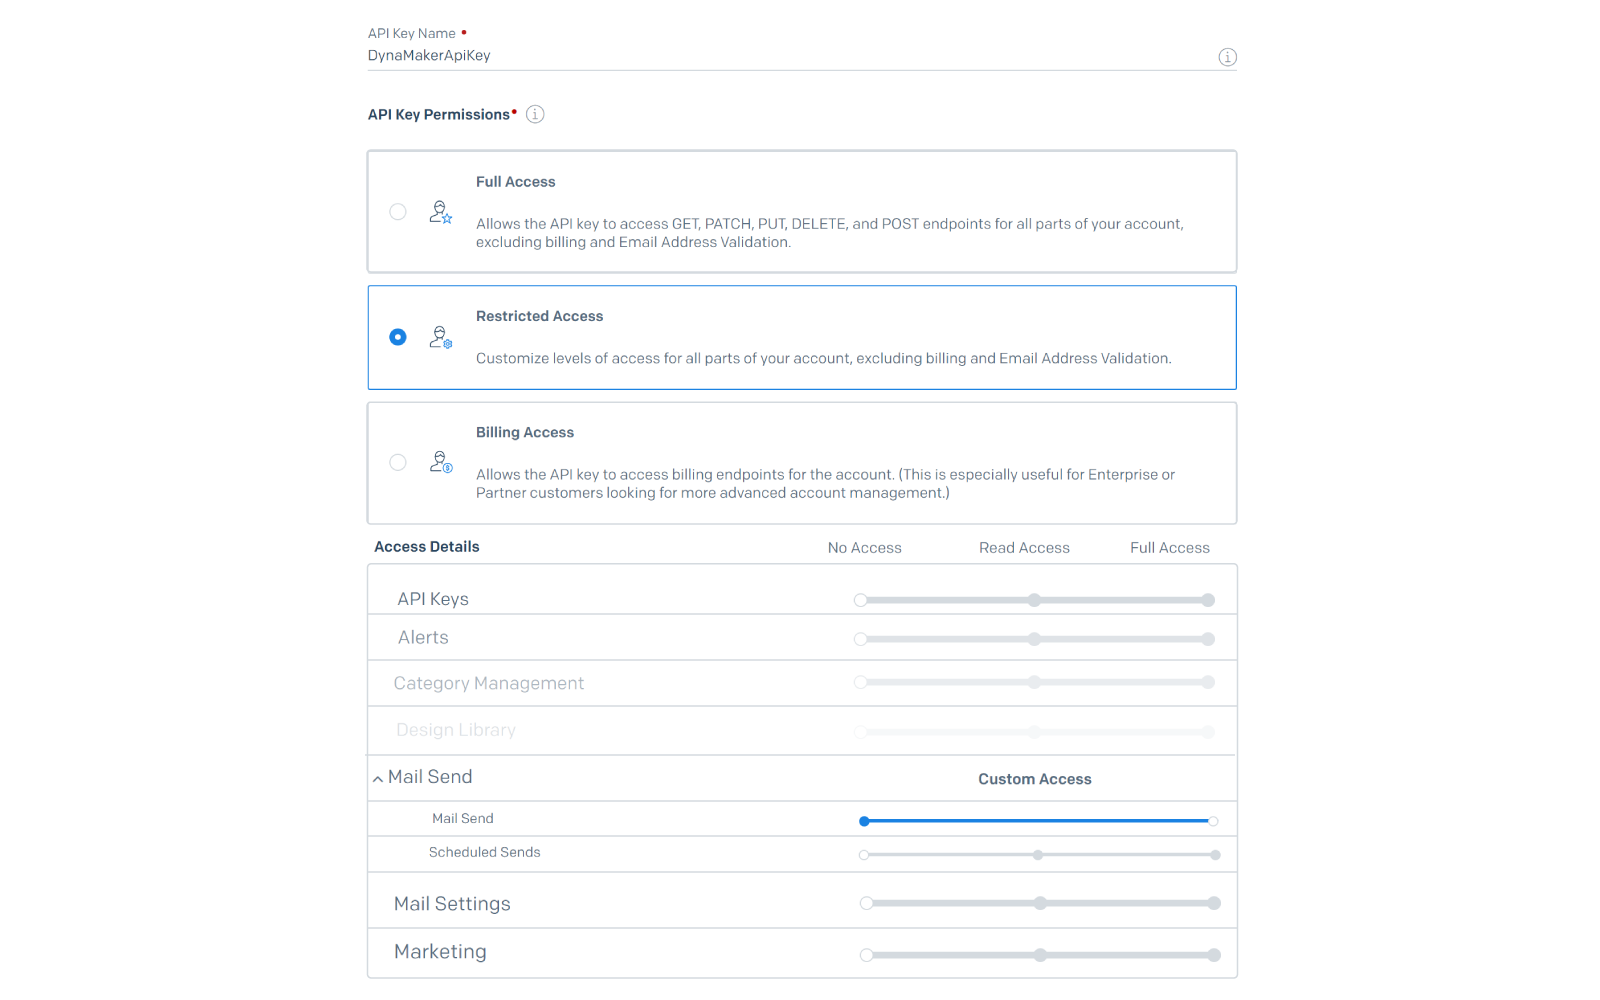
You will be given an API key that needs to be saved somewhere before SendGrid hides it.
Now, you can enable the plugin with this API key in your DynaMaker app, like:
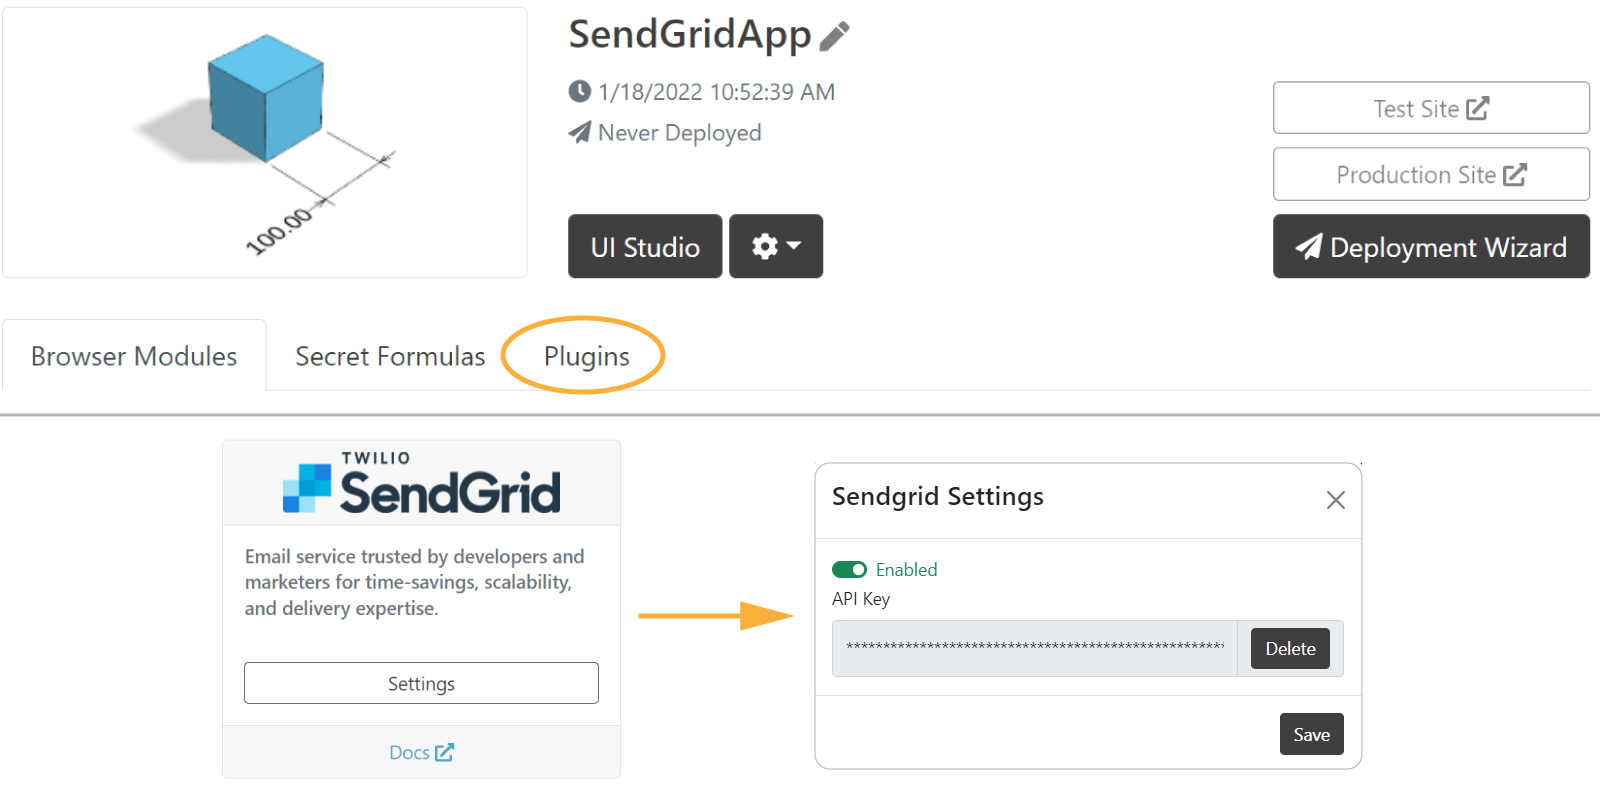
Remember that you can have the same API key for multiple apps. Also, each DynaMaker app can use different email templates simultaneously. In the next step we will show how to create these templates.
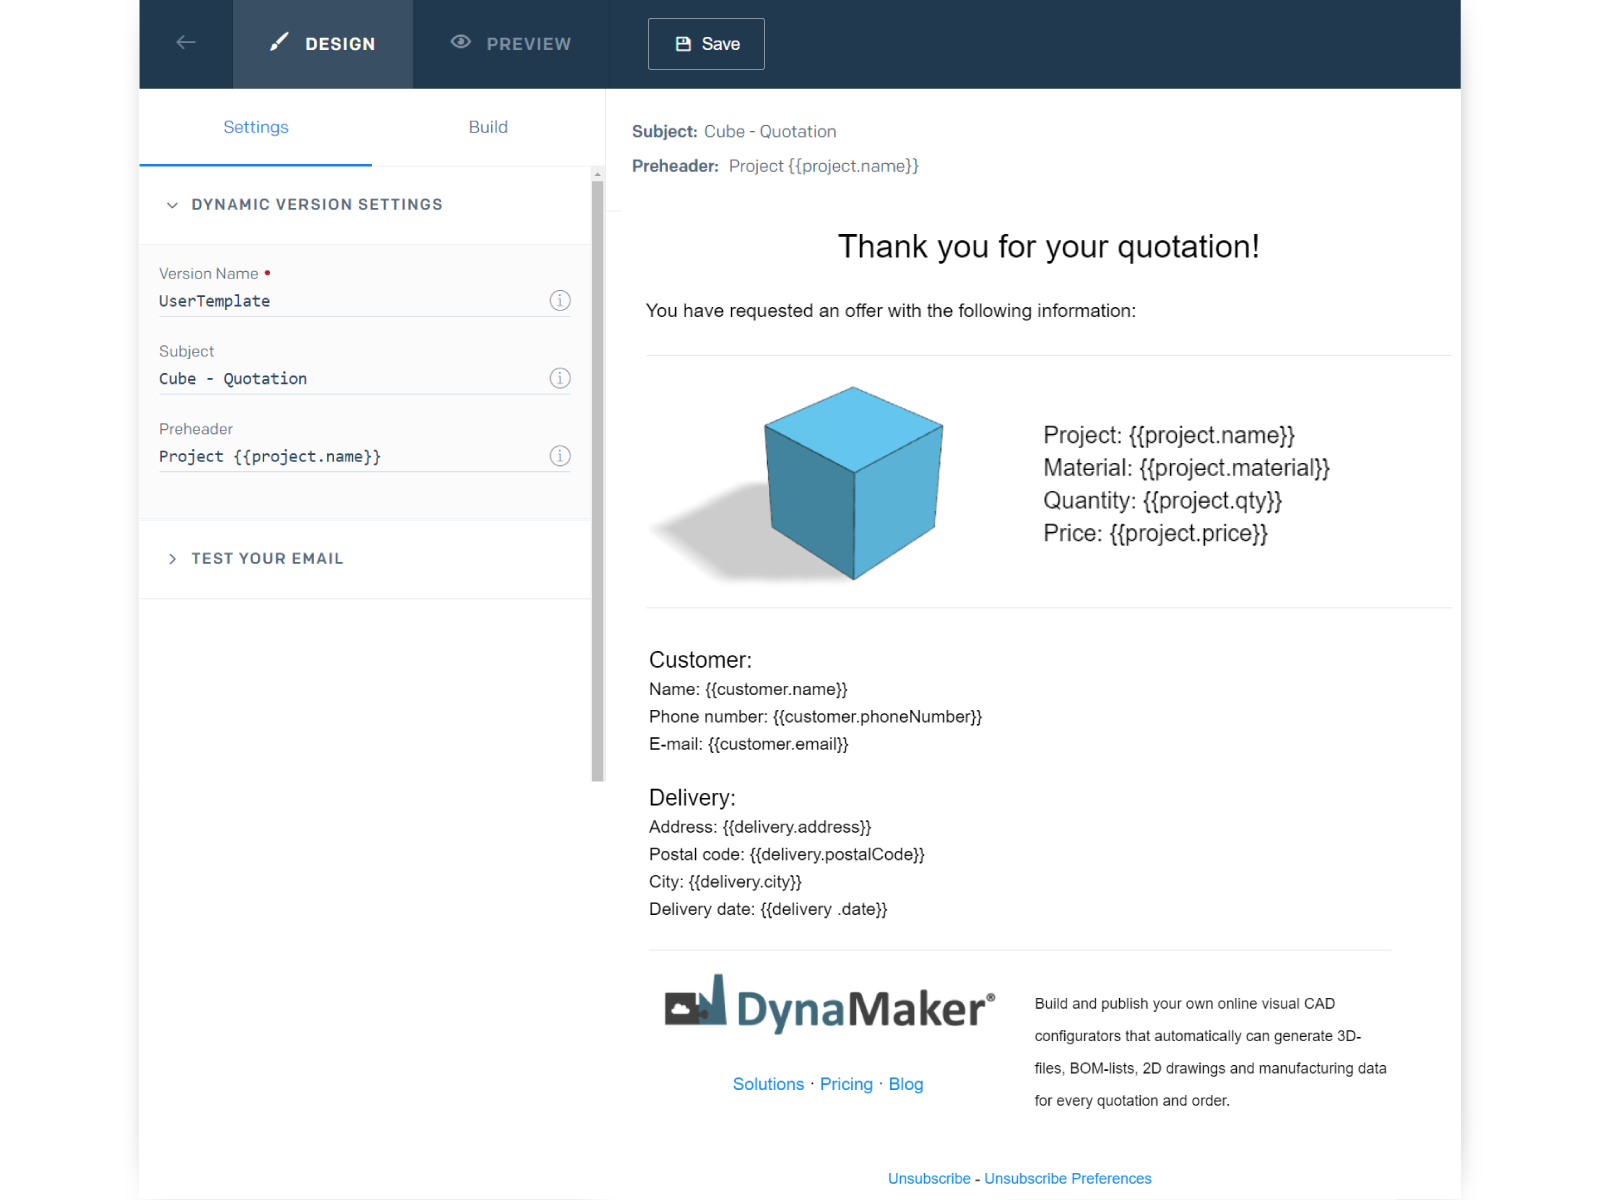
C. Create Dynamic Template
We will create a template intended for the user of the application.
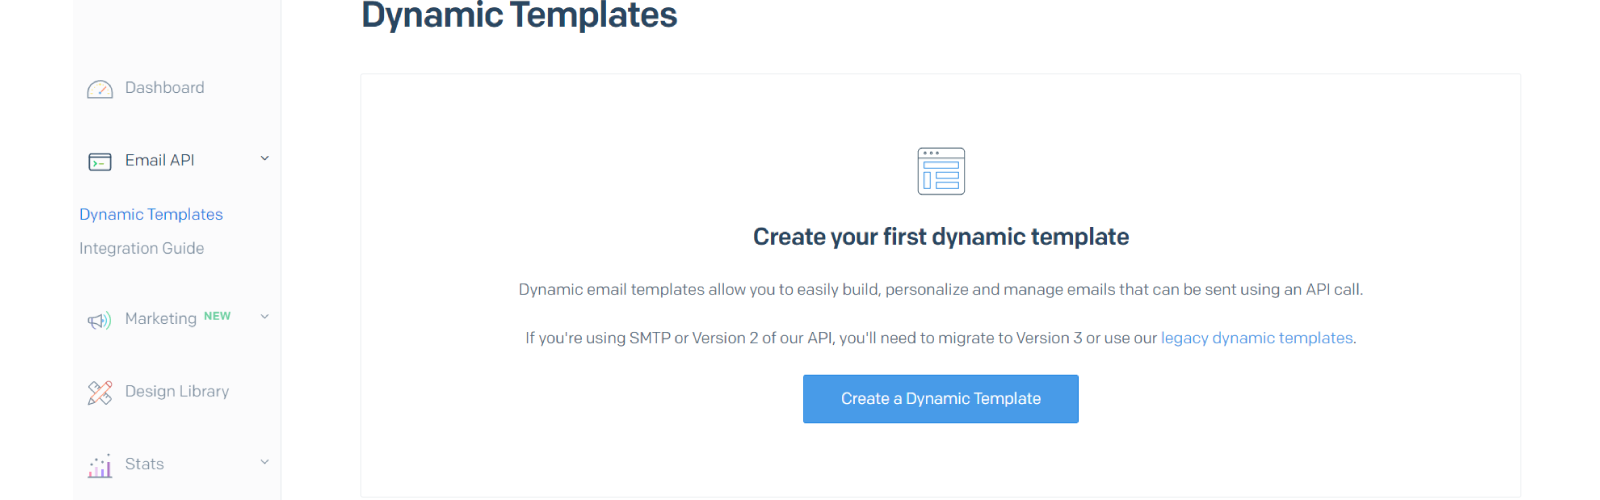
- Go back to the dashboard of your SendGrid account.
- Under Email API, go into Dynamic Templates and create a template with any name you want
- Add a version with any name, e.g.
UserTemplate.
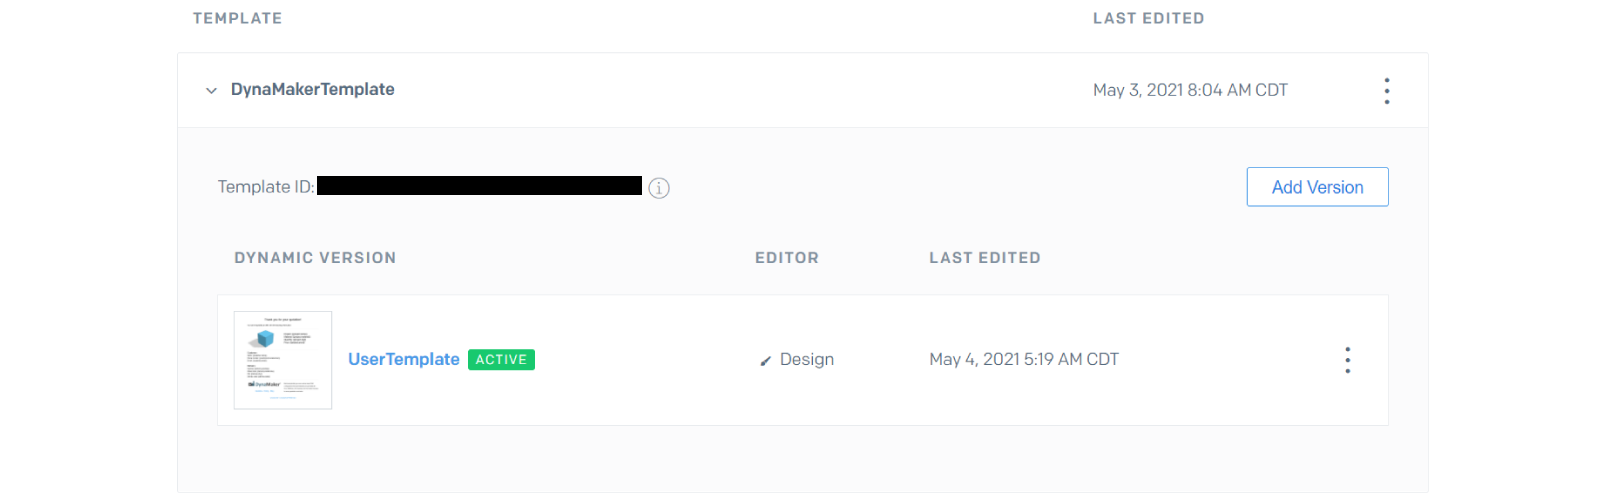
Keep the template ID for the DynaMaker application later.
- Customize them however you want. The values from DynaMaker will be fetched correctly with the proper syntax (i.e.
{{ }}):
You can read more about the syntax here in case you want to use if statements in the email for example.
Great! There is a built-in functionality in the dynamic template (to the left) to send this template with a test email.
Try it and see that you get everything in place. Also, if you want to test the values within {{ }}, you can go under
Preview (at the top) in Show Test Data.
Before using this template in your app, there is one more step left. You need to create a sender identity that SendGrid asks for.
D. Create Sender Identity
You will find this option at the very top of your SendGrid dashboard as a green warning. Otherwise, you can also find it under Settings, in Sender Authentication.

Write a real email as sender, since you will need to verify it.
2. DynaMaker Plugin
Once we have enabled the plugin with the API key, it is ready to use in your app.
A. Import Plugin
First off, you need to import PLUGINS in your UI as if it was a subcomponent. Then you should be able to get the
code completion correctly and use the function PLUGINS.SENDGRID.sendMail().
B. Send Mail
The function PLUGINS.SENDGRID.sendMail() needs a configuration as argument that should include the values you want to
read in the dynamic template of SendGrid (e.g. project, customer and delivery). You can try to create it in a function
that should return an object including the following for example, which includes 3 attachments - pdf, dxf and bom as
csv:
async function getMailConfig(attachmentContents: { pdfContent: string; dxfContent: string; bomContent: string }) {
  // Dynamic data (used in SendGrid template as {{project.name}}, {{customer.email}}, etc)
  const customerEmail = ACTIONS.getCustomerEmail()
  const dimensions = ACTIONS.getCubeDimensions()
  const { width, depth, height } = dimensions
  const projectName = `Cube - ${width} x ${depth} x ${height}`
  const deliveryDate = new Date(Date.now() + 12096e5) // 12096e5 is 2 weeks in milliseconds
  const deliveryDateString = deliveryDate.toISOString().split('T')[0]!

  const project = { name: projectName, material: 'PVC Blue', qty: 1 }
  const customer = { name: 'Mr Customer', phoneNumber: '0760000000', email: customerEmail }
  const delivery = { address: 'Stora Torget 1', postalCode: 58219, city: 'Linköping', date: deliveryDateString }

  return {
    template_id: 'your-dynamic-template-id',
    from: {
      email: 'your-sender-email-you-verified-in-sendgrid@theamazingcube.com',
    },
    personalizations: [
      {
        to: [
          {
            email: customer.email,
            name: 'Mr Customer',
          },
        ],
        cc: [{ email: 'sales@theamazingcube.com' }],
        dynamic_template_data: {
          project,
          customer,
          delivery,
        },
      },
    ],
    attachments: [
      {
        content: attachmentContents.pdfContent,
        type: 'application/pdf',
        filename: `The Amazing Cube.pdf`,
      },
      {
        content: attachmentContents.dxfContent,
        type: 'application/dxf',
        filename: `The Amazing Cube.dxf`,
      },
      {
        content: attachmentContents.bomContent,
        type: 'text/csv',
        filename: `The Amazing Cube.csv`,
      },
    ],
  }
}
Notice that the
template_idof the dynamic template in SendGrid can be seen in its dashboard next to the versions.
Now that you have the configuration defined, we can use this in a button to request a quotation typically followed by a form modal by:
const quotationButton = new SKYUI.Button(
  `Request Quotation`,
  () => {
    const formModal = Studio.createFormModal(
      [
        {
          type: 'text',
          id: 'customerName',
          label: 'Name',
          required: true,
        },
        {
          type: 'email',
          id: 'customerEmail',
          label: 'Email',
          required: true,
        },
      ],
      {
        animation: true,
        modalClassName: 'quotation-modal',
        texts: {
          title: 'Quotation Request',
          description: 'Fill in the details of your request',
          cancelButton: 'Cancel',
          okButton: 'Send',
        },
      },
    )

    formModal.open().then((formData) => {
      if (formData) {
        // Files to attach in email
        // --- PDF
        const pdfDrawing = await ACTIONS.generateQuotationDrawing({ fileType: COMPONENTDRAWING.FILE_TYPE.PDF })
        const pdfDataUrl = await pdfDrawing.generatePdfDataUrl()
        const pdfContent = pdfDataUrl.replace('data:application/pdf;base64,', '')

        // --- DXF
        const dxfDrawing = await ACTIONS.generateQuotationDrawing({ fileType: COMPONENTDRAWING.FILE_TYPE.DXF })
        const dxfDataUrl = await dxfDrawing.generateDxfDataUrl()
        const dxfContent = dxfDataUrl.replace('data:text/plain;base64,', '')

        // --- BOM (CSV)
        const bomData = ACTIONS.getBomData()
        const bomContent = btoa(bomData)

        const mailConfig = getMailConfig({ pdfContent, dxfContent, bomContent })
        PLUGINS.SENDGRID.sendMail(mailConfig)

        Studio.openInfoModal(
          'Thank you for your request!',
          'Your request has been sent!',
          'You will receive an email with information. You can close this pop-up.',
        )
      } else {
        // Form modal was canceled
      }
    })
  },
  { icon: 'send' },
)
Remember that the SendGrid template can be updated without saving or publishing the app again.
As an example, we show it in app where the customer email is written as input together with a success notification.
Since sendMail() is a promise, you can display the message when it has completed:
PLUGINS.SENDGRID.sendMail(mailConfig).then((response) => {
  if (response.ok) {
    Studio.dispatchEvent({
      type: 'success-message',
      content: `Quotation requested successfully! Check the email sent to ${ACTIONS.getCustomerEmail()}`,
    })
  } else {
    throw new Error(response.statusText) // check console browser for possible errors (F12)
  }
  return response
})