Tacton CPQ
The Tacton CPQ plugin brings helper functions and code completion for your Tacton product model to the DynaMaker editor. In order to explain how the plugin work, we will go through:
1. Prepare Tacton model
Create one or more groups in your Tacton model containing the values that you want the DynaMaker app to be able to
access. The group name must include the string dynamaker (not case sensitive) to be available in autocomplete in the
DynaMaker editor.
2. DynaMaker Plugin
A. Synchronization
To set it up, you can do it:
- i) manually via uploading the model (.tcx file)
- ii) automatically via server synchronization.
I. Manual File Upload
As an alternative to the automatic server synchronzation, you can do a manual upload of the model. If you don't already have the product model (.tcx file), you can download it from the Tacton CPQ admin interface. For that:
- Open the ticket that you want to target.
- Go to
Master Data > Products > YOUR_PRODUCT. - In
Attribute Valuesto the right, underModelclick onDownload.

Now that you have the file, you can upload it to the application dashboard in DynaMaker.
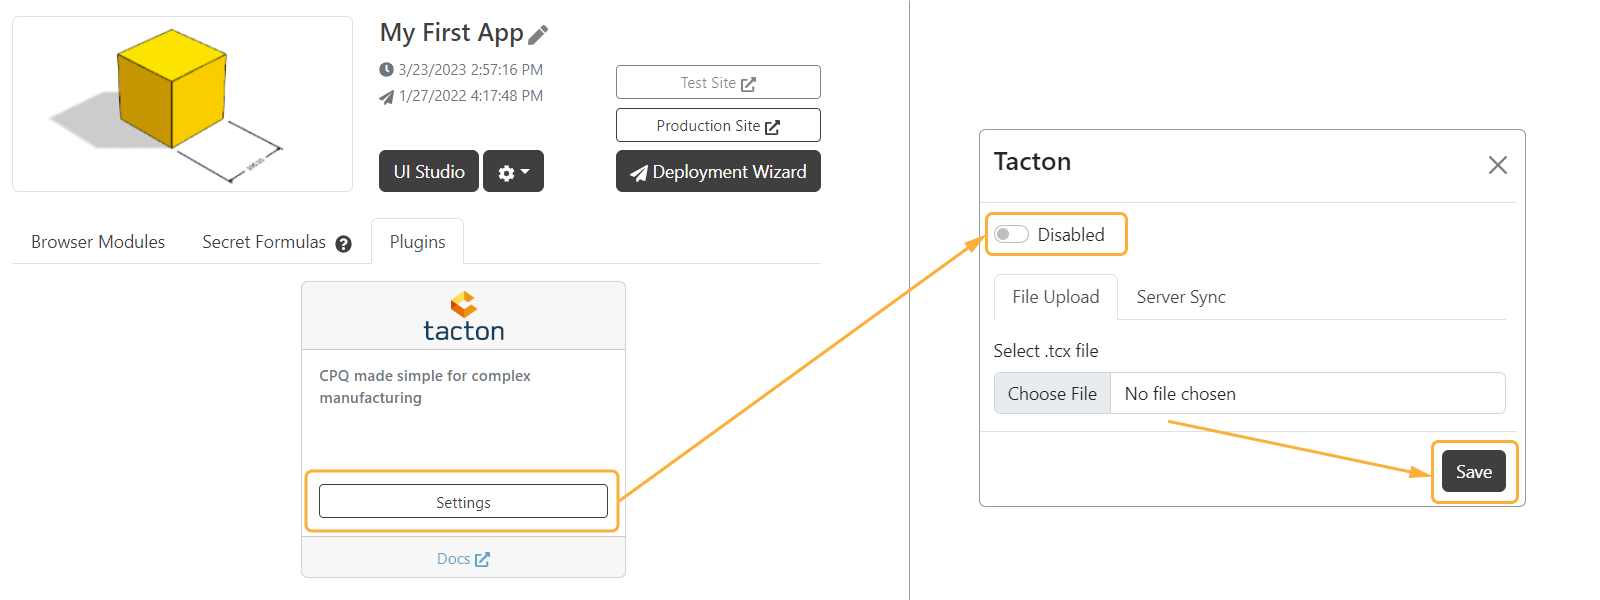
- Go to Plugins in your app dashboardlook for Tacton plugin.
- Choose File Upload, add your .tcx file & click on Save.
II. Automatic Server Synchronization
As an alternative to the manual upload, you can do a automatic server synchronization. For that you need to:
1. Create Tacton CPQ API User:
Create an API user for the DynaMaker integration in the ticket that you want to synchronize with. In the Tacton ticket
administration, go to Sales Process > Structure > Objects and Attributes > Users > Instances > Create User. Make sure
to set the API User field to Yes in the Attribute Values section.
2. Allow Tacton model download
In the Tacton ticket administration, go to
Sales Process > Structure > Master Data Objects > Standard Objects > Product > Attributes > model and set Prevent
Download to No.
3. Fill in the fields in DynaMaker
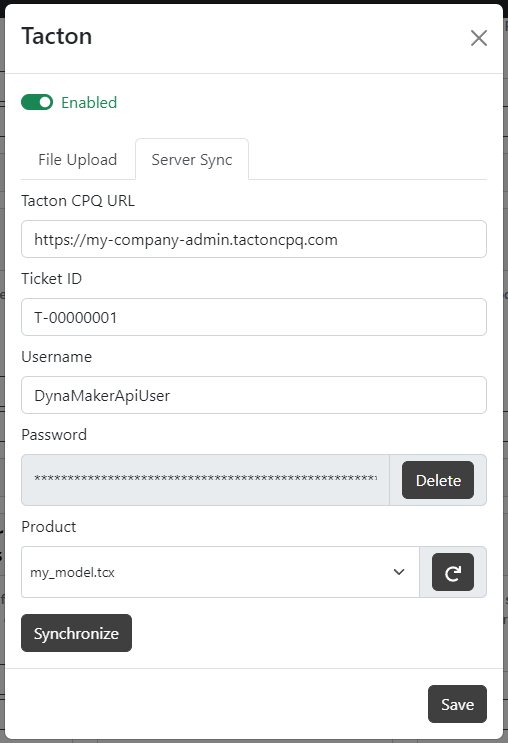
- Go to Plugins in your app dashboardlook for Tacton plugin.
- Choose Server Sync.
- In Fill in URL, Ticket ID, Username and Password of your API user.
- Click on Save.
- Refresh the Product list and select the model that you want to sync with.
- Click on Synchronize.
B. Use Plugin in UI
The UI of the DynaMaker app will be the bridge between the Tacton parameters and the components.
- Go to the UI of your app.
- Import
PLUGINSin edit/hide imports... at the top of the code editor as if it's a component. - Now that you can use
PLUGINS, call the functiononConfigurationUpdatefrom the plugin, which will be triggered automatically with every change in the Tacton configurator:
PLUGINS.TACTON.onConfigurationUpdate((parsedConfiguration, rawConfiguration) => {
  const assemblyComponent = ACTIONS.getAssemblyComponent()

  const oldHeight = assemblyComponent.getProperty('height')
  assemblyComponent.setPropertiesFromData(rawConfiguration) // function to create later in assembly

  const newHeight = assemblyComponent.getProperty('height')

  const needsUpdateCamera = oldHeight !== newHeight
  Studio.requestGeometryUpdate().then(() => {
    if (needsUpdateCamera) {
      Studio.setCameraToFitBounds({ travelTime: 750 })
    }
  })
})
Here for example we take
rawConfiguration(Tacton data) that we send to a new functionassemblyComponent.setPropertiesFromData()in which we handle all the Tacton parameter values. Additionally, we have added extra logic to detect if the propertyheightof the assembly has changed. If so, we update the camera accordingly. However, don't forget to update the geometry (Studio.requestGeometryUpdate()) or you won't see any changes.
You can also set the assembly properties directly in the function PLUGINS.TACTON.onConfigurationUpdate() and use
parsedConfiguration instead. However it might be cleaner to do it in the components that are being affected. It's up
to you how you want to do it, but if you use rawConfiguration and parse the data later (as we show in the next
section) you will be able to create presets directly with the raw data that Tacton is sending (very useful for finding
bugs in specific Tacton configurations).
C. Use Plugin in Component
In case you want to have a cleaner UI and update the properties within the component itself, you could do it with the
previously mentioned function assemblyComponent.setPropertiesFromData().
- In your component, import
PLUGINSas if it's a subcomponent, - Create a
classfunctionsetPropertiesFromData()which could look like:
export class Component extends STUDIO.BaseComponent<Properties> {
  constructor() {
    // properties etc
  }

  setPropertiesFromData(rawConfiguration: PLUGINS.TACTON.TactonData) {
    const result = PLUGINS.TACTON.parseConfiguration(rawConfiguration)

    const { dynamaker_strings, dynamaker_numbers } = result

    const ralColor = dynamaker_strings.ral_color
    this.properties.ralColor = ralColor

    const openingWidth = dynamaker_numbers.opening_width
    this.properties.openingWidth = openingWidth

    this.update() // in case there are subcomponents to update
  }

  // other functions like generateGeometry(), update(), etc
}
In the code above we show an example that there are some Tacton parameters that are already grouped in
dynamaker_strings and dynamaker_numbers (custom names given in Tacton) in which all the parameters are inside these
as example to differenciate numbers from strings, but of course you can have a single group (e.g. dynamaker_values)
with all the parameters. It's up to you how you want to customize this, but remember that if the Tacton model changes at
some point, the plugin must be synched again and you must fix all the broken connections between Tacton parameters and
properties, otherwise you will start getting errors and the Tacton configurator will have a broken DynaMaker visualization.